Why a Little Fall Prep Prevents a Costly Spring Mess
Turning off irrigation system winter is the single most important maintenance task for your lawn sprinklers, and the surest way to avoid freeze-cracked pipes, ruptured valves, and staggering spring repair bills. The science is simple but unforgiving: when water freezes, it expands in volume by about 9 percent. This expansion exerts immense force—up to 40,000 PSI—which is more than enough to split rigid PVC pipes, burst flexible poly lines, and crack solid brass valve bodies as if they were made of glass.
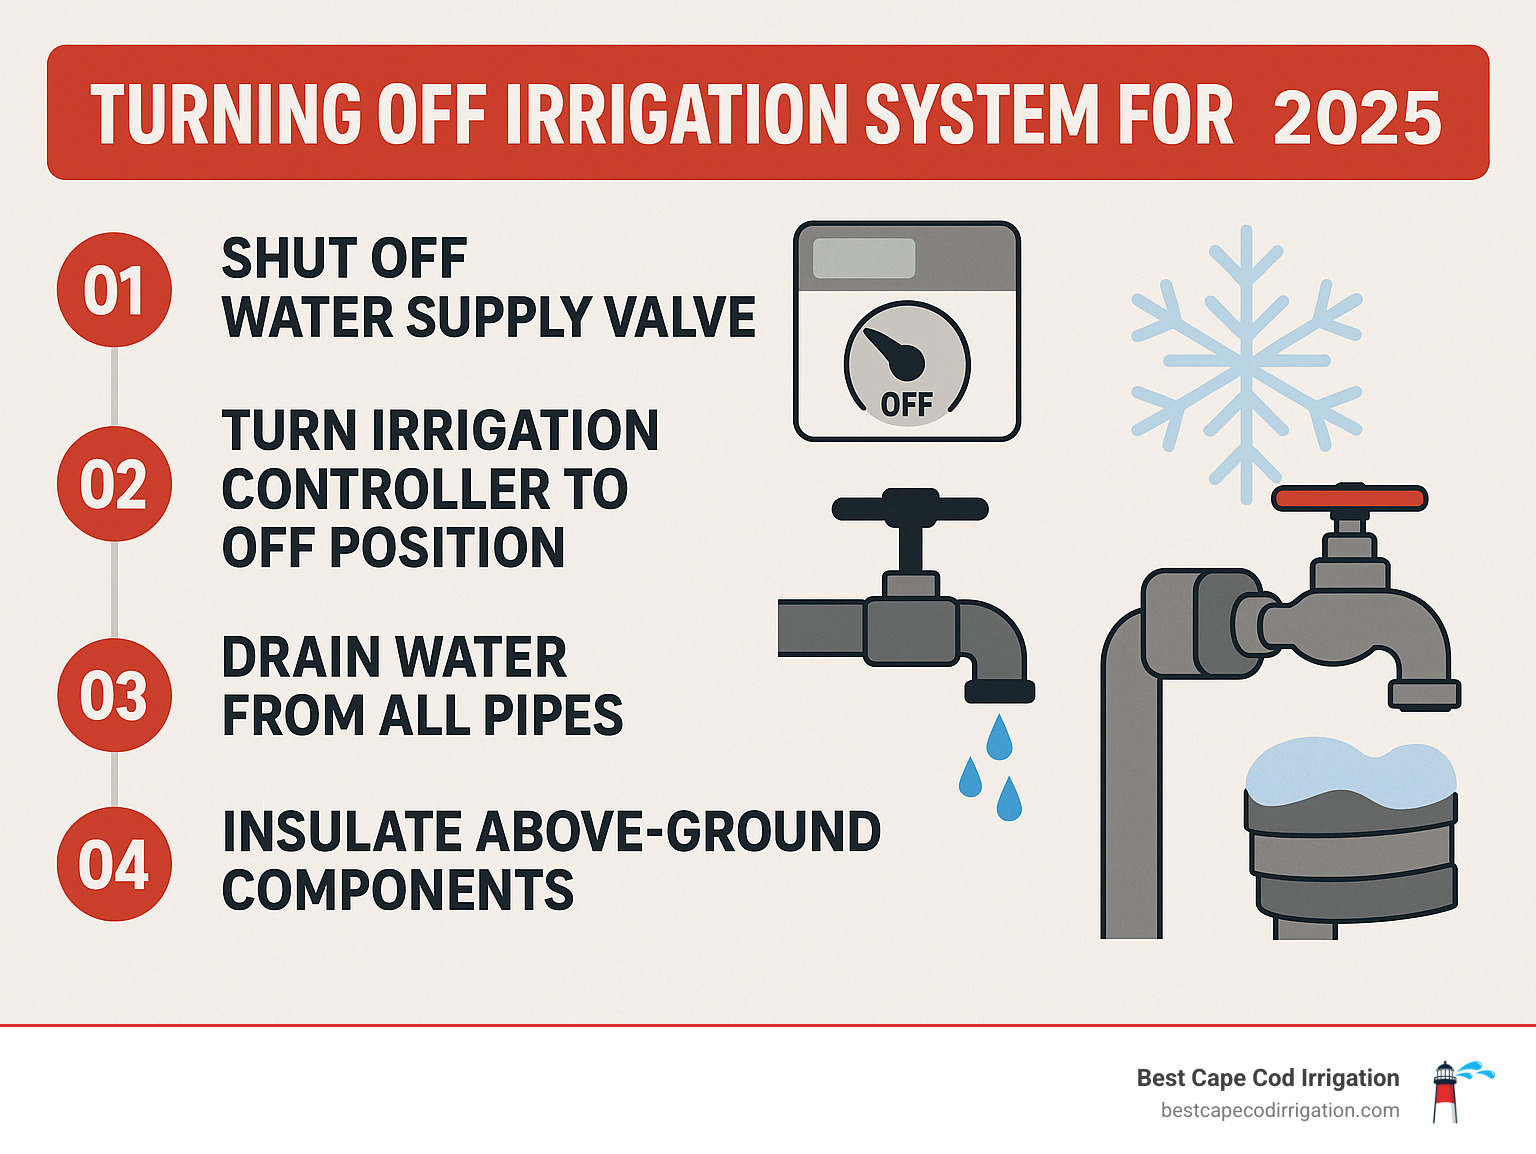
A single night of deep freeze can turn a cup of trapped water into a system-destroying wedge of ice. The result is a springtime findy of underground leaks, geysers in your lawn, and broken sprinkler heads. To prevent this costly mess, a proper winterization is essential. It involves a clear, four-step process.
Quick answer: follow these four steps.
- Shut off the main water supply: Completely isolate the irrigation system from your home’s water source.
- Turn off (or Rain-mode) the controller: Deactivate the system’s brain to prevent it from trying to run while the water is off.
- Drain every line: Remove every last drop of water from the pipes and components, either through manual drains or a compressed air blow-out.
- Insulate or remove above-ground parts: Protect the most vulnerable components, like the backflow preventer, from direct exposure to freezing temperatures.
Here on Cape Cod, where nor’easters can bring sudden, deep freezes, the stakes are even higher. A single hard freeze can wipe out every unprotected backflow preventer in the neighborhood—and because it’s a shared catastrophe, replacement parts and professional service slots often sell out quickly. Investing 30-60 minutes in a thorough winterization now can literally save you a four-figure repair bill and weeks of waiting in the spring.
Know your winterization terms:
First Things First: When to Winterize and What You’ll Need
Timing is everything when it comes to winterization. Here on Cape Cod, the first frost often lands between late October and early November, but you shouldn’t wait for the first frost warning. The goal is to act before the ground temperature drops significantly. A good rule of thumb is to complete your winterization no later than Halloween. Start monitoring the 10-day forecast in early October. Once you see consistent nighttime temperatures dipping into the 40s and approaching the 30s, it’s time to act.
Before you begin, gather the necessary tools and supplies to ensure the job goes smoothly. A well-prepared start prevents multiple trips to the hardware store.
Essential Tool & Supply Checklist:
- Safety Glasses: Non-negotiable. You’ll be working with pressurized water, air, and potential debris. Protect your eyes.
- Bucket: To catch water from drain ports and prevent a mess, especially if your shut-off is indoors.
- Channel-Lock Pliers: For loosening any tight valve caps or fittings.
- Foam Insulation Tape & Faucet Covers: Inexpensive and highly effective for protecting exposed pipes, spigots, and the backflow preventer.
- Air Compressor (for blow-out method): This is the most critical component for a thorough job. It must have an adjustable pressure regulator and the correct fittings to connect to your system’s blow-out port. A standard garage compressor may not have the required volume (CFM) to do the job effectively.
Why Act Now?
Procrastination is the enemy of a healthy irrigation system. Even a small amount of trapped water—as little as a cup—can freeze and burst a rigid PVC fitting or crack the delicate internal mechanisms of a valve. Proper winterization is also an act of responsible water conservation. By ensuring your system is completely drained and sealed, you prevent hidden underground leaks that can waste thousands of gallons of water and cause ground erosion before they’re finded in the spring. A properly winterized system is a system that starts clean, efficient, and leak-free next year.
Which Drain Method Do You Have?
Your system will use one of three methods to remove water. Identifying which one you have is key to the process.
- Manual Drains: The system has threaded caps or levered ball valves installed at the lowest points of the piping. You must manually open these to let gravity drain the water.
- Automatic Drains: These spring-loaded drains automatically open and expel water when the system pressure drops below about 10 PSI. While convenient, they can become clogged with debris and may not drain 100% of the water from uneven pipe runs.
- Blow-Out Method: This involves forcing compressed air through the pipes to push every last drop of water out through the sprinkler heads. It is by far the safest and most effective method for Cape Cod’s unpredictable and deep freezes, as it removes virtually all water, eliminating any chance of freeze damage.
If you’re not sure which system you have, or if you can’t locate drain valves, you should plan on performing a blow-out. It’s the only way to be certain your investment is protected.
A Step-by-Step Guide to Turning Off Irrigation System Winter
Follow these four steps methodically for a complete and successful winterization. Don’t skip any steps, as each one is critical for protecting the entire system.
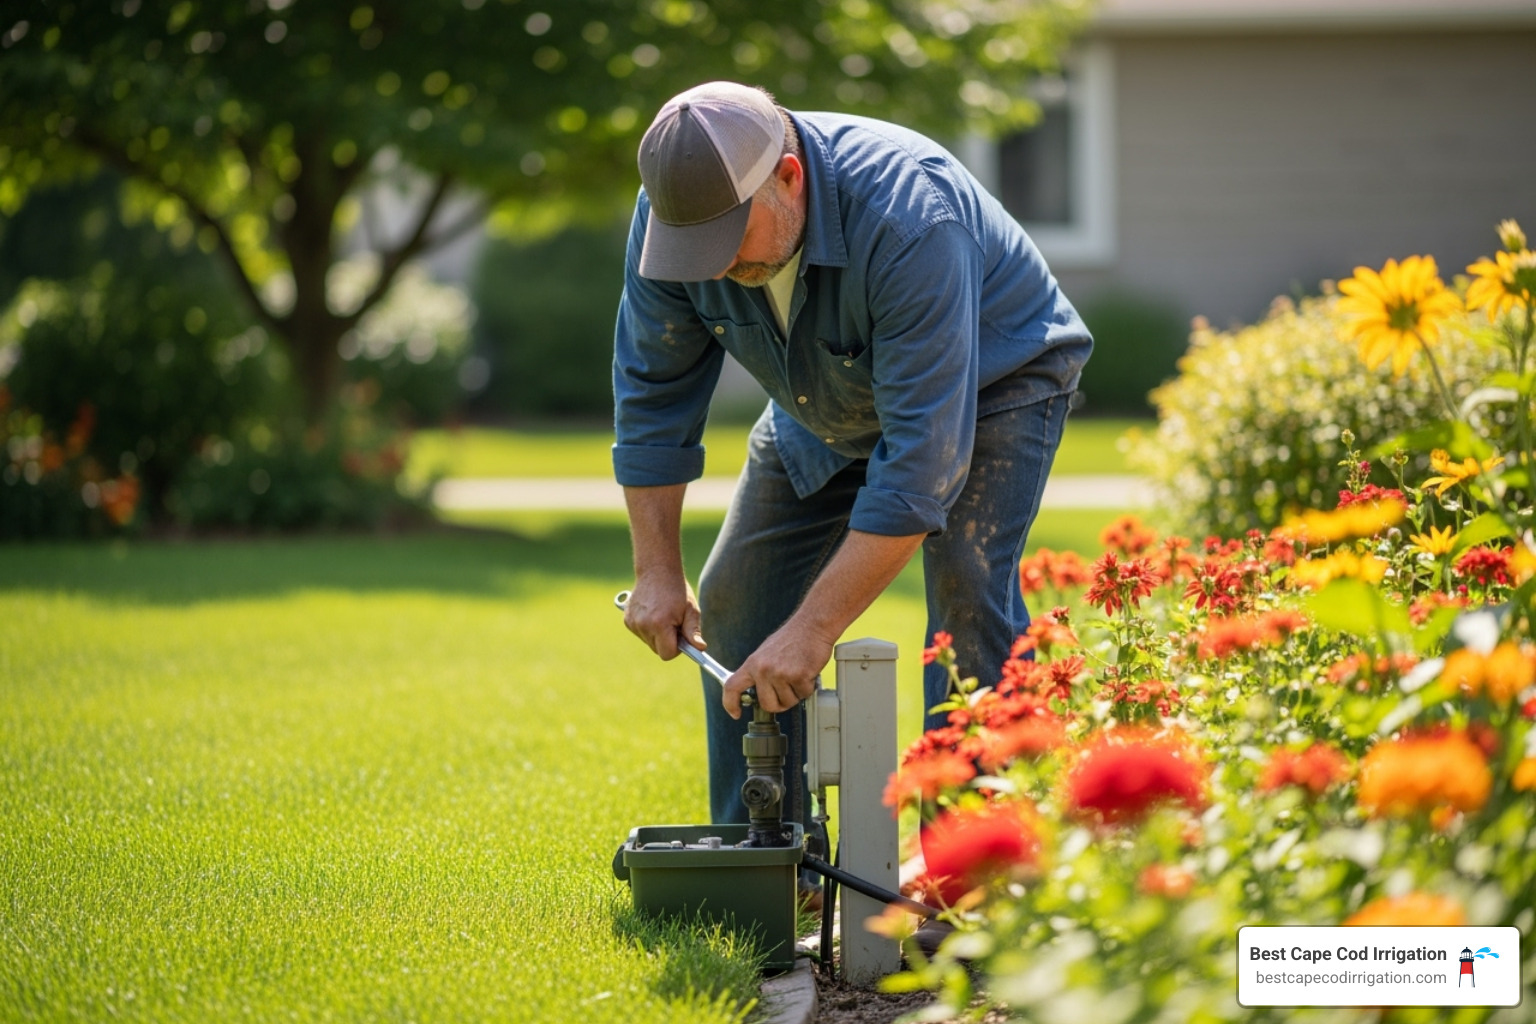
Step 1 – Shut Off Main Water
First, you must cut off the water supply to the irrigation system. Locate the system’s main shut-off valve. This is typically found in the basement, a crawlspace, or a garage, near where the water line exits the house. In some cases, it may be in an underground valve box near your water meter. The valve will likely be one of two types: a ball valve (with a lever handle that is parallel to the pipe when open) or a gate valve (with a round, dial-like handle). Turn the lever handle a quarter-turn so it’s perpendicular to the pipe, or turn the round handle clockwise until it is firmly closed. Do not force it.
If your system has a stop-and-waste valve (which has a small metal cap on its side), you should open this waste port after closing the main valve. Place a bucket underneath and remove the cap. This allows any water trapped between the valve and the house to drain out, protecting that section of pipe.
Step 2 – Deactivate the Controller
With the water off, you need to tell your system’s controller to take the winter off. For modern digital controllers, you don’t need to unplug them. Simply turn the dial or use the menu to set the system to the “OFF” or “RAIN MODE” position. This keeps the power on, which preserves your saved watering schedules and allows the small amount of heat from the transformer to prevent condensation inside the unit. Smart controllers like the Hydrawise App allow you to do this remotely from your phone. For older, mechanical timers, it’s best to simply unplug the unit to prevent unnecessary wear and tear on the motor.
Step 3 – Drain the Lines
This is the most critical step. How you perform it depends on your system type.
| Method | Best For | DIY Level |
|---|---|---|
| Manual | Systems with clearly marked drains at all low spots | Easy |
| Automatic | Systems already equipped with auto drains | Easy |
| Blow-out | Any system, especially in freezing climates like Cape Cod | Moderate |
- For Manual Drains: Open the drain caps or valves located at the low points of your system. You may also need to open the bleed screws on your zone valves to break any vacuum seals and allow water to drain completely. Leave them open for at least an hour before closing them back up.
- For Automatic Drains: Even with auto-drains, you need to relieve the system pressure. After shutting off the main water, go to your controller and run one of the sprinkler zones for a minute. This will drop the pressure below 10 PSI and trigger the drains to open.
- For the Blow-Out Method: This is the professional standard. Using an air compressor, you force all water out of the pipes, valves, and heads. You’ll work zone by zone until only a fine mist (and then just air) exits the sprinkler heads. This is the only method that guarantees a completely empty system.
Step 4 – Protect Above-Ground Parts
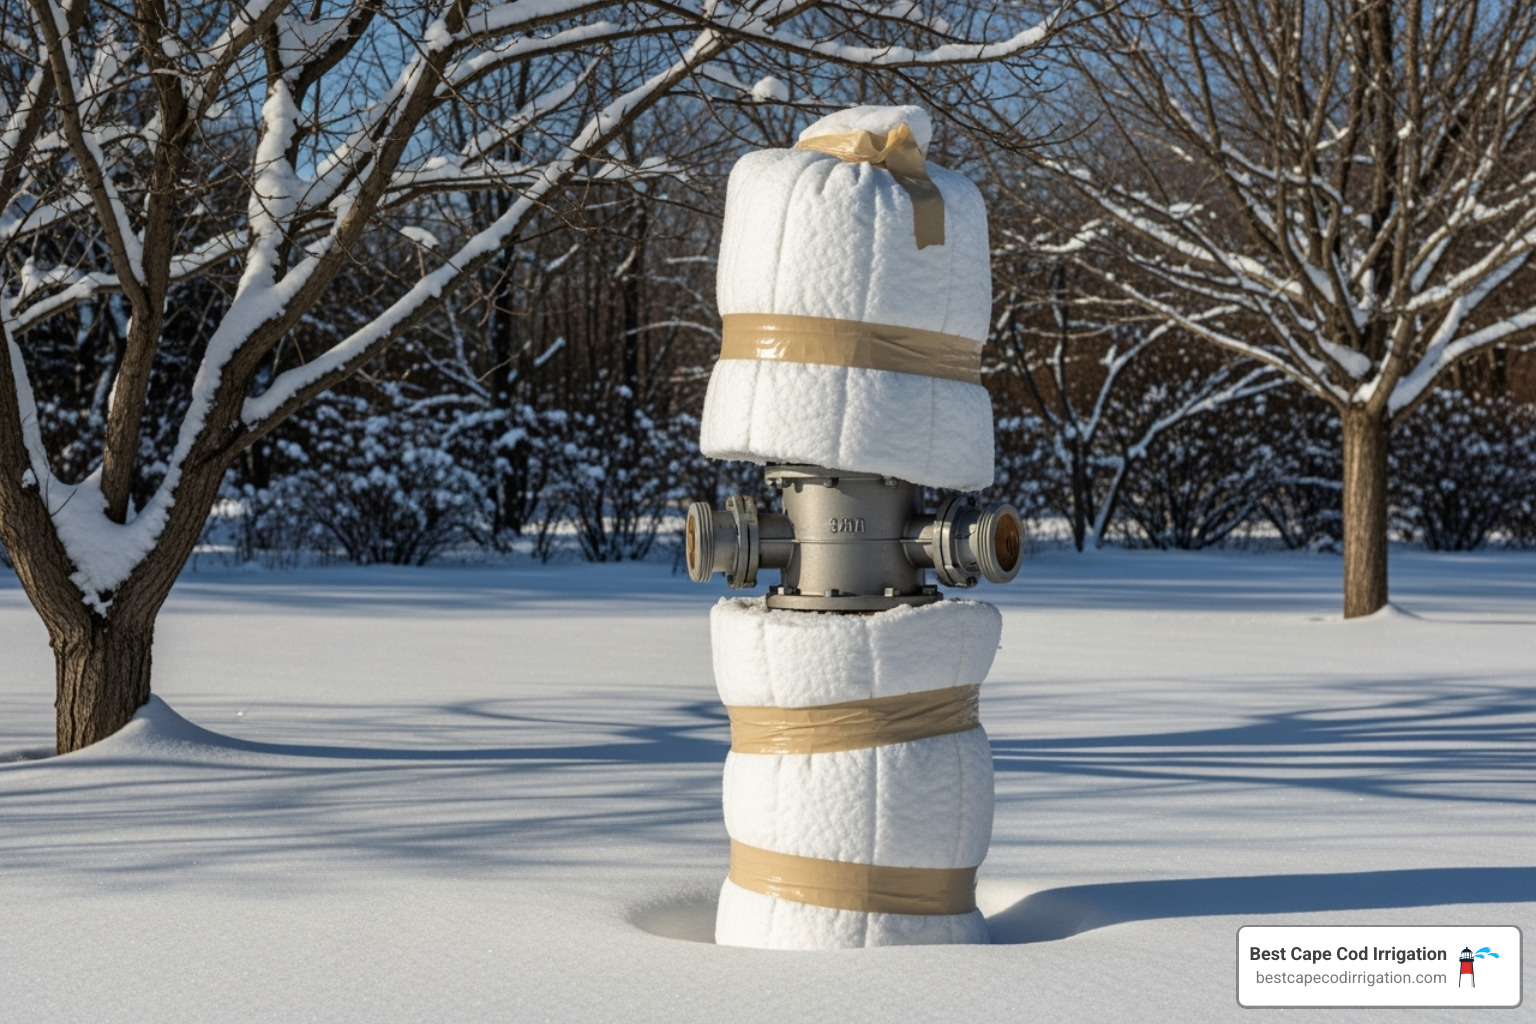
Any component exposed to the air is highly vulnerable. The backflow preventer is the most critical. If it has unions, you can unthread it and store it in a garage or basement for the winter. If not, it must be drained and insulated. After draining its test cocks and valves, wrap the entire device and any exposed pipes with self-adhesive foam insulation tape. Then, cover the wrapped device with a waterproof insulated pouch or a heavy-duty plastic bag to keep the insulation dry. An inexpensive foam cover should also be placed on any outdoor hose bibs connected to the system. Finally, if you have a rain sensor, remove the hygroscopic discs (the small stack of absorbent washers) and store them indoors. They can be damaged by freezing, and this also ensures they are dry and ready for accurate readings in the spring.
The Blow-Out Method: For Complete Peace of Mind
While manual and automatic drains can work in milder climates, the blow-out method using compressed air is the only way to be 100 percent certain every drop of water is gone from your system. This is the industry-standard practice for professional irrigation technicians on Cape Cod for a reason—it’s foolproof. However, it also carries risks if done improperly. Always wear eye protection during a blow-out. Pressurized air can send small rocks, dirt, or broken plastic flying.
Furthermore, you must use the correct air pressure. Too much pressure can be as damaging as ice. Never exceed 80 PSI for rigid PVC pipe and 50 PSI for flexible polyethylene (poly) pipe. Exceeding these limits can blow fittings apart or damage the internal gears of rotor-style sprinkler heads.
For a successful blow-out, you’ll need an air compressor capable of delivering a high volume of air, typically 50–100 CFM (Cubic Feet per Minute). Most small, homeowner-grade pancake compressors do not provide enough volume to effectively clear the lines. You will also need a pressure regulator to control the PSI and the proper adapter to connect the air hose to your system’s blow-out port. This connection must always be made downstream of the backflow preventer to avoid damaging it and to prevent contaminating your home’s drinking water.
The Blow-Out Process in Detail:
- Safety First: Put on your safety glasses before starting.
- Isolate the Backflow Preventer: Ensure the shut-off valves on both sides of the backflow device are closed. This protects it from the direct force of the compressed air.
- Connect the Compressor: Attach the air hose to the blow-out fitting on your irrigation line.
- Set the Pressure: Adjust the compressor’s regulator to a safe pressure, starting low (around 40 PSI) and only increasing if necessary, but never exceeding the pipe’s limit.
- Activate a Zone: Go to your controller and manually start the zone that is the highest in elevation or the furthest from the compressor.
- Introduce Air: Slowly open the valve on your compressor to let air flow into the pipes. You will hear the air pushing water out through the sprinkler heads.
- Blow Until Dry: Let the air run until the heads stop spraying water and are emitting only air and a fine mist. This typically takes 2-3 minutes per zone. Do not run the air for too long after the water is gone, as the friction can create heat and damage the pipes.
- Cycle Through Zones: Once the first zone is clear, shut it off at the controller and immediately activate the next zone. Repeat this process for every zone in your system, generally working from the furthest to the closest.
- Final Shutdown: After the last zone is blown out, turn off and disconnect the compressor. Release any remaining air pressure in the system by briefly opening a valve on the backflow preventer.
Many homeowners find that hiring a pro with commercial-grade equipment is safer, faster, and ultimately cheaper than buying or renting the gear and risking catastrophic damage. For more technical details, you can review Hunter’s winterizing guide.
Common Mistakes and Pro Tips
Avoiding a few common pitfalls can be the difference between a successful winterization and a costly spring surprise. Here are the top mistakes we see homeowners make:
- Skipping a Zone: It’s surprisingly easy to forget a small drip line in a flower bed or a single sprinkler head tucked away in a corner. The best practice is to create a simple map of your zones and check them off as you go. When blowing out the system, physically walk to each zone and visually confirm that every single head has been cleared of water.
- Using Too Much Pressure: This is the most dangerous DIY mistake. It’s a common myth that higher pressure works better or faster. The reality is that high PSI will find the weakest point in your system—an old glue joint, a threaded fitting, or a valve diaphragm—and cause it to fail. Adhere strictly to the rule: no more than 80 PSI for PVC and 50 PSI for poly pipe.
- Ignoring the Backflow Preventer: This is often the most expensive component of your irrigation system. Simply wrapping it is not enough; the water trapped inside will still freeze and crack the brass body or internal check valves. It must be properly drained by opening its test cocks and ball valves. If you’re unsure of the correct procedure for your model, removing it and storing it indoors is the safest bet. A replacement can easily top $500 with installation.
- Leaving Drains and Valves Open: After you’ve manually drained the lines or finished a blow-out, it’s crucial to close all drain caps and valves. Leaving them open provides a welcoming entrance for insects, spiders, and other critters to build nests inside your pipes during the winter. This can lead to stubborn clogs that are difficult to locate and clear in the spring.
DIY or Professional?
For a simple system with manual drains, a DIY winterization is very manageable. The supplies may only cost $10–$20 for insulation and faucet covers. However, the blow-out method, which is the only guaranteed approach for our climate, requires a large, expensive air compressor. The average cost for a professional winterization service (based on general internet data, not specific Best Cape Cod Irrigation pricing) can range from $75 to $300+, depending on the number of zones and complexity of the system.
While DIY can save money upfront, hiring a professional offers significant advantages. A pro arrives with a commercial-grade, high-volume, low-pressure compressor that is perfectly suited for the job. They carry liability insurance to cover any potential damage, and they guarantee their work. For complex systems or for homeowners who value peace of mind, the investment in a professional service from a trusted local company is well worth it.
Frequently Asked Questions
Do I really need to blow out the lines on Cape Cod?
Yes, absolutely. While gravity-based manual drains can remove most of the water, they only work if your pipes have a perfect, continuous downward slope. Over time, soil settles and creates low spots or “bellies” in the pipe where water gets trapped. A simple gravity drain will not clear these pockets. Blowing out the system with compressed air is the only foolproof method to ensure every drop is removed, which is critical for surviving Cape Cod’s multi-day deep freezes.
What if I forget to winterize my system?
Forgetting is a costly mistake. At a minimum, you can expect to find cracked PVC pipes and broken sprinkler heads in the spring. More likely, you will also have damaged one or more of your expensive zone valves. The most common and costly casualty is the backflow preventer, a device that can cost hundreds of dollars to replace—and that’s before you factor in the labor from a licensed plumber and the cost of repairing the landscape.
Should the controller stay plugged in?
For any modern digital or smart controller, the answer is yes. Just make sure you set it to the “OFF” or “RAIN” position. Leaving it plugged in accomplishes two things: it preserves all your custom watering schedules so you don’t have to reprogram them in the spring, and the low-voltage transformer generates a tiny amount of warmth that helps keep the internal electronics dry and free of condensation.
Can I use my small garage pancake compressor for a blow-out?
It’s generally not recommended. Most consumer-grade compressors are designed for high-pressure, low-volume (CFM) applications, like filling tires or running a nail gun. Irrigation blow-outs require the opposite: high-volume, low-pressure air to push the large volume of water out of the pipes without damaging them. Using a small compressor often fails to clear the lines completely and risks damage from excessive pressure.
My neighbor just wraps their backflow preventer. Is that enough?
No, this is a common and critical misunderstanding. Insulation only slows down heat transfer; it does not prevent freezing. If water is left inside the backflow device, wrapping it will not stop that water from eventually freezing and expanding during a prolonged cold spell. The device must be fully drained first, and then insulated for protection.
Protect Your Investment This Winter
Winter on Cape Cod is beautiful, but it’s unforgiving to the unprepared. Your irrigation system is a significant investment in your property’s health and curb appeal, and a short fall checklist is all it takes to protect it. By following the four pillars of winterization—shutting off the water, deactivating the controller, completely draining the lines, and insulating all exposed parts—you prevent a long and expensive list of spring repairs.
Whether you choose to tackle the project yourself or prefer the peace of mind that comes with professional service, the key is to act before the first deep freeze sets in. Ensuring your system wakes up healthy next year starts with putting it to bed properly this fall.
For over 25 years, Best Cape Cod Irrigation has been the trusted partner for homeowners from Falmouth to Harwich and across the region. We don’t just perform a service; we provide comprehensive protection backed by deep local knowledge. Our technicians use state-of-the-art, commercial-grade equipment and a meticulous process honed by decades of experience with Cape Cod’s unique climate and soil conditions. Let us put our expertise to work for you.
Ready for a worry-free winter and a quick, seamless startup next spring? Contact us for professional irrigation services and ensure your landscape’s most important asset is in the best hands.
