Why Proper Spring Activation Protects Your Irrigation Investment
Turning on sprinkler system in spring requires careful timing and proper technique to avoid costly damage and ensure your lawn gets the water it needs for the growing season ahead.
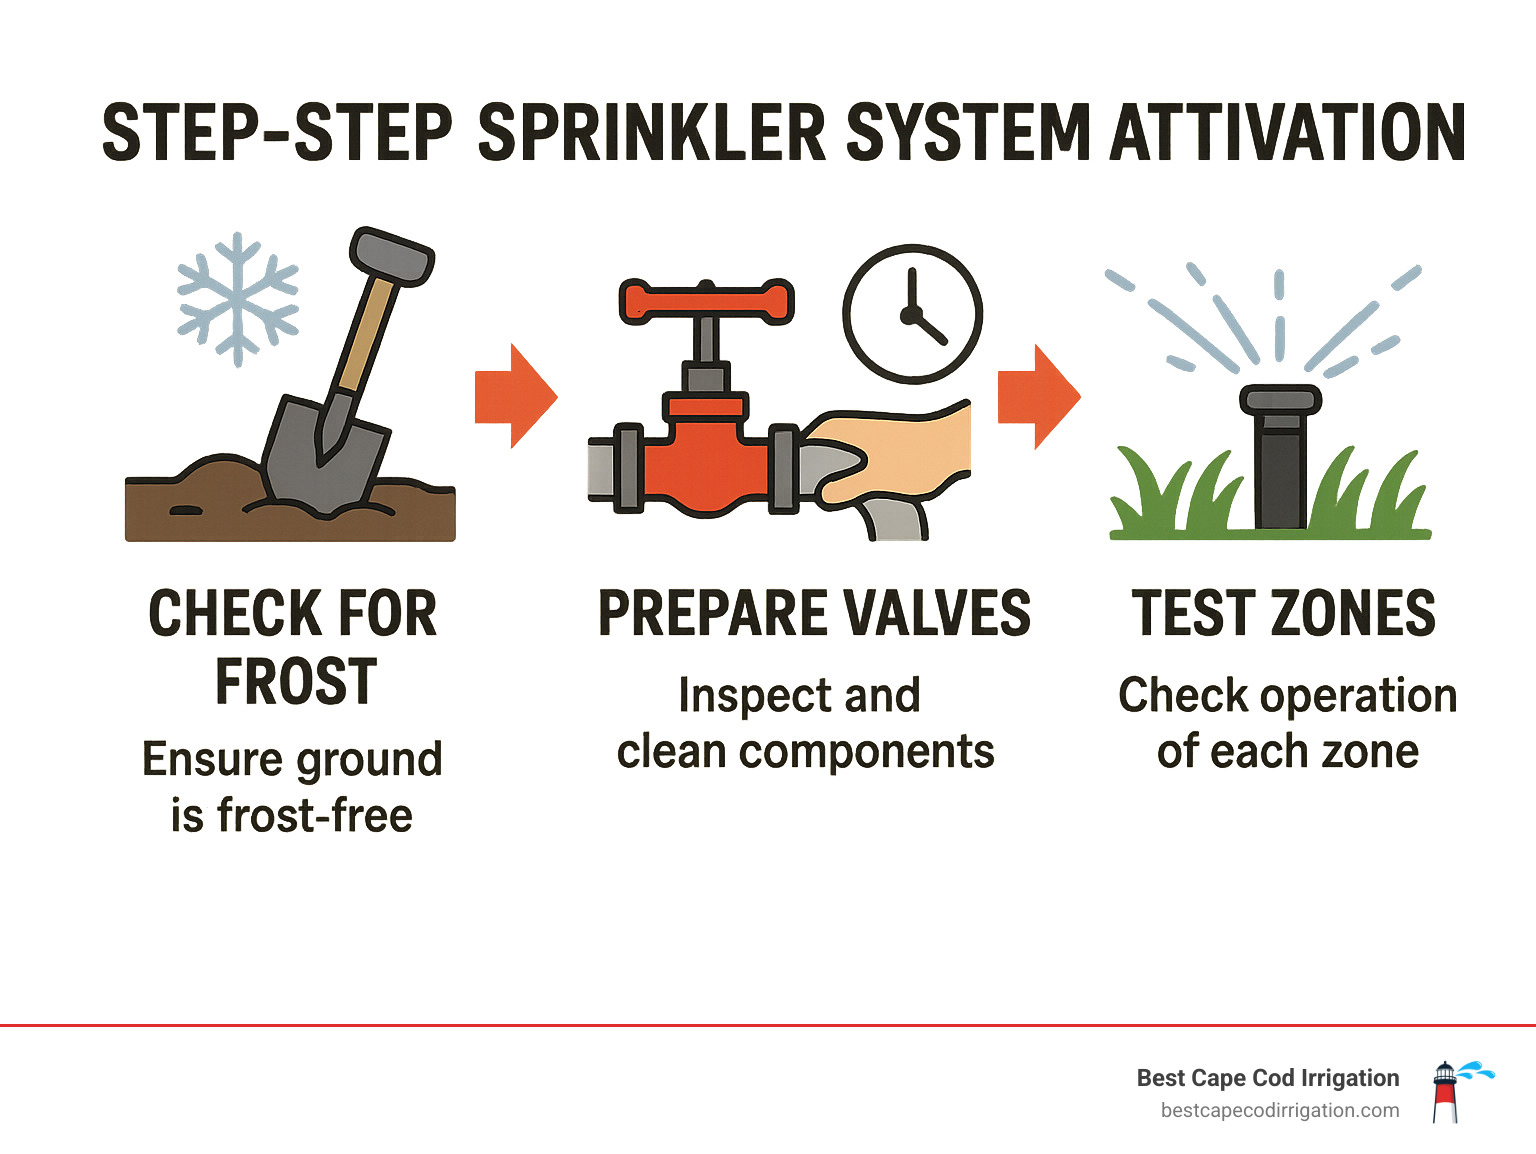
Quick Spring Startup Checklist:
1. Wait for frost-free soil – Dig 12 inches deep to confirm no frost remains
2. Inspect all components – Check backflow preventer, heads, and valve boxes for winter damage
3. Open valves slowly – Turn main valve gradually over 30+ seconds to prevent water hammer
4. Test each zone manually – Run zones 3-5 minutes each to identify leaks or issues
5. Reprogram controller – Update schedules for spring watering needs
Opening the main water valve too quickly can cause water hammer, which is a leading cause of pipe bursts and damaged valves in sprinkler systems each spring.
Cape Cod’s sandy soil and unpredictable spring weather make proper timing crucial. Turn on your system too early when frost still lurks below ground, and you risk cracked pipes and expensive repairs. Rush the startup process, and water hammer can destroy components that survived the winter perfectly intact.
Professional irrigation system activation services typically cost between $150 and $200 for systems with 1-4 zones, but many homeowners can handle the basics themselves with proper guidance.
Key terms for turning on sprinkler system in spring:
– price of water sprinkler
– spring rain lawn sprinklers
When Is It Safe to Start Turning on Sprinkler System in Spring
The biggest mistake Cape Cod homeowners make? Getting too eager with turning on sprinkler system in spring before Mother Nature gives the all-clear.
The golden rule is simple: wait until your soil is completely frost-free down to 12 inches deep. For most Cape Cod properties, this sweet spot typically arrives in mid to late May, though coastal neighbors might get lucky a week or two earlier thanks to moderating ocean temperatures.
Ground temperatures need to stay consistently above 55°F for at least seven consecutive days before it’s safe to begin your startup process.
Here’s what we watch for: no frost warnings in the extended 10-day forecast, nighttime temperatures staying above freezing, and daytime highs that make you want to shed that winter jacket.
Nature provides helpful hints too. When forsythia bushes burst into their cheerful yellow blooms, that’s your soil telling you it’s warmed to around 55°F. You’ll also notice your grass perking up with active growth and tree buds starting to swell.
Soil & Weather Checks Before Activation
The most foolproof method is the “12-inch dig test.” Grab a sturdy shovel and dig down a full foot in several spots around your property. If you hit any frost crystals or soil that feels like concrete, your system isn’t ready yet.
North-facing areas and shaded sections often stay frozen weeks longer than sunny south-facing lawns. Don’t assume your entire property thawed uniformly.
For tech-savvy folks, a soil thermometer inserted 6-8 inches deep gives you precise readings. The soil needs to maintain that 55°F threshold consistently, not just hit it once on a warm afternoon.
Risks of Turning on Sprinkler System in Spring Too Early
When water meets frozen ground, physics isn’t forgiving.
The immediate damage can be devastating. Pipes crack from ice expansion, fittings burst under pressure, and sprinkler heads get pushed around by frost heave. But the sneaky problems are often worse – those hairline cracks that don’t show up until mid-July when your water bill skyrockets.
Valve diaphragms are particularly vulnerable when pressurized water hits frozen lines. We’ve seen homeowners face pipe replacement costs ranging from $200 to $2,400 per section, valve repairs from $150 to $1,200 each, and emergency service calls from $250 to $1,500 or more. These are average costs based on internet data and not actual costs for Best Cape Cod Irrigation services.
An extra week of waiting can save you thousands in repairs and the headache of a torn-up lawn in peak growing season.
For detailed guidance on the complete process, check out our comprehensive guide on Opening Sprinkler System in Spring.
Pre-Startup Inspection Checklist
Before turning on sprinkler system in spring, you need to know what survived the winter and what needs attention. A thorough inspection now prevents finding problems when your lawn is already stressed from heat.
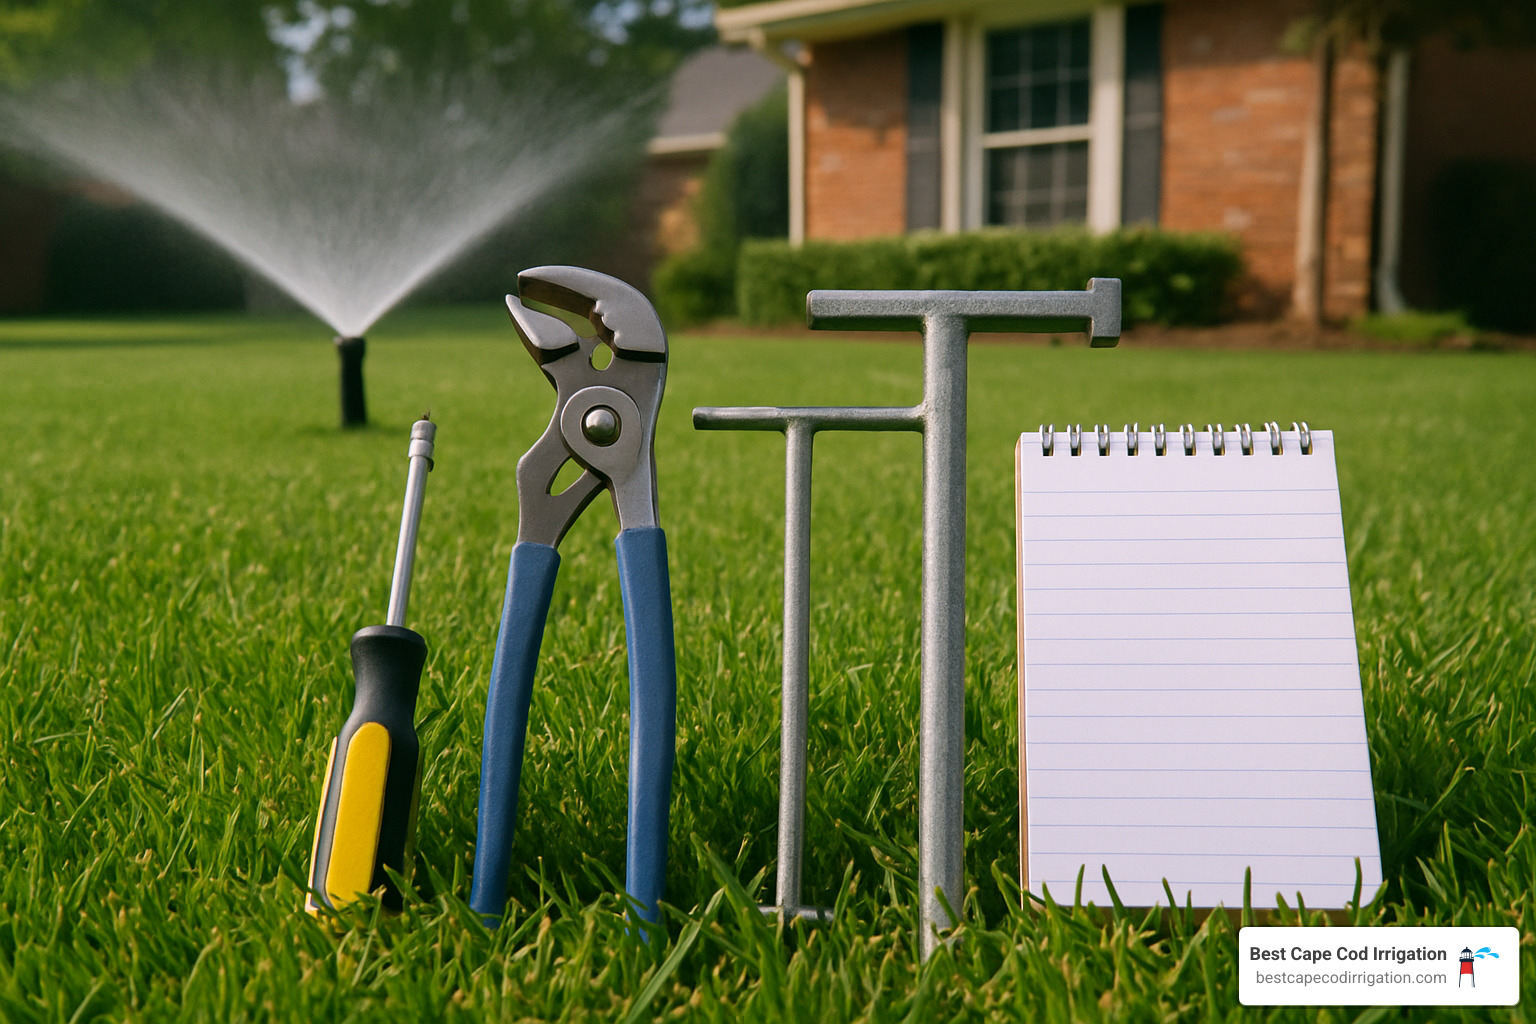
Your basic toolkit should include a flat-head screwdriver for adjusting valve screws, channel-lock pliers for tightening connections, and a sprinkler valve key if your system uses buried valve boxes. Don’t forget a pen and paper – you’ll think you’ll remember that wobbly head in zone three, but details blur together.
A small shovel helps clear debris from valve boxes, while a flashlight reveals problems hiding in dark corners. Safety gear like kneeling pads protect your knees during long inspections, and work gloves prevent cuts from sharp valve box edges.
Backflow Preventer & Vacuum Breaker Prep
Your backflow preventer stands guard between your irrigation system and your home’s drinking water supply. Cape Cod’s freeze-thaw cycles can crack these devices in ways that aren’t immediately obvious.
Start with a visual inspection of the entire device. Look for hairline cracks, especially around the bottom where water tends to collect and freeze. Check that the test-cocks are properly closed and haven’t been damaged by ice expansion.
The bleeder caps should be installed and snug, but not over-tightened. If they’re missing or cracked, water can spray everywhere during startup.
Code compliance matters more than you might think. Cross-connection protection isn’t just a good idea – it’s required by law in most areas. The Facebook FacebookLinkedInTwitterYoutube resources can help you understand which type of backflow prevention your system requires.
System Walk-Through: Heads, Valves, Pipes
Walk every inch of your irrigation system with fresh eyes, looking for the subtle signs that winter left behind. Sprinkler heads often get buried under mulch or pushed down by frost heave.
Debris removal is more important than most homeowners realize. That pile of leaves around a spray head can redirect water flow, creating dry spots in your lawn. Grass that grew over heads during winter can completely block spray patterns.
Check each head for cracks in the nozzle or body. Sunken heads are common after freeze-thaw cycles – they’ll need to be raised back to proper grade before the system runs.
Valve boxes often become winter homes for small creatures and collection points for debris. Clear them out completely, checking that valve handles move freely and aren’t corroded in place.
The master valve check might seem technical, but it’s straightforward. Make sure it moves smoothly and shows no signs of cracking around the body or connections.
Document everything you find during this walk-through. This systematic approach to Irrigation Repairs & Maintenance helps you prioritize repairs and decide what you can handle yourself versus what needs professional attention.
Step-by-Step Guide: Turning On Sprinkler System in Spring
The moment has arrived for the actual turning on sprinkler system in spring process. Think of this as gently waking a sleeping giant – patience and technique matter more than speed.
Before you touch that main valve, confirm everything is ready. Your test cocks and bleeder valves should be closed tight, your controller should be switched to manual mode, and you should have your inspection notes within arm’s reach.
Proper Valve Opening While Turning on Sprinkler System in Spring
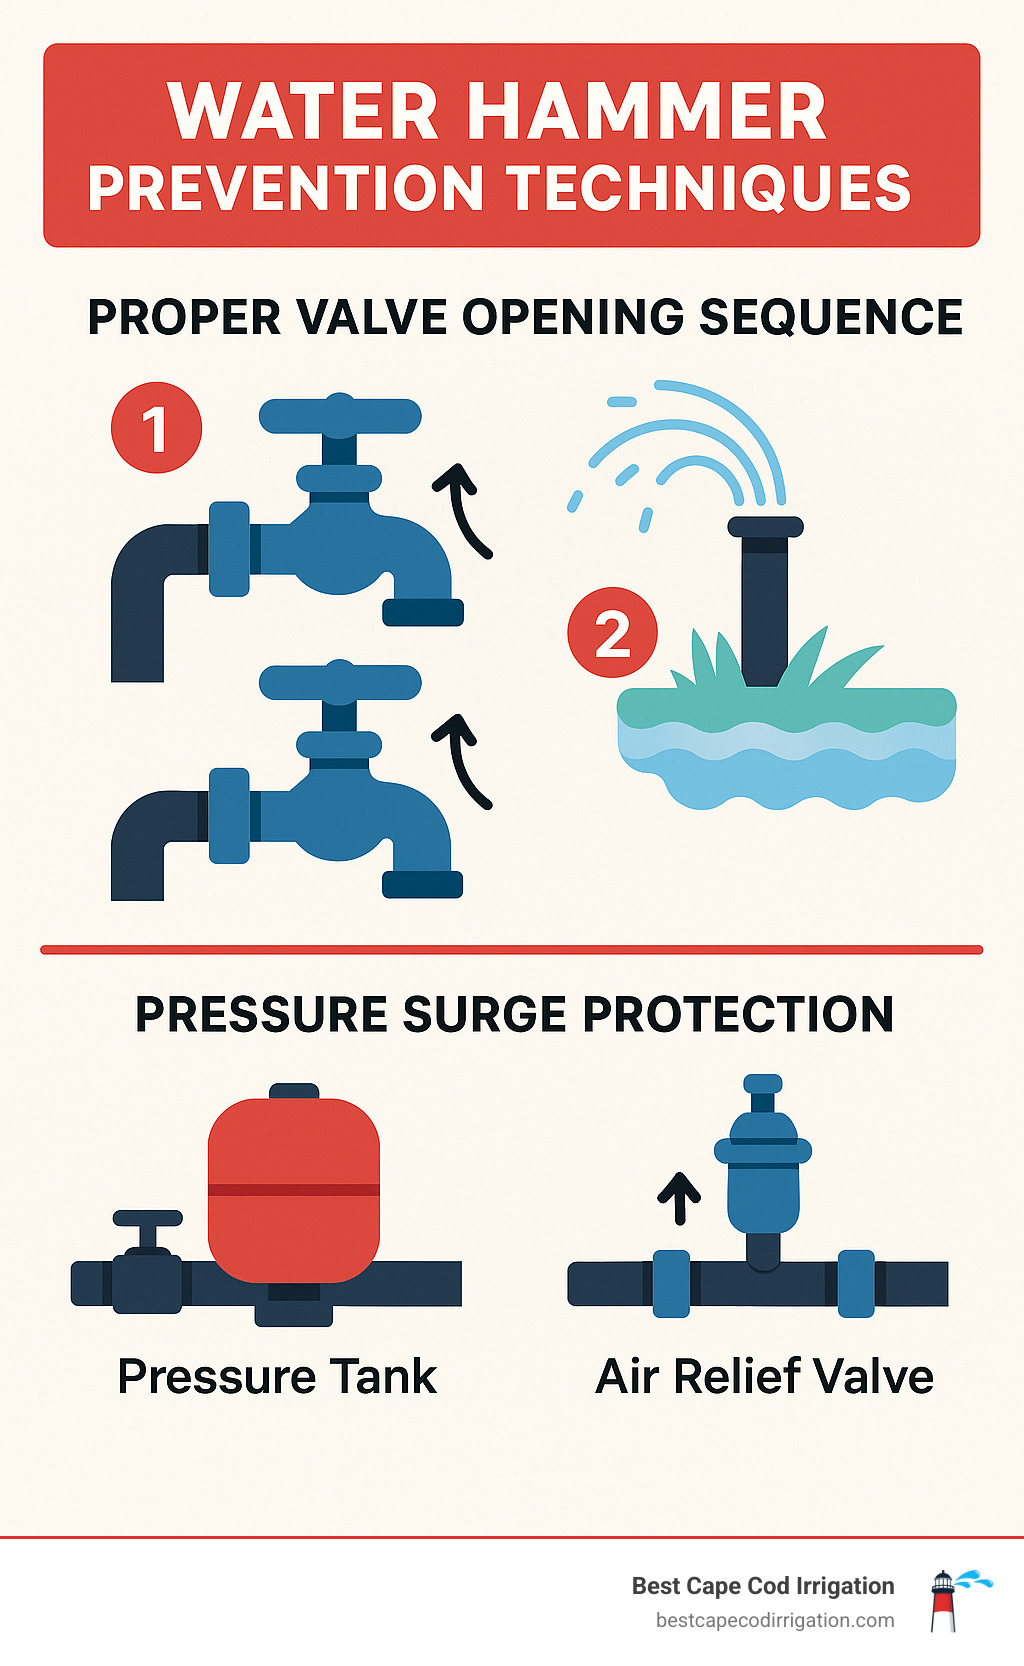
Water hammer is the enemy of irrigation systems – it’s that violent surge of pressure when water suddenly rushes into empty pipes. Picture a freight train slamming into a brick wall, except the wall is your expensive sprinkler components.
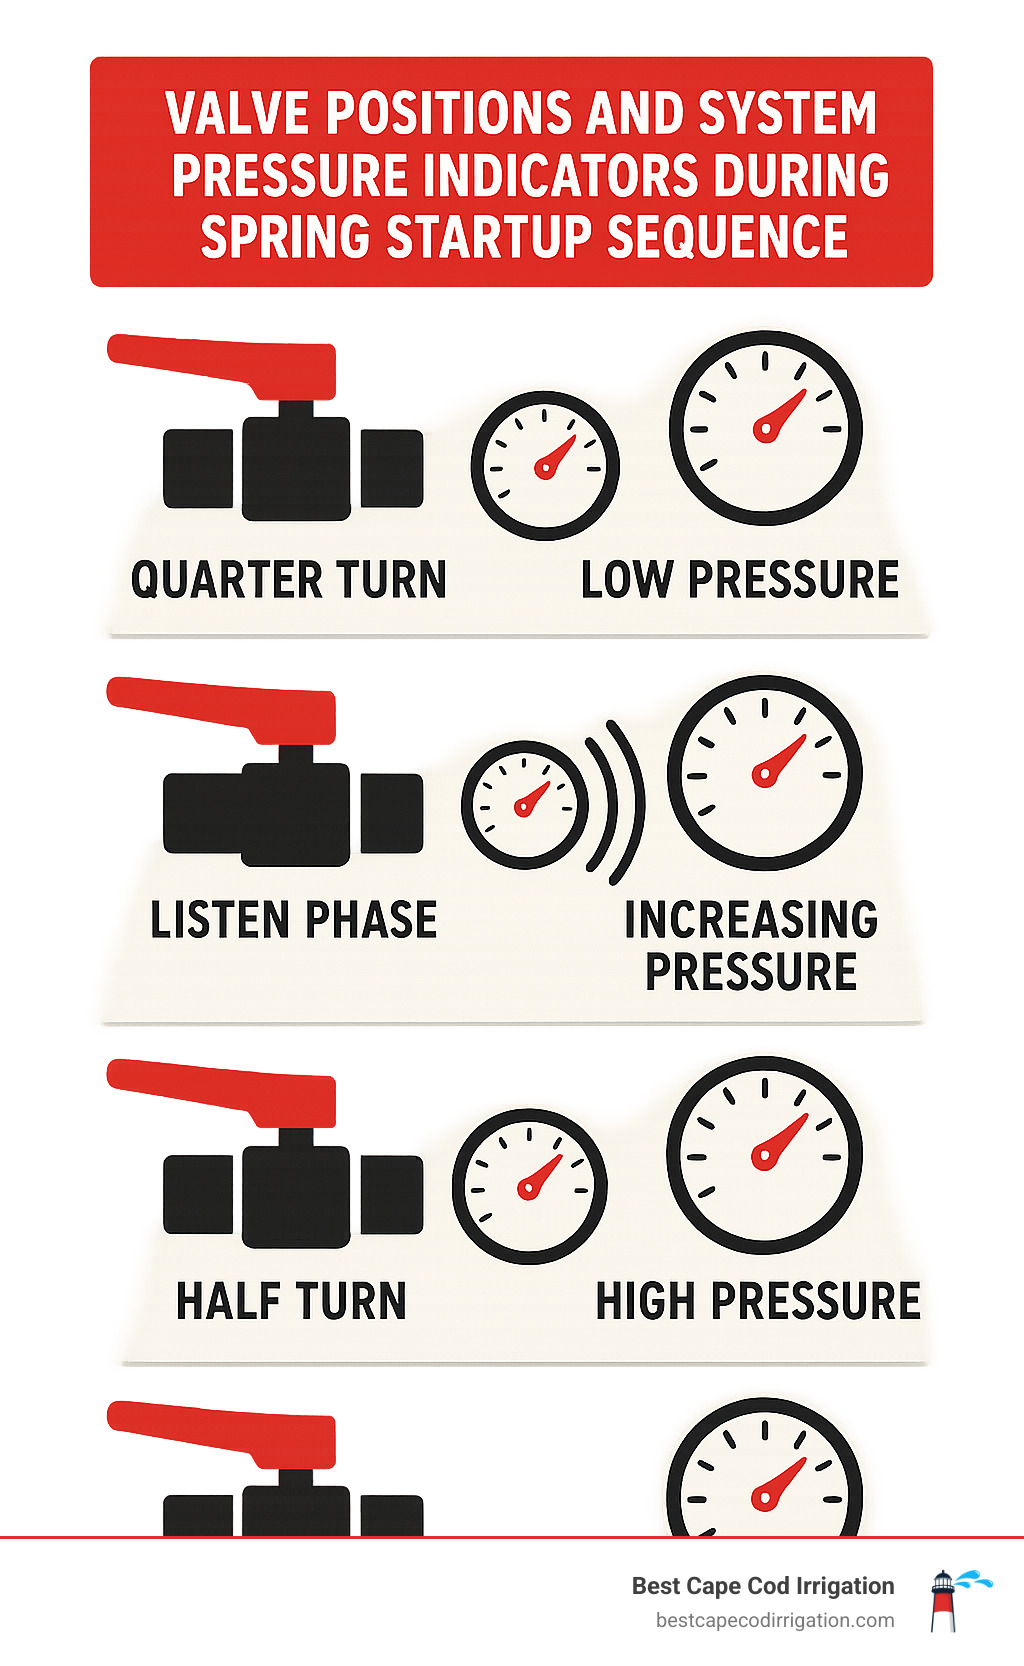
The secret weapon against water hammer? The 30-second rule for turning on sprinkler system in spring.
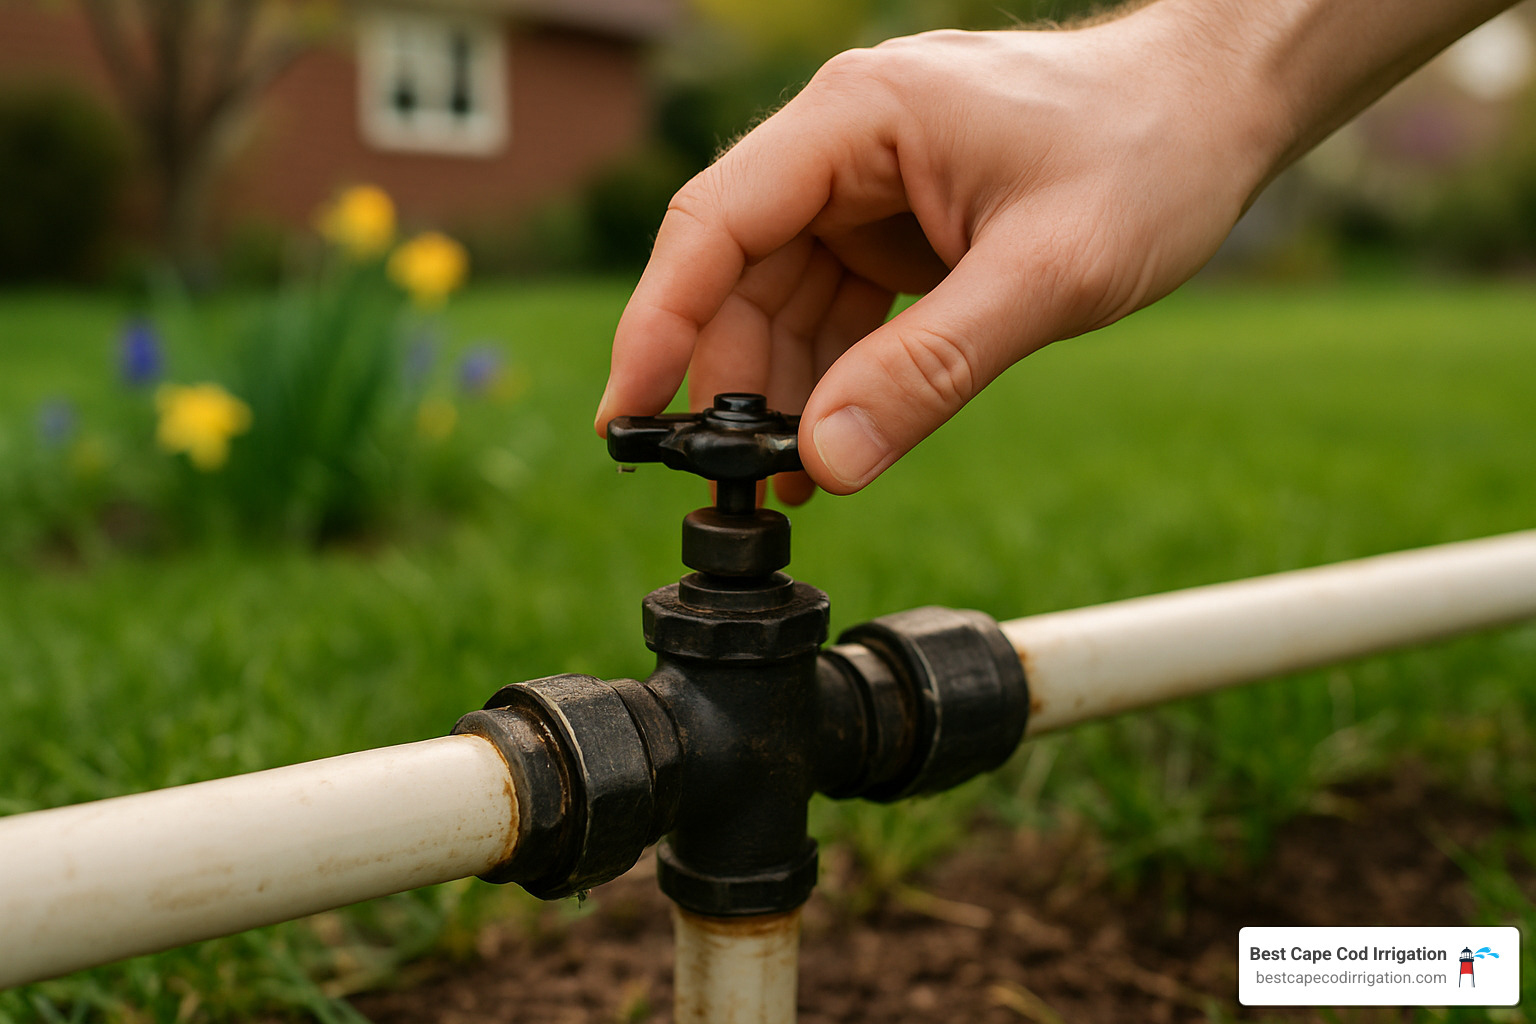
Start with just a quarter turn of your main valve and then stop. Listen to what’s happening. You should hear water beginning to flow into the system, filling those empty pipes gradually.
After about 20 seconds at quarter-open, turn the valve to the halfway position. The water flow sounds should be diminishing as pressure equalizes throughout the system. If you hear banging or hammering sounds, you’re moving too fast.
Finally, after another 20 seconds, complete the opening to full position. The entire process should take at least a full minute. When properly done, you should hear complete silence after about 60 seconds, indicating your system is fully pressurized and ready for testing.
If you continue hearing water flow sounds after two minutes, you likely have a leak somewhere that needs attention.
Zone-by-Zone Testing & Documentation
Now comes the detective work – testing each zone to see how your system survived the winter. Running each sprinkler zone for 3-5 minutes during spring startup gives you enough time to spot problems while avoiding water waste.
Switch your controller to manual or test mode and start with Zone 1. As the zone activates, don’t just stand there watching one sprinkler head – take a walk. Cover the entire zone systematically, looking for heads that refuse to pop up, spray patterns that look irregular, and those telltale soggy spots that scream “pipe leak.”
The first minute of each zone test is usually the most dramatic. You’ll see initial sputtering and irregular spray patterns as trapped air works its way out of the lines. This is completely normal. By the second minute, things should settle into steady, predictable operation.
Pay attention to pressure consistency across each zone. All heads should pop up within 10-15 seconds of zone activation, and they should all operate simultaneously.
Keep detailed notes as you go. Document every head that’s not working properly, every spray pattern that looks off, and every area where water seems to be going where it shouldn’t.
Watch for serious red flags: zones that won’t activate at all might have electrical problems, multiple heads not working in one zone could indicate a major pipe break, and continuous water flow when a zone should be off suggests valve problems that can waste hundreds of gallons.
Post-Startup Adjustments & Troubleshooting
Your system is running, but don’t celebrate just yet – this is where the real work begins. Everything might be working, but it needs fine-tuning to perform beautifully.
The first task is reprogramming your controller for spring conditions. Early spring watering should start conservatively – about 10-15 minutes per zone, running 2-3 times per week. Cape Cod’s spring weather can be unpredictable, and overwatering cool, wet soil creates more problems than drought stress.
Don’t forget the basics: set the current date and time, replace that backup battery, and test your rain sensor.
Water pressure is the silent killer of irrigation systems. Too much pressure – anything above 65 PSI – and you’ll see misting instead of proper coverage, heads popping off, and pipes stressed to their breaking point. A system with too much water pressure (above 65 PSI) can result in cracked pipes, busted valves, and inefficient watering. The sweet spot is 40-65 PSI.
| PSI Range | Performance | Common Issues |
|---|---|---|
| Below 40 PSI | Poor coverage, weak spray | Dry spots, uneven watering |
| 40-65 PSI | Optimal performance | None when properly maintained |
| Above 65 PSI | Excessive pressure | Misting, broken heads, pipe stress |
A simple pressure gauge attached to a hose bib near your irrigation connection will tell you everything you need to know. If you’re running high, a pressure regulator can save your system from early retirement.
Fine-Tuning for Efficiency & Conservation
Smart Wi-Fi controllers have revolutionized irrigation by taking the guesswork out of scheduling. They monitor local weather conditions, adjust for seasonal changes, and can even send you alerts when something’s not right.
Soil moisture sensors are game-changers for water conservation. They prevent your system from watering when the ground is already saturated.
The magic hour for watering remains early morning, between 4-6 AM. The air is still, evaporation is minimal, and your lawn has all day to dry before evening.
Take a close look at your sprinkler head alignment during these first few runs. Winter frost heave can shift heads, and you might find some watering the sidewalk instead of the lawn.
Consider drip irrigation retrofits for flower beds and shrub areas. These plants often need less frequent but deeper watering than grass, and drip systems deliver water directly to root zones with virtually no waste.
For homeowners who want to maximize their system’s potential, our Schedule Maintenance program includes seasonal adjustments, efficiency audits, and the peace of mind that comes with professional oversight.
Common Mistakes & When to Call a Pro
Even the most careful homeowners can stumble when turning on sprinkler system in spring. After 25+ years of spring service calls here on Cape Cod, we’ve seen every mistake in the book.
The most expensive mistake? Opening valves too quickly like you’re starting a race car. Water hammer doesn’t forgive impatience, and we’ve seen $500+ valve replacements that could have been prevented with 30 seconds of patience.
Skipping the frost check ranks as mistake number two. Cape Cod’s sandy soil can be deceiving – it looks thawed on top while ice crystals lurk 8 inches down.
The backflow preventer inspection gets overlooked constantly, yet it’s your drinking water’s first line of defense. Beyond health concerns, most municipalities require annual testing by certified professionals.
Neglecting pressure testing might seem minor until you consider that excessive pressure silently destroys components all season long. Your system needs 40-65 PSI to work properly – anything more is destructive waste.
Perhaps the sneakiest mistake is assuming all zones work correctly just because the controller runs its cycle. We regularly find “dead zones” that homeowners didn’t notice until their prize roses started wilting in July.
When to call the professionals? Some tasks require certification and specialized tools that make DIY attempts costly mistakes. Backflow preventer testing must be performed annually by certified personnel – it’s not optional.
Underground pipe repairs quickly become expensive excavation projects. Electrical troubleshooting of controllers or valve systems can be dangerous – 120V irrigation systems pack enough power to cause serious injury.
Smart controller programming and integration has become increasingly complex. Professional installation ensures you actually benefit from these features.
Average professional service costs vary widely. Based on internet data (not Best Cape Cod Irrigation pricing): basic spring startup ranges from $75-$300, while startup with minor repairs runs $150-$500. Major system repairs can cost anywhere from $300-$4,500 or more, and smart controller installation typically ranges $200-$2,400.
Note: These are average costs based on internet data and not actual costs for Best Cape Cod Irrigation services.
Red flags that demand immediate professional attention include multiple zones failing simultaneously, electrical burning smells from controllers, system-wide water pressure problems, and backflow preventers that leak or won’t hold pressure.
The bottom line? Know your limits. We’d rather help you succeed with a service call than watch you struggle with expensive mistakes.
Frequently Asked Questions about Turning on Sprinkler System in Spring
When is the best time to activate my system on Cape Cod?
Cape Cod’s unique coastal climate means mid to late May is typically your sweet spot for turning on sprinkler system in spring. Our ocean-moderated temperatures are a blessing and a curse – we don’t get extreme cold snaps that inland areas face, but spring can be deceptively chilly with frost lurking longer than expected.
The key is patience. While your neighbors might be itching to start watering in early May, waiting until the soil is consistently frost-free to 12 inches deep will save you from expensive repairs later.
Use nature’s own timing system – when forsythia bushes burst into their brilliant yellow blooms, soil temperature has been above 55°F for about a week. This natural indicator is remarkably reliable for determining safe startup conditions on the Cape.
Coastal properties near the water often thaw a week or two earlier than inland areas, but don’t assume your entire property is ready just because one sunny spot looks good.
How do I check if the ground is really frost-free?
The most reliable method is getting your hands dirty with the physical dig test. Grab a spade shovel and dig down 12 inches in several spots around your property. This isn’t a one-and-done check – you need to test multiple locations because your property likely has microclimates.
Pay special attention to areas that stay cold longer – under decks, north sides of buildings, and spots that don’t get much direct sunlight. If you find any ice crystals or soil that’s still frozen solid anywhere on your property, wait another week and test again.
For the tech-savvy homeowner, a soil thermometer inserted 6-8 inches deep should read consistently above 40°F for several days running. But honestly, the shovel test is more reliable because it shows you exactly what’s happening where your pipes are buried.
Those few extra days of waiting can save you thousands in repair costs.
What is water hammer and how can I prevent it?
Water hammer is the enemy of irrigation systems everywhere – a pressure shock wave that occurs when water flow starts or stops suddenly. It sounds exactly like someone banging on your pipes with a hammer, and the damage can be just as devastating.
Here’s what happens: when you open a valve too quickly, water rushes into empty pipes at high speed. When that moving water hits a closed valve or fitting, it creates a pressure spike that can instantly crack pipes, burst fittings, or destroy sprinkler heads.
Prevention is beautifully simple – slow down. When turning on sprinkler system in spring, take at least 30 seconds to go from closed to fully open on your main valve. Start with just a quarter turn, wait 10-15 seconds, then gradually open more.
The sound of proper startup should be a gentle whoosh that gradually quiets down, not dramatic banging that signals trouble ahead.
Conclusion
Turning on sprinkler system in spring is like giving your lawn a gentle wake-up call after a long winter’s sleep. When done properly, it sets the stage for months of lush, healthy growth while protecting your valuable irrigation investment.
Your sprinkler system needs the same gentle approach you’d want after a long sleep. Waiting for truly frost-free conditions protects pipes from cracking. Opening valves slowly prevents water hammer damage. Testing each zone carefully catches small problems before they become expensive disasters.
Cape Cod’s sandy soils and coastal climate create unique challenges. Our soils drain quickly but need more frequent watering. Salt air corrodes components faster. Those gorgeous ocean breezes affect evaporation rates in ways that can surprise homeowners new to coastal living.
Whether you tackle spring startup yourself or call in the pros, the secret is getting it right the first time. A properly awakened system will hum along quietly all season, keeping your landscape green while your water bills stay reasonable.
After 25+ years of bringing Cape Cod irrigation systems back to life each spring, we’ve seen what works and what doesn’t. Smart technology makes modern systems more efficient than ever, but they still need that human touch to ensure everything’s working as it should.
Ready to give your irrigation system the spring awakening it deserves? Our team understands every quirk of Cape Cod’s climate and soil conditions. We’ll handle the technical details while you focus on enjoying your beautiful landscape.
Contact Us today to schedule your spring startup and take the worry out of another growing season. Your lawn will thank you, and you’ll have one less item on your spring to-do list!
