Why Choose Drip Irrigation for Your Garden?
Drip irrigation system installation is the fastest way to cut water use while boosting plant health on Cape Cod. Instead of spraying the whole yard, drip lines deliver moisture right to the root zone—perfect for our quick-draining, sandy soils.
Quick Overview – Drip Irrigation System Installation
- Gather components (backflow preventer, timer, filter, regulator, tubing, emitters)
- Sketch a simple layout and mark emitter spots
- Build the head unit on your outdoor spigot
- Run 1/2″ mainline tubing and secure with stakes
- Punch holes, add emitters, and branch with 1/4″ line
- Flush, cap, test, and enjoy automatic watering
Why it works so well:
- Up to 90 % efficiency (sprinklers average 50–70 %)
- Sandy soils absorb slow, steady drip far better than overhead spray
- Leaves stay dry, so diseases drop and roots grow deeper
- Once set, a timer handles watering—no more dragging hoses
- Most DIYers finish in one afternoon with basic tools

Key terms at a glance:
Gathering Your Tools and Components
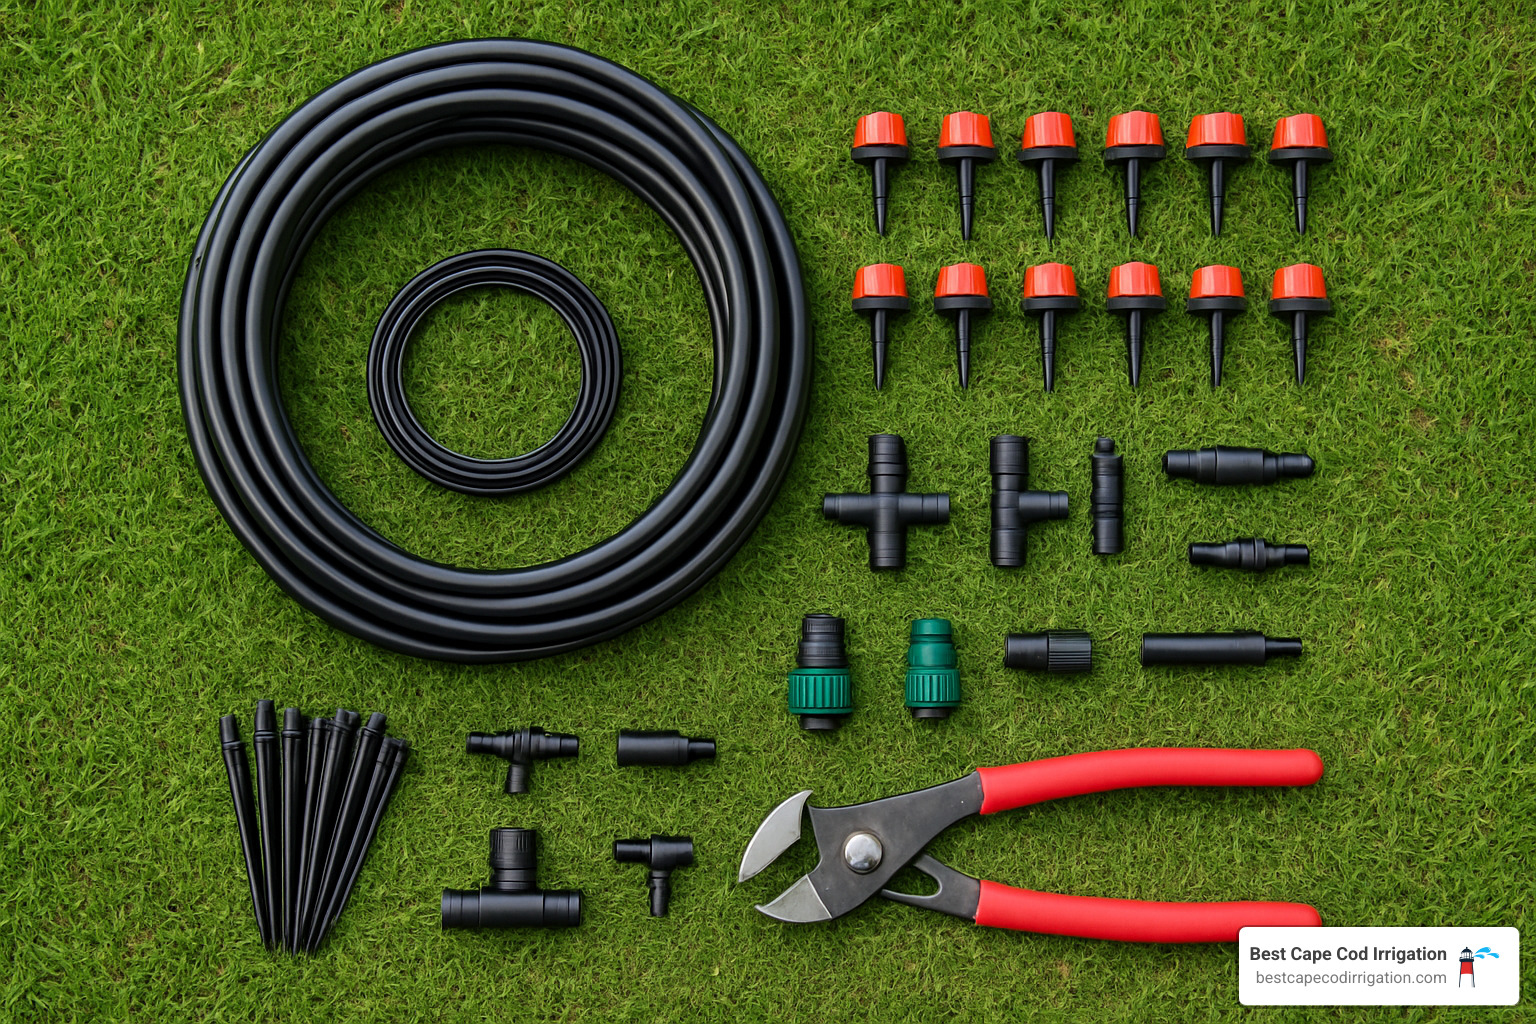
Think of your drip irrigation system installation like cooking a great meal – having all your ingredients ready before you start makes everything go smoothly. There’s nothing worse than getting halfway through your project only to realize you’re missing a crucial component.
The good news? You won’t need a garage full of tools for this project. Most of what you need can fit in a single shopping bag, and the specialized tools are surprisingly affordable.
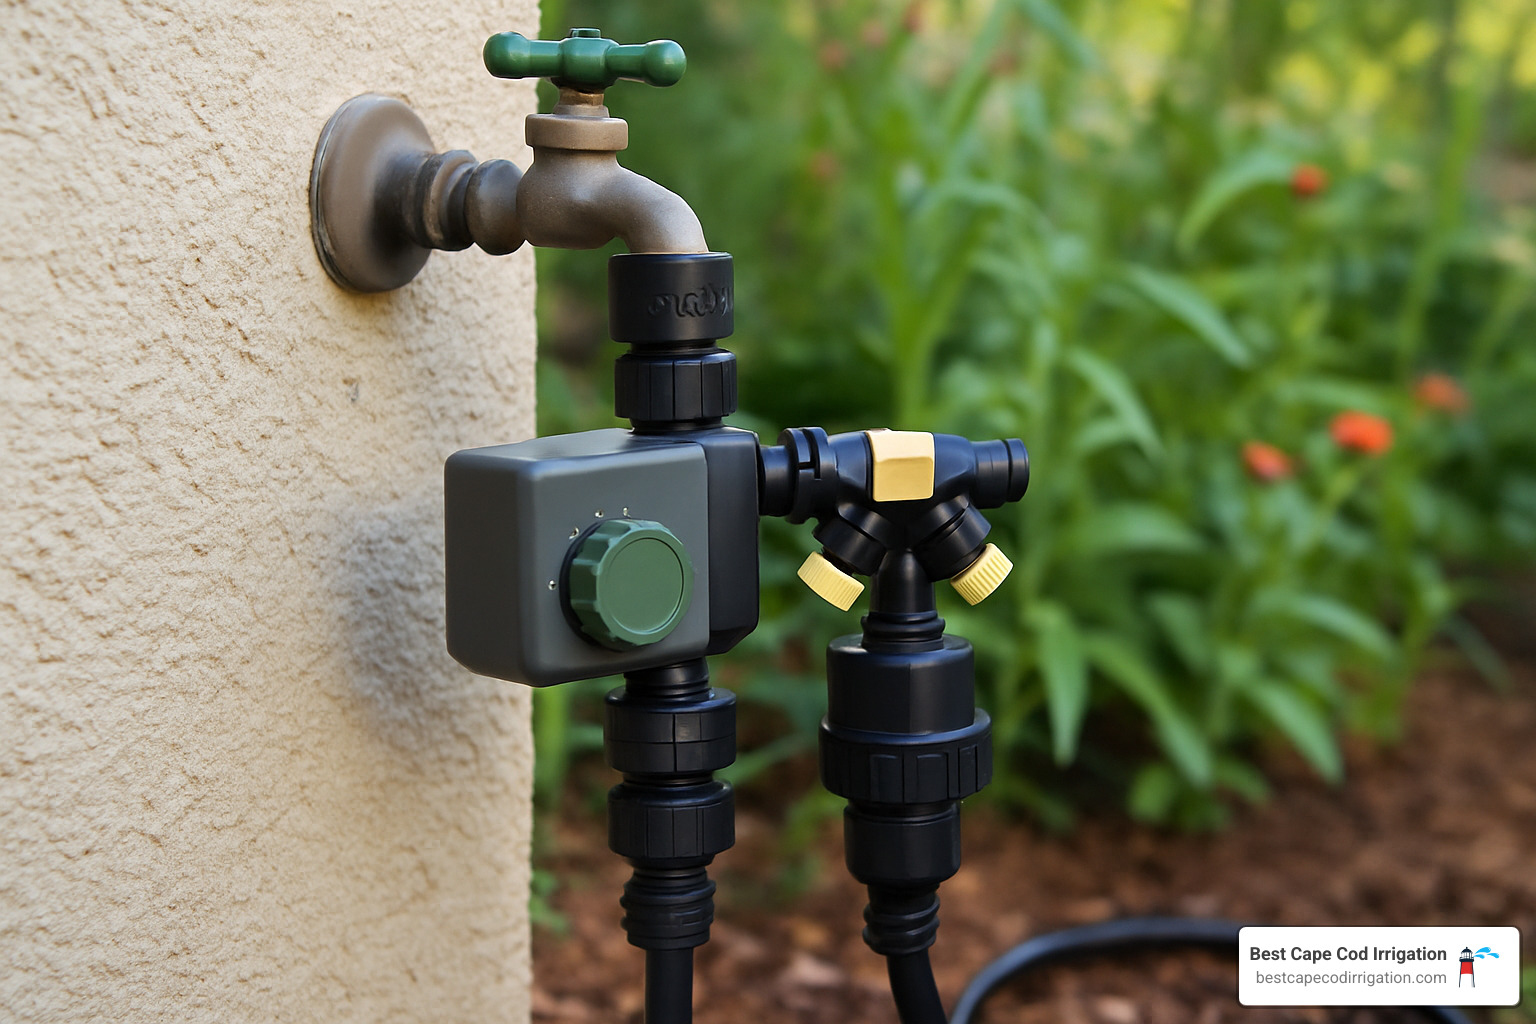
Getting your head assembly components ready is where most beginners feel overwhelmed, but it’s actually pretty straightforward. These components connect in a specific order, starting from your outdoor spigot: a backflow preventer (protects your home’s water supply), followed by a hose-end timer for automatic watering, then a Y-splitter so you can still use your hose for other tasks.
Next comes the hose filter – this little hero prevents debris from clogging your emitters later. Look for at least 150 mesh filtering. The pressure regulator keeps everything running at the optimal 10-30 PSI, and finally, the tubing adapter connects your standard hose threads to the drip tubing.
For the distribution network, you’ll need both 1/2″ poly tubing for your main lines and 1/4″ poly tubing for branches to individual plants. Here’s a helpful tip: keep your main runs under 200 feet and branch lines under 15 feet for best performance.
Your emitters and drippers come in different flow rates from 0.5 to 20 gallons per hour, so you can match each plant’s needs perfectly. Micro-sprayers work great for ground cover areas, while barbed fittings (tees, elbows, and couplings) let you create custom layouts around obstacles.
Essential tools include tubing stakes to secure everything in place, a hole punch tool for precise emitter installation, tubing cutters or shears for clean cuts, and end caps or figure-8 closures to seal your lines.
Tools and Materials Needed:
- Backflow preventer
- Hose-end timer
- Y-splitter
- Hose filter
- Pressure regulator
- Tubing adapter
- 1/2″ and 1/4″ poly tubing
- Emitters, drippers, and micro-sprayers
- Barbed fittings (tees, elbows, couplings)
- Tubing stakes
- Hole punch tool
- Tubing cutter or shears
- End caps or figure-8 closures
Don’t worry if you already have basic scissors at home – they can substitute for specialized tubing cutters in a pinch. The beauty of drip irrigation is that it’s designed for regular homeowners, not professional contractors.
Planning and Designing Your System
Before punching even one hole, sketch a quick map of your garden beds. Mark plant locations, the spigot, and immovable features (walks, patios, big rocks). A five-minute drawing prevents hours of re-routing later.
Know Your Soil
- Sandy (common on Cape Cod): 2 GPH emitters, 10–12 in. apart
- Loam: 1 GPH emitters, 16–18 in. apart
- Clay: 0.5–1 GPH emitters, 18–24 in. apart
Emitter Counts
- Small shrubs: 2–3 per plant
- Large trees: 12–36 spread under the canopy
- Veggie rows: emitter every 12–18 in.
- Flowers: 1 emitter at each plant base
Flow-Rate Math (the 220 GPH rule)
- Add up all emitter GPH in a zone.
- Keep the total under 220 GPH to maintain pressure.
- Make sure your spigot can supply at least 25 % more than that total.
Online drip irrigation calculators take the guesswork out if math is not your hobby.
Need professional design help? Check our Garden Watering Solutions service.
A Step-by-Step Guide to Drip Irrigation System Installation
Step 1 – Assemble the Head Unit
Attach parts in this order (hand-tighten with plumber’s tape):
- Backflow preventer
- Hose-end timer
- Optional Y-splitter for regular hose use
- Filter (arrow toward system)
- Pressure regulator (20–30 PSI)
- Tubing adapter to 1/2″ line
Step 2 – Lay Mainline & Branches
Warm tubing in the sun, then run 1/2″ mainline (max 200 ft per zone) along beds. Stake every 5–6 ft and use gentle curves or universal elbows/tees for turns. Add 1/4″ branches up to 15 ft long as needed.
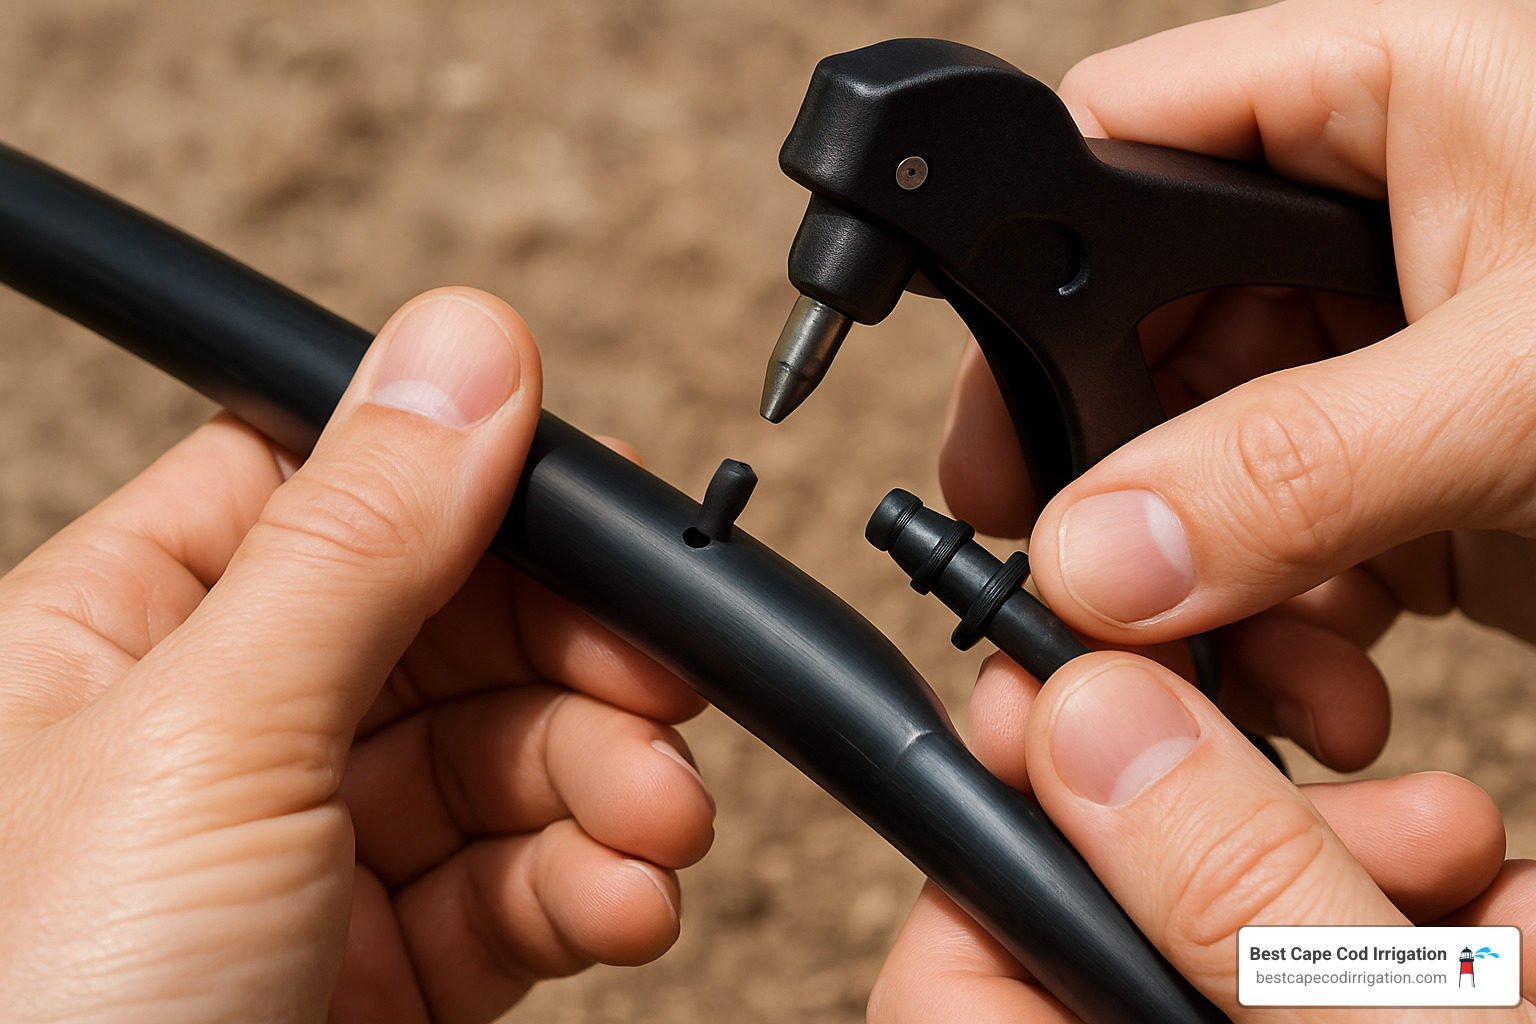
Step 3 – Add Emitters
Use a punch tool for clean 3 mm holes, then snap in barbed emitters or connectors. Common choices:
- Color-coded 0.5, 1, 2, 4 GPH drippers
- Pressure-compensating (PC) emitters for slopes/long runs
- Micro-sprinklers for dense groundcovers
Step 4 – Flush, Cap & Test
- Remove end caps, open water full blast, flush until clear.
- Fold and figure-8 cap line ends (or screw-on hose ends).
- Turn water on gradually; every emitter should drip, not spray.
- Fix leaks or move emitters before burying/staking final positions.
That’s it—total install time for most beds is two to four hours. For complex sites, our Drip Pipe Installation crew can handle the heavy lifting.
Automating and Optimizing Your System
Step 1: Set an Automatic Watering Schedule
Once your drip irrigation system installation is complete, automation transforms it from a daily chore into a set-it-and-forget-it solution. The right timer makes all the difference between a system that works for you and one that becomes another item on your to-do list.
Getting Your Timer Settings Right:
Programming your hose end timers doesn’t require a computer science degree. Start with 2-3 watering sessions per week – this works for most Cape Cod gardens. Your watering duration should begin around 30-60 minutes per session, though you’ll adjust this based on how your plants respond.
Early morning watering between 5-7 AM is your secret weapon. Plants get their drink before the heat hits, there’s less evaporation, and you avoid the fungal issues that come with wet leaves overnight. Plus, your water pressure is usually highest in the morning when neighbors aren’t showering or doing laundry.
Seasonal Fine-Tuning:
Your plants’ thirst changes with the seasons, and your timer should follow suit. Spring means ramping up frequency as everything wakes up and starts growing. Summer calls for longer watering sessions during those hot July weeks – same frequency, just more water each time.
When fall arrives, dial back the frequency as temperatures cool and plants prepare for dormancy. Winter means shutting down completely before freezing temperatures arrive – Cape Cod winters aren’t kind to water-filled irrigation lines.
Soil-Specific Scheduling:
Cape Cod’s varied soil conditions require different approaches. Sandy soil (common near the coast) drinks water quickly and needs more frequent, shorter cycles – think daily 20-30 minute sessions. Clay soil (found inland) holds water longer, so twice-weekly 60-90 minute sessions work better. Loamy soil sits in the middle with every-other-day 30-45 minute cycles.
For homeowners wanting weather-responsive automation that adjusts to rainfall and temperature changes, our Smart Irrigation Solutions take the guesswork out of seasonal adjustments.
Step 2: Best Practices for a Long-Lasting Drip Irrigation System Installation
Protecting Your Investment:
The difference between a system that lasts 3 years and one that serves you for 15 years often comes down to a few simple protection strategies. Mulch coverage is your system’s best friend – apply 2-3 inches of organic mulch over your tubing for UV protection and reduced evaporation. Shredded bark, wood chips, or straw all work beautifully while improving your garden’s appearance.
UV protection isn’t optional on Cape Cod. Even “UV-resistant” tubing breaks down under our intense summer sun. That mulch layer or light burial protects your investment and keeps the system running smoothly for years.
Smart Maintenance Habits:
Monthly check-ups take just 15 minutes but prevent major headaches. Look for clogged emitters – a toothpick clears most blockages easily. Inspect for leaks at fittings, especially after temperature swings. Seasonally, clean your filter and flush lines to remove any buildup. Annual maintenance means replacing worn components and updating timer batteries before they fail.
System Optimization Rules:
Respect your system’s limits for best performance. Keep mainline length under 200 feet per zone – longer runs lose pressure and water unevenly. Monitor pressure with an inexpensive gauge to catch problems early. Don’t exceed 220 GPH total per zone, or you’ll overwhelm your water supply and pressure regulator.
Planning for Growth:
Your landscape will evolve, and your irrigation should grow with it. Add zones for new planting areas using tee fittings and additional timers. Upgrade to multi-zone controllers when you outgrow single-zone timers. Install valves for independent zone control when your system becomes more complex.
Keep Goof Plugs handy for those inevitable mistakes – we’ve all punched holes in the wrong spots or changed our minds about emitter placement.
For comprehensive system optimization and professional maintenance that ensures maximum efficiency, our Eco-Friendly Irrigation Cape Cod services help you get the most from your investment while supporting Cape Cod’s environmental goals.
Troubleshooting and Seasonal Maintenance
Quick Fix Guide
| Problem | Likely Cause | Fast Solution |
|---|---|---|
| Clogged emitters | Debris or minerals | Clean filter, flush lines, poke emitter with pin |
| Low pressure | Too many emitters, long run, leak, dirty filter | Split zone, shorten line, repair leak, clean filter |
| Leaks at fittings | Tubing not seated | Push tubing fully, add clamp if needed |
| Emitters pop off | Pressure above 30 PSI | Check/replace regulator |
Pressure-compensating emitters level out minor elevation or length changes. Keep a handful of Goof Plugs and barbed couplers for instant repairs.
Seasonal Checklist
- Spring: Inspect lines, replace timer batteries, clean filter, flush system.
- Monthly in season: Check for clogs/leaks; clean filter.
- Fall: Reduce watering frequency, then shut water off, flush lines, and store head unit indoors.
- Winter: Cap open tubing ends to keep critters out. On Cape Cod, even brief freezes can crack plastic—dry lines completely.
Prefer hands-off upkeep? Our Drip Irrigation Maintenance plans keep systems running smoothly year-round.
Frequently Asked Questions about Drip Irrigation Installation
How much does a DIY drip system cost?
Average internet estimates run $40–$300 per 100 sq ft, depending on parts quality and automation level. (These are public averages, not quotes from Best Cape Cod Irrigation.)
How long should I run it?
Start with 30–60 min, two or three times a week. Sandy soil may need shorter daily cycles; clay needs longer but fewer.
Can I use drip for my lawn?
Technically yes, but uniform grass coverage is tough. For turf we recommend a traditional Irrigation System Installation. Drip shines in beds, veggies, trees, and containers.
How often do I clean the filter?
At least once a month—weekly if you have hard or sediment-heavy water.
What if I punch a hole in the wrong spot?
Pop in a Goof Plug, move the emitter, and carry on. The system is designed to be forgiving and modular.
Conclusion: Enjoy Your Efficient, Water-Wise Garden
Congratulations! You’ve successfully completed your drip irrigation system installation and transformed your garden into a water-efficient oasis. The satisfaction of watching your plants thrive while knowing you’re conserving water and saving time is truly rewarding.
The Rewards of Your Hard Work:
Your new drip system delivers impressive water savings – up to 50% less water usage compared to traditional sprinklers. That translates directly to lower utility bills and a smaller environmental footprint. The time savings are equally valuable – no more weekend mornings spent dragging hoses around or remembering to move sprinklers.
Most importantly, you’ll notice healthier plants within just a few weeks. The consistent moisture delivery and reduced disease pressure from keeping foliage dry creates ideal growing conditions. Your Cape Cod garden will flourish even during our sometimes challenging summer dry spells.
Long-Term Benefits Keep Coming:
The advantages of your drip irrigation system installation compound over time. Lower water bills provide ongoing savings, while reduced maintenance means less time weeding since you’re only watering your plants, not the spaces between them. The improved plant health from consistent moisture promotes strong root development, making your landscape more resilient.
Perhaps best of all is the peace of mind knowing your garden is automatically cared for, even when you’re enjoying a Cape Cod beach day or traveling off-Cape.
Room to Grow:
Your system is designed for expansion. As your landscape evolves, you can easily add new zones for additional planting areas, upgrade to smart timers that adjust for weather conditions, or integrate soil moisture sensors for even more precision.
When Professional Help Makes Sense:
While DIY installation is incredibly satisfying, some situations benefit from professional expertise. Large or complex properties with multiple zones and advanced automation can be challenging to design and install. Challenging terrain like slopes, rocky soil, or difficult access areas may require specialized techniques and equipment.
If you’re interested in integration with existing systems or want to incorporate the latest smart technology like weather-based controllers and soil moisture sensors, professional installation ensures optimal performance.
For homeowners throughout Cape Cod seeking expert assistance with custom design or Professional Irrigation Installation, our experienced team at Best Cape Cod Irrigation understands the unique challenges of our coastal environment. With over 25 years of regional expertise, we know how Cape Cod’s sandy soils, salt air, and variable weather patterns affect irrigation systems.
Our eco-friendly approach ensures your system maximizes efficiency while minimizing environmental impact – something that’s particularly important in our sensitive coastal ecosystem.
Your Water-Wise Journey Continues:
Whether you’ve tackled this as a DIY project or are considering professional assistance for a more complex system, you’ve taken an important step toward sustainable gardening. Contact us today to learn more about our comprehensive irrigation system installation services and find how we can help expand or improve your water-wise garden.
Your plants are already thanking you with healthier growth, your water bill will thank you with lower costs, and you can enjoy the satisfaction of a job well done. Welcome to efficient, automated irrigation – your garden will never be the same!
