Why Repair Underground Sprinkler Hose Issues Matter for Cape Cod Homeowners
A hidden leak can waste hundreds of gallons of water each week, spike your utility bill, and leave ugly patches on an otherwise healthy lawn. The upside? Most Cape Cod homeowners can fix a break themselves in a single afternoon.
At-a-Glance DIY Fix
- Locate trouble – look for pooling water, soggy soil, or dry rings.
- Gather tools – pipe cutter, slip couplings, primer, cement, trowel.
- Cut & replace – remove damaged pipe and glue in a new section.
- Test – bring pressure up slowly and watch for drips.
- Backfill – tamp soil in layers and re-lay sod.
Professional sprinkler systems start around $3,500, but a typical DIY hose repair costs just $50–$100 in materials. Common causes on the Cape include freeze-thaw cracking, tree roots, and accidental shovel strikes. Catch them early and your lawn—and wallet—stay happy.
Repair underground sprinkler hose word roundup:
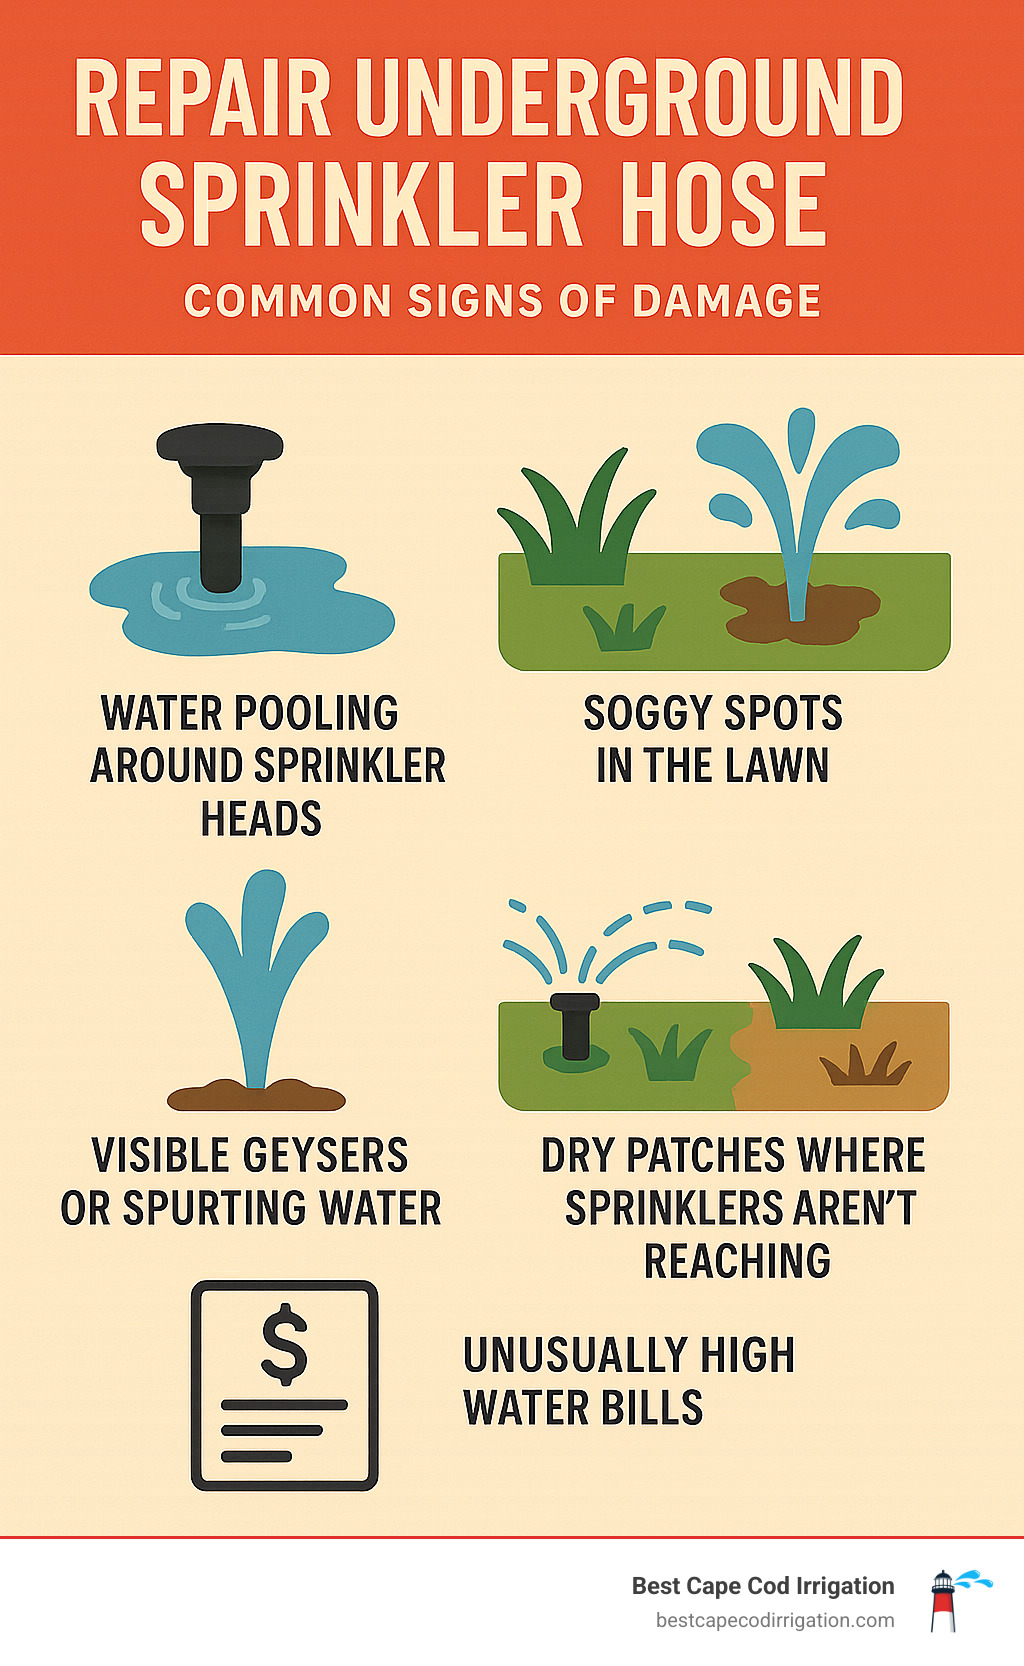
Identifying the Leak: Signs and Causes
Your sprinkler system always drops hints when something’s wrong—you just have to notice them. Classic clues include standing water, extra-soggy turf, mini geysers, or the opposite problem: stubborn dry patches. If several heads in one zone sputter or your water bill jumps for no reason, suspect a line break.
Why Lines Fail on the Cape
- Accidental digging while planting or installing fences.
- Tree roots squeezing pipes over the years.
- Freeze–thaw cycles that split pipes not fully winterized.
- Heavy, shifting clay soils common in parts of Falmouth, Mashpee, and Barnstable.
- Plain old age and UV breakdown.
Pinpointing the Exact Spot
- Run zones one at a time to narrow the search.
- Listen for a muffled hiss of escaping water.
- Mark the damp area, shut off the system, and let the ground dry for clearer clues.
- Dig slowly with a hand trowel, working sideways to expose at least 6 inches of pipe on both sides of the damage.
Stuck? Pros use acoustic leak detection. If the leak keeps hiding, see our guide on sprinkler system leak repair.
Gathering Your Tools and Materials
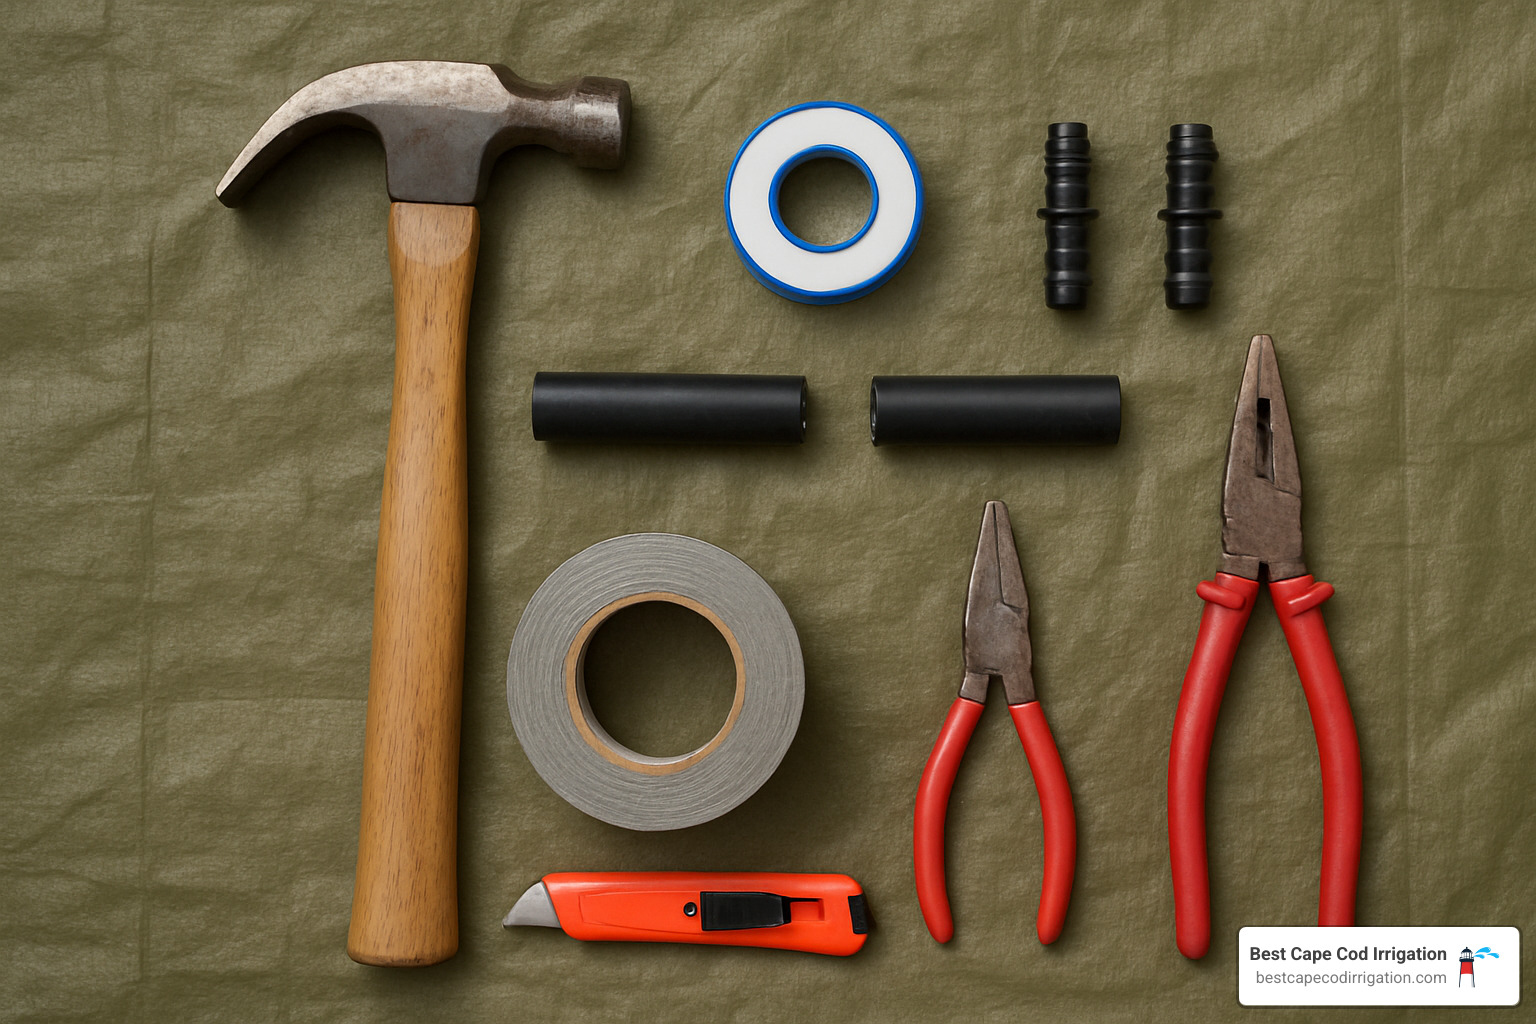
Here’s the thing about repair underground sprinkler hose projects: having the right tools makes all the difference between a quick fix and a frustrating afternoon. The good news is that most repairs don’t require expensive specialty equipment – just some basic tools and materials you can pick up at any hardware store.
Safety comes first, though. Before you even think about digging, call 811 (Dig Safe) to locate underground utilities. This free service will mark gas, electric, cable, and other utility lines on your property. Trust me, hitting a gas line while trying to fix a sprinkler leak is nobody’s idea of a good time – and it can be dangerous and expensive.
While you’re thinking about safety, grab some safety glasses and work gloves. Cut PVC pipe has surprisingly sharp edges, and you’ll be working with chemicals like PVC primer and cement that you don’t want getting on your skin.
Essential Supplies
Now let’s talk about what you’ll actually need for the repair. For digging, you’ll want both a shovel for initial excavation and a hand trowel for precise work around the pipes. The trowel is your best friend here – it gives you the control you need to avoid accidentally damaging more pipe.
For cutting, a PVC pipe cutter is worth the investment over a hacksaw. It gives you cleaner, straighter cuts, which makes for stronger repairs. If you already have a hacksaw, it’ll work, but the pipe cutter makes the job easier.
When it comes to repair materials, you’ll need replacement pipe that matches what you have. Bring a sample to the hardware store to make sure you get the right size and type. For PVC repairs, you’ll also need PVC primer and cement – these work together to create a chemical bond that’s actually stronger than the original pipe. Don’t forget some sandpaper to scuff the pipe surfaces before gluing.
The fittings you choose depend on your specific situation. Slip couplings are the most common choice for straightforward repairs – they slide over the pipe ends and create a permanent seal. Compression couplers are great for tight spaces or when you want to avoid using glue. If you’re working with polyethylene pipe, you’ll need band clamps instead. For tiny punctures, PVC saddles can sometimes save you from cutting out a whole section.
Finally, grab some basics like a measuring tape, clean cloths for pipe cleaning, a permanent marker, and a bucket for mixing or holding water during the repair process.
The total cost for these supplies typically runs $50-$100, depending on what you already have in your garage and how extensive the damage is. When you compare this to professional repair costs that can range from $150 to over $800 (based on internet data and varying by complexity), you can see why DIY repair underground sprinkler hose projects make financial sense for most Cape Cod homeowners.
Step-by-Step Guide to Repair Underground Sprinkler Hose
Follow these four streamlined steps and you’ll be watering again before dinner.
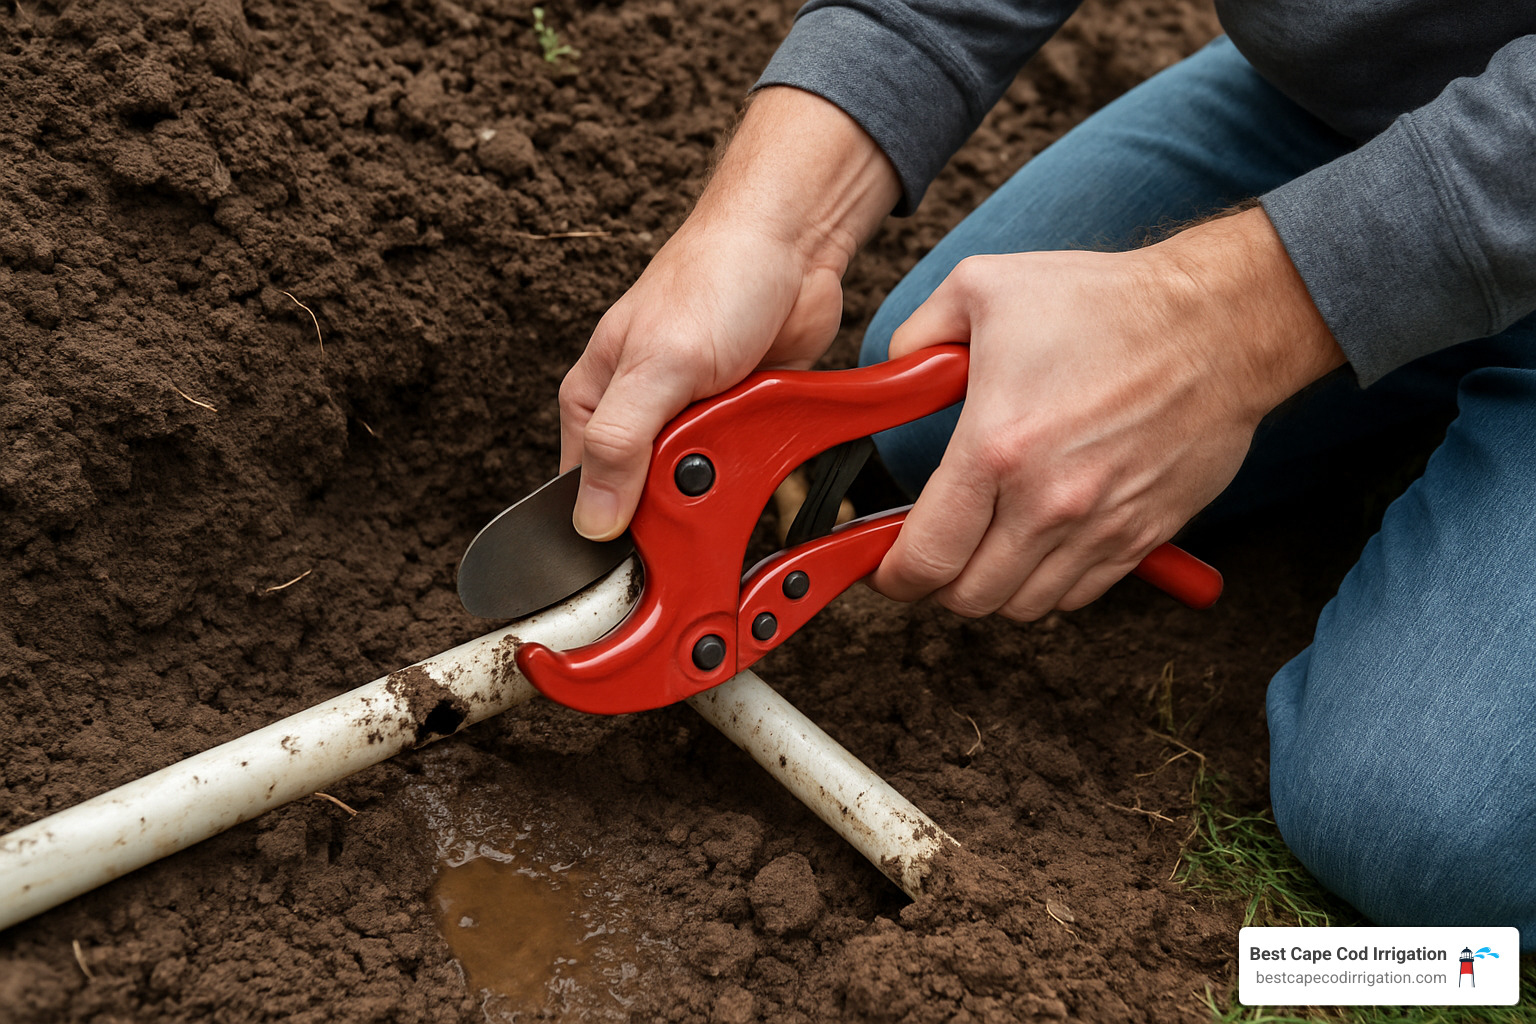
1. Prep the Site
Turn off the irrigation valve and wait a few minutes for pipes to drain. Excavate a 1-ft-square hole. If you want the grass to survive, cut the sod in squares and slide it aside. Wipe mud off the pipe and measure the damaged span.
2. Remove and Replace
Use a PVC cutter (or sharp hacksaw) to take out the break, making straight, burr-free cuts. Dry-fit the new piece and two slip couplings. Happy with the fit? Prime, cement, quarter-turn, and hold for 30 seconds. For poly pipe, push barbed fittings in and tighten stainless clamps—no glue needed.
More complex cracks? See our detailed tips on irrigation pipe crack repair.
3. Test
PVC joints need a full 24-hour cure for max strength. When time’s up, reopen the valve slowly, watch the repair, and then run the zone at full pressure for five minutes. No drips? You’re golden.
4. Backfill & Restore
Pack a thin layer of soil under the pipe for support, then backfill in 3-inch lifts, tamping gently. Replace sod, water it well, and run a complete cycle to confirm everything operates normally.
When to DIY vs. Call a Pro
| Factor | DIY | Professional |
|---|---|---|
| Cost | $50–$100 materials | $150–$800+ (average $270) |
| Time | 4–6 hrs (includes cure) | 1–2 hrs on-site |
| Good For | Single, obvious breaks | Main lines, multiple leaks, valve issues |
| Tools | Basic homeowner kit | Acoustic locators, pullers, trenchers |
DIY shines when you can see the break and it’s on a lateral line. Tiny punctures or clean cracks rarely need more than a slip coupling.
Call a seasoned tech if the leak sits near your foundation, recurs in the same spot, or lives under a driveway or mature tree. Major supply-line failures demand gear most homeowners don’t own.
(Prices above are average internet estimates, not quotes from Best Cape Cod Irrigation.) For complex jobs or peace of mind, learn about our irrigation PVC pipe repair service.
Preventing Future Sprinkler Line Breaks
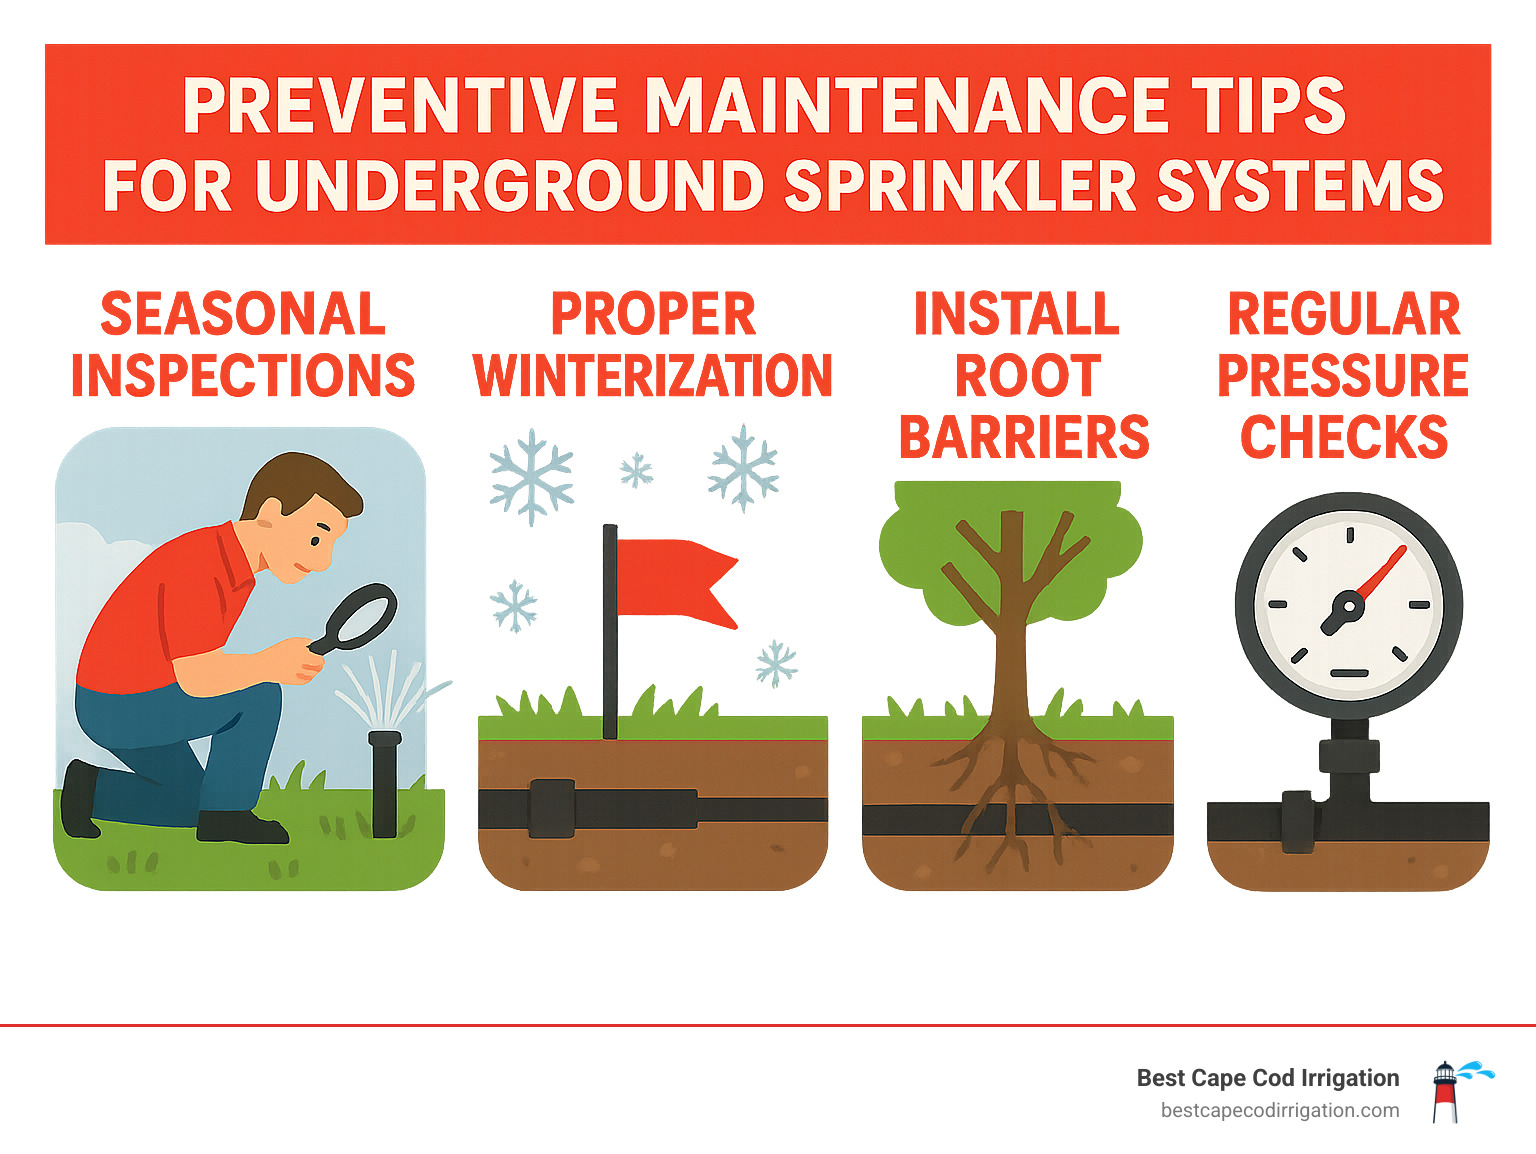
Save yourself a weekend of digging by building these habits into your yard care routine:
- Spring & fall walk-throughs: scan for sunken turf, lazy heads, or odd growth patterns.
- Professional winterization: compressed air clears every drop before Cape Cod’s freeze sets in.
- Flag lines before you dig: inexpensive irrigation flags stop accidental shovel strikes.
- Root barriers: install near thirsty trees to divert roots away from pipes.
- Mind the pressure: heads spraying farther than normal often mean the PSI is too high—add a regulator.
- Clean heads quarterly: debris causes puddling that weakens soil and stresses pipes.
A few preventive minutes each season beat an emergency repair underground sprinkler hose session every time.
Frequently Asked Questions about Sprinkler Hose Repair
Can a sprinkler system leak when it’s turned off?
Yes. If more than the lowest head in a zone drips, the zone valve is probably not sealing tight and may need service. Single-head puddling that stops after a minute is usually just residual drainage.
PVC vs. Poly pipe repairs?
- PVC: rigid, glued joints, 24-hour cure.
- Poly: flexible, barbed fittings + clamps, immediate test.
How deep are lines buried on Cape Cod?
Lateral lines sit 8–12 inches underground; main supply lines often go 12–18 inches to stay below the local frost depth. Always call 811 before any digging.
Your Partner for a Healthy Cape Cod Lawn
Fixing a leak yourself feels great, but tough jobs sometimes need a pro. Best Cape Cod Irrigation has delivered smart, water-wise systems from Bourne to Chatham for 25+ years. Ready for expert help or a seasonal tune-up? Schedule professional irrigation repairs & maintenance.
