Why DIY Sprinkler System Valve Repair Saves You Time and Money
Sprinkler system valve repair is often simpler than most Cape Cod homeowners think – and learning the basics can save you hundreds of dollars in service calls. When your irrigation zone won’t shut off or you notice mysterious wet patches in your yard, a faulty valve is usually the culprit.
Quick Fix Guide for Common Valve Problems:
1. Zone won’t turn on – Check solenoid wiring and clean debris from diaphragm
2. Zone won’t shut off – Replace torn diaphragm or clear clogged ports
3. Low water pressure – Clean internal screens and inspect for blockages
4. Leaking around valve – Tighten bonnet screws or replace worn seals
5. Complete failure – Replace entire valve assembly (typically $30-175 in parts)
Most sprinkler valve problems stem from Cape Cod’s sandy soil conditions, which allow grit and debris to clog internal components over time. Most valve repairs take just 45 minutes to 2 hours and require only basic hand tools. With sprinkler valves lasting 10-15 years on average, knowing how to maintain and repair them yourself can extend their lifespan while keeping your water bills in check.
Even minor valve issues can waste significant water – something especially important here on Cape Cod where water conservation and eco-friendly lawn care go hand in hand with maintaining beautiful landscapes.
Simple guide to sprinkler system valve repair:
– drip irrigation maintenance
– drip sprinkler repair
Why This Guide Matters
Living on Cape Cod means dealing with unique irrigation challenges. Our sandy soil drains quickly, requiring frequent watering, while our coastal climate brings salt air that can corrode valve components faster than inland locations. A leaking sprinkler valve can waste hundreds of gallons per day, turning eco-friendly lawn care into an environmental nightmare. By mastering basic valve repair, you’re protecting Cape Cod’s precious water resources while maintaining beautiful landscapes.
How Sprinkler Valves Work & Why They Fail
Think of your sprinkler valve as the traffic cop of your irrigation system – it decides when water flows and when it stops. Understanding how these devices work makes sprinkler system valve repair much less intimidating.
Every automatic sprinkler valve is essentially a water-powered switch controlled by electricity. When your irrigation timer says “go,” it sends a small electrical signal to the solenoid. The solenoid then relieves pressure in a chamber above the diaphragm – a flexible rubber disk that acts like a cork in a bottle.
Water pressure itself does the heavy lifting. Once that pressure chamber empties, the water flowing through the valve lifts the diaphragm up, opening the floodgates to your sprinklers. When the timer says “stop,” the solenoid closes, pressure builds back up above the diaphragm, and water flow stops.
You’ll encounter two main valve types on Cape Cod. Anti-siphon valves stick up above ground like little green mushrooms and must sit at least 6 inches higher than your tallest sprinkler head. They’re easy to find and fix, but Cape Cod’s occasional freeze can crack them if you’re not careful with winterization.
In-line valves hide underground in valve boxes, playing hide-and-seek when you need to service them. They’re tougher against weather but require a separate backflow preventer somewhere else in your system.
Valve Components 101
Every valve contains the same basic parts, whether it’s a $30 budget model or a fancy $175 commercial unit. The pressure chamber sits above the diaphragm like an upside-down cup, filling and emptying to control operation. A small spring helps push the diaphragm down against its seat for a tight seal.
The bonnet comes in two styles: screw-down types that twist off like a pickle jar, or bolt-down versions held by screws. Inside, you’ll find the diaphragm, spring, and various seals that keep everything watertight.
The flow control screw lets you fine-tune water pressure to each zone – super handy when you have both spray heads and rotors on the same system. The valve body itself, usually made from sturdy PVC, rarely fails. Most problems happen with the rubber and electrical bits inside.
Common Failure Triggers
Cape Cod’s unique environment creates specific challenges. Our sand and grit infiltrates everything – it’s like having tiny saboteurs constantly trying to jam your valve’s moving parts. Even a grain of sand caught under the diaphragm can prevent proper sealing.
Worn rubber components age faster here thanks to our salty coastal air. That diaphragm that should last 10-15 years might need replacing after just 5-7 years of Cape Cod living.
Faulty wiring becomes a real problem when our humid summers and wet springs conspire against electrical connections. Water finds its way into wire nuts and corrodes connections, leading to valves that work sometimes and don’t work other times.
Frozen cracks can surprise even seasoned Cape Cod residents. Our winters are milder than Boston’s, but that unexpected November freeze or late March cold snap can crack valve bodies or turn flexible diaphragms into brittle potato chips.
Identifying a Faulty Valve: Symptoms & Causes
Nothing ruins a peaceful Cape Cod morning quite like finding your sprinkler system has turned your lawn into a swamp overnight. The good news? Sprinkler system valve repair often starts with recognizing the warning signs early, before minor hiccups become major headaches.
Wet spots or mysterious puddles around your sprinkler heads when the system should be off are classic red flags. This usually means your valve’s diaphragm has a tear or debris is preventing it from sealing properly. You might notice the ground stays soggy in certain areas even days after watering, which is your valve’s way of crying for help.
When zones refuse to shut off, you’re dealing with a stubborn valve that’s stuck in the open position. This often happens when sand and grit from our Cape Cod soil work their way under the diaphragm, preventing it from sealing against its seat. Your water bill won’t thank you for ignoring this one.
Low water pressure across an entire zone tells a different story. Instead of a complete failure, you’re looking at a partially blocked valve where debris is restricting flow through internal screens. Your sprinkler heads might barely pop up, or they’ll produce weak, disappointing spray patterns that leave your lawn looking patchy.
Listen to your system too – overheating solenoids often announce themselves with unusual buzzing sounds or by feeling hot to the touch. This typically signals electrical problems or internal valve damage that needs immediate attention before it leads to complete failure.
Uneven watering patterns can be trickier to diagnose since they might seem like a sprinkler head problem at first. However, if multiple heads in the same zone are underperforming, the issue likely traces back to flow control problems or partially clogged valve internals affecting water distribution throughout the zone.
DIY Diagnostics Toolkit
Before you start tearing apart valves, having the right diagnostic tools saves time and prevents frustration. Think of these as your irrigation detective kit.
A multimeter becomes your electrical detective, helping you test whether solenoids are getting proper voltage and maintaining electrical continuity. Most residential solenoids need about 0.30 amps to open initially and 0.19 amps to stay open – numbers worth remembering when troubleshooting mysterious electrical gremlins.
Waterproof wire nuts might seem like small potatoes, but Cape Cod’s humid coastal air loves attacking electrical connections. Invest in silicone-filled wire nuts that actually repel moisture rather than just hoping regular ones will hold up.
A simple probe rod or thin metal rod helps you play underground treasure hunter when valve boxes have disappeared under years of soil and grass growth. You’re feeling for the hard plastic edges of buried valve boxes – it’s surprisingly satisfying when you finally locate that elusive valve.
For those really challenging situations where valves seem to have vanished into thin air, a valve locator or “chatter locator” can detect the electromagnetic signature of operating solenoids. These specialized tools aren’t cheap to buy, but many equipment rental companies carry them for those occasional tough cases.

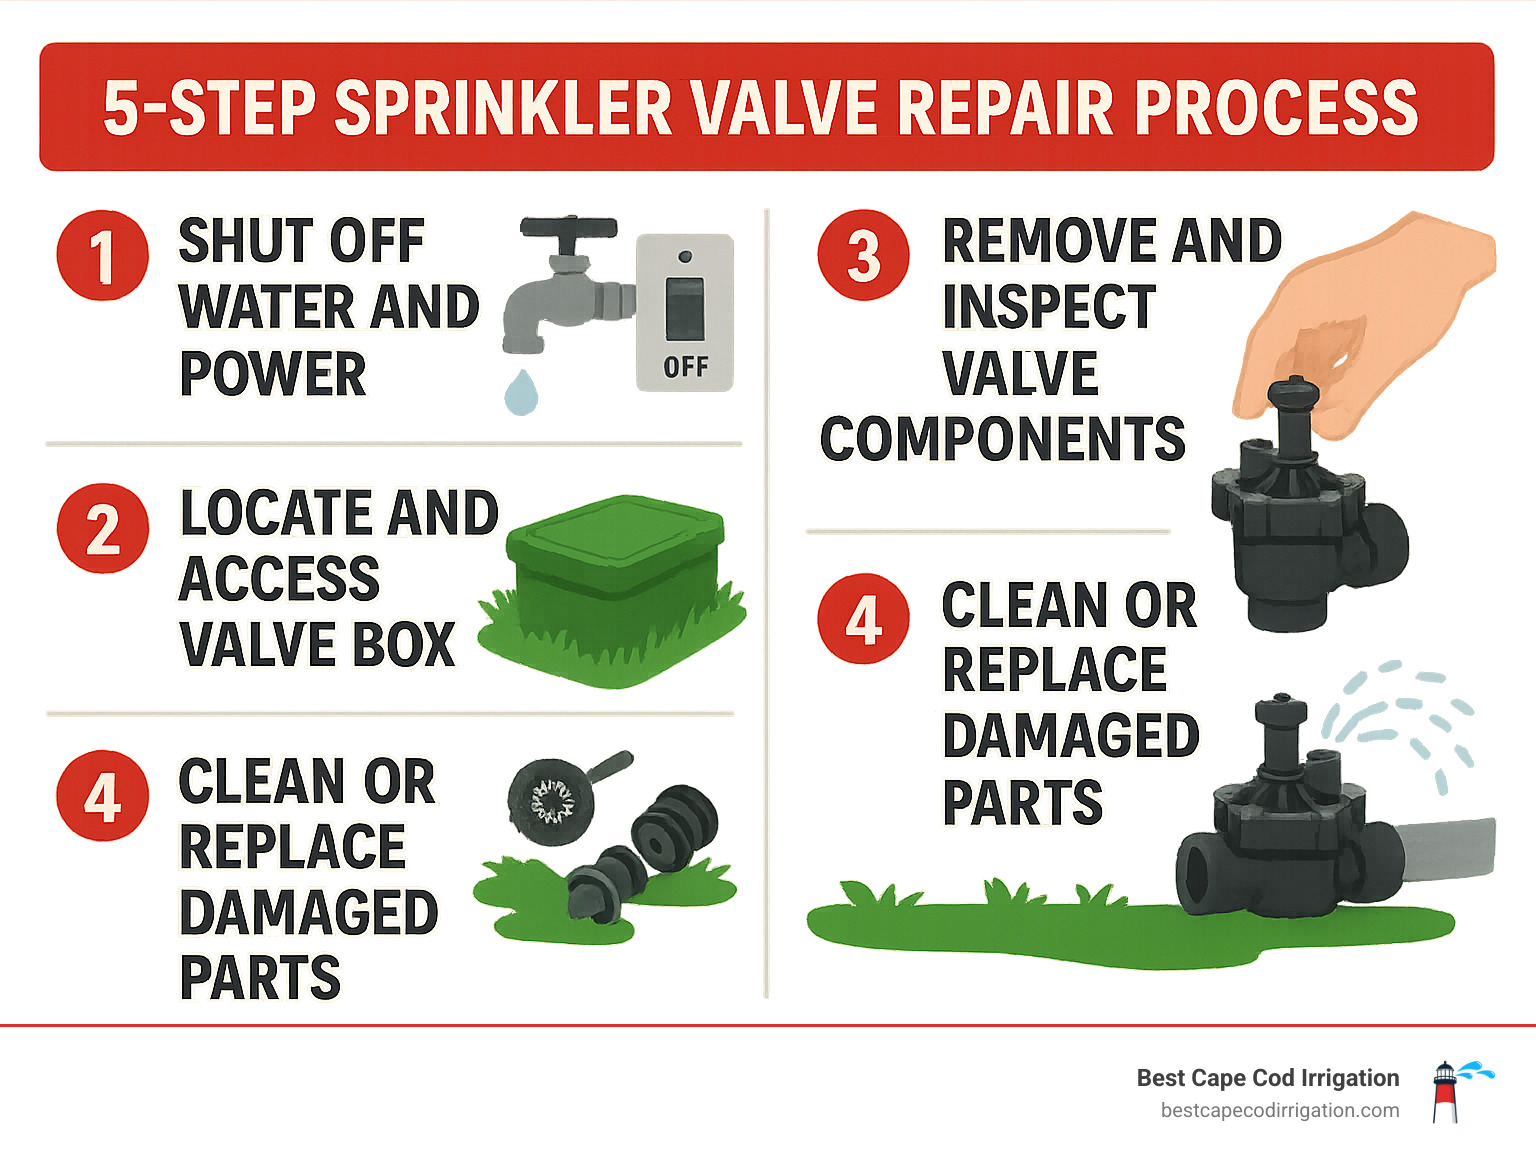
DIY Sprinkler System Valve Repair: Step-by-Step
Ready to tackle that troublesome valve? The actual sprinkler system valve repair process is more straightforward than most Cape Cod homeowners expect. Think of it like performing surgery – you need the right tools, a clean workspace, and patience.
Safety always comes first. Shut off power at the controller and turn off water at the main supply before you even think about touching that valve.
Sprinkler System Valve Repair Basics
Gather your tools before you start digging around. You’ll need a Phillips head screwdriver, pliers, garden trowel, bucket for bailing out standing water, clean rags, and your replacement parts. Don’t forget waterproof wire connectors – they’re absolutely essential in our humid Cape Cod climate.
Jar-top valves unscrew just like a mason jar lid, making them the easiest to service. Bolt-down valves require removing multiple screws, which can be tricky if they’ve corroded over time.
Before you start taking things apart, grab your smartphone and take a photo of the valve internals. This simple step can save you from the frustration of trying to remember how everything fits back together. Mark the diaphragm orientation with a permanent marker too – the diaphragm must go back exactly as it came out, or your valve won’t work properly.
Silicone grease is your friend for O-rings and threaded connections. Our salt air environment is tough on metal components, and a little lubrication goes a long way toward preventing future corrosion. If you’re more of a visual learner, the video library has excellent step-by-step demonstrations.
Cleaning & Rebuilding the Valve
Once you’ve got the valve opened up, systematic cleaning makes all the difference. Start by rinsing all ports with clean water to flush out Cape Cod’s notorious sand and grit. A small piece of flexible wire works wonders for clearing stubborn blockages in the valve body and bonnet passages.
Inspect the seat where the diaphragm creates its seal. Look for nicks, grooves, or rough spots that could prevent proper closure. Light scratches can sometimes be smoothed with fine sandpaper, but deeper damage usually means replacement time.
The diaphragm itself tells the whole story. Replace the diaphragm if you find any wrinkles, tears, or tiny holes – even pinprick-sized perforations can cause major operational headaches. Test that the diaphragm spring rebounds properly when compressed.
Here’s the good news: you can usually reuse the housing. The PVC valve body is built to last decades with proper maintenance. Clean all components thoroughly and inspect O-rings for cracks or hardening. Replace any worn seals – they’re cheap insurance against callbacks.
Full Valve Replacement
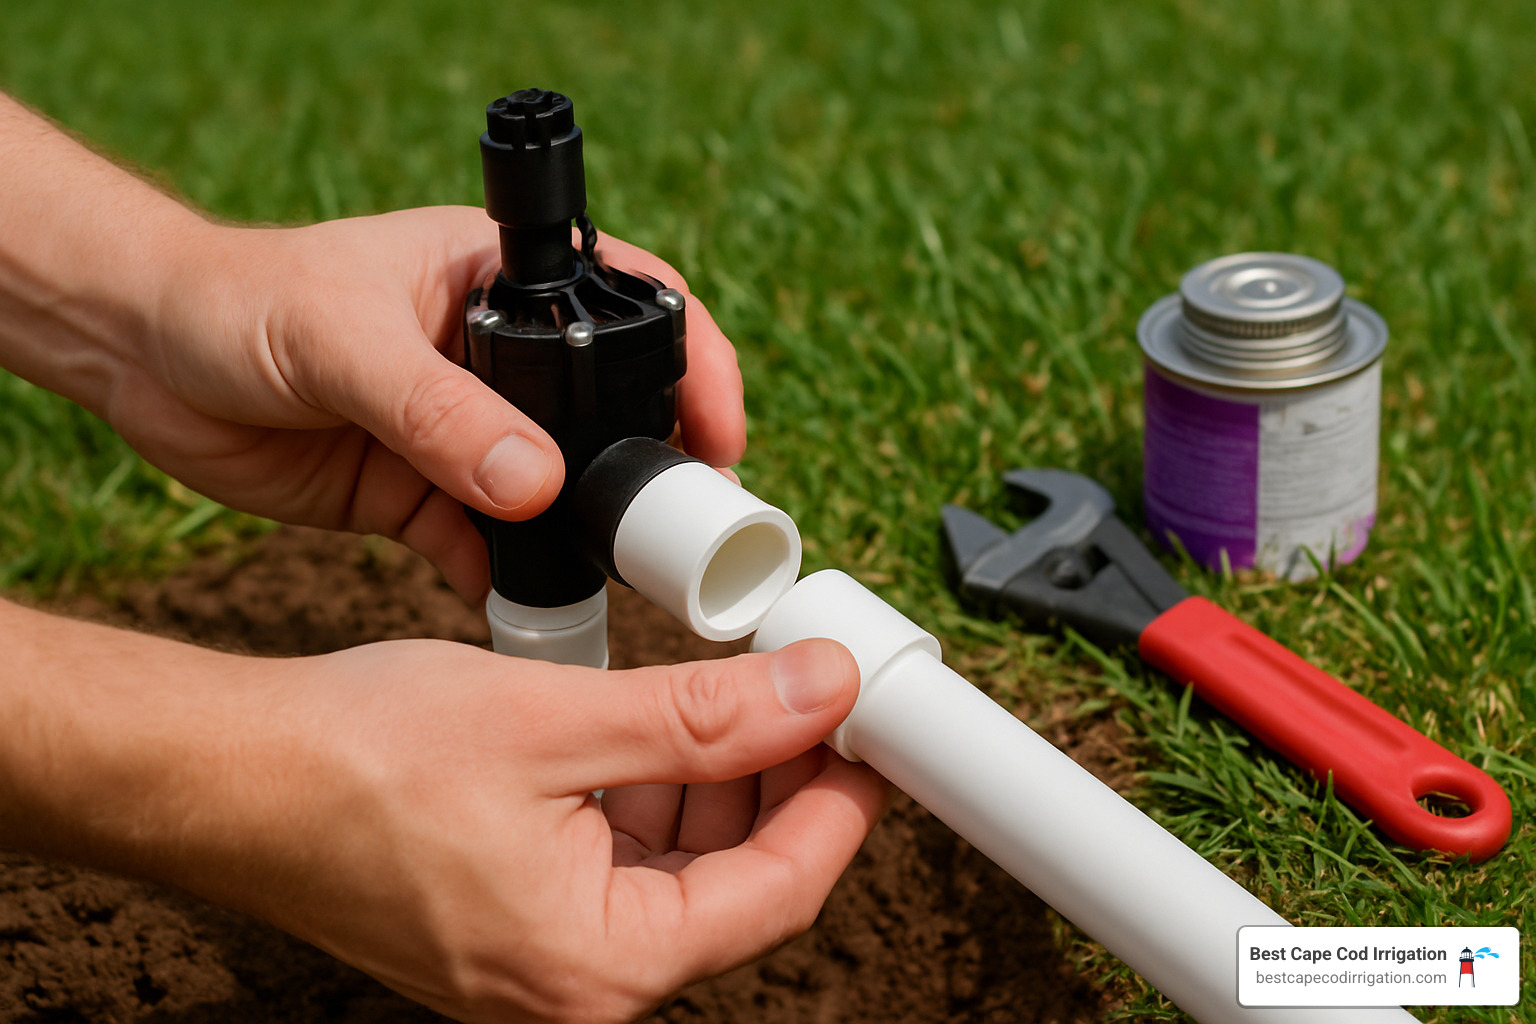
Sometimes cleaning just isn’t enough, and you need to replace the entire valve. Don’t panic – while this involves more plumbing work, it’s still within reach of most DIY enthusiasts.
Cut the PVC connections using a ratcheting pipe cutter rather than a hacksaw. Clean cuts prevent burrs that could create turbulence or catch debris downstream. Apply thread seal tape to all threaded fittings, wrapping in the direction of the threads.
Glue couplers require some urgency. Prime both surfaces, apply PVC cement, and work quickly – you have maybe 10-15 seconds to position everything correctly. Keep a paper towel handy to wipe excess moisture from inside pipes before gluing.
Wire the solenoid using waterproof connectors. Wire color doesn’t matter for solenoid connections because polarity isn’t important. Twist the wires together securely and protect them with silicone-filled wire nuts.
Allow proper cure time of at least 2 hours before pressurizing the system. Rushing this step is a great way to flood your valve box and start over.
Testing Your Sprinkler System Valve Repair
The moment of truth arrives when you test your handiwork. Use your controller’s manual run feature to activate each repaired zone individually. Listen for that satisfying “click” when the solenoid engages.
Perform a thorough leak check around all connections and the valve body itself. Look for drips, seepage, or wet spots that might indicate incomplete seals. Check flow balance across the entire zone too. All sprinkler heads should operate with similar pressure and coverage patterns.
Monitor the system through several complete cycles. Some problems only show up after multiple on/off operations, and it’s better to catch them now than during your next dinner party.
For a visual reference of proper valve disassembly, check out this helpful image: Unscrew top valve image.
Costs, Tools & When to Call a Pro
Let’s talk money – because nobody likes surprises when it comes to home repairs. Sprinkler system valve repair costs vary dramatically depending on whether you tackle it yourself or call in the pros.
Parts costs are surprisingly reasonable for most valve repairs. A basic diaphragm replacement kit runs just $5-$15, while a complete valve rebuild kit costs $15-$40. If you need an entirely new valve assembly, expect to spend $20-$100 for standard models, though specialty or high-end valves can push that up to $175.
The real eye-opener comes with professional labor costs. Based on internet research (not our actual service pricing), you’re looking at $50-$300 for most valve repairs. Here’s where it gets interesting – complex jobs involving multiple valves or difficult access can easily run three times that average, especially when you factor in diagnostic time and system-wide issues.
DIY time investment typically runs 1-2 hours for straightforward repairs, plus whatever time you spend hunting down parts at the hardware store. Don’t forget to factor in your learning curve if this is your first rodeo with valve repair.
You’ll need some basic tools to do the job right. A hand pump makes quick work of removing standing water from valve boxes. A ratcheting pipe cutter gives you clean, professional cuts if you need to replace piping. Safety goggles protect your eyes from splashing water and debris. And a multimeter becomes invaluable when you’re chasing electrical gremlins in solenoid circuits.

Is It Worth Fixing?
This is where experience really pays off. Minor leaks around valve bonnets or small tears in diaphragms are absolutely worth fixing yourself. You’re talking $10-$30 in parts to extend your valve’s life by several years – that’s a no-brainer.
But cracked valve bodies tell a different story. PVC cracks rarely stay fixed, and you’ll likely find yourself back in the same muddy valve box within a season or two. Better to bite the bullet and replace the whole unit.
Age matters more than you might think. Valves over 15 years old often develop multiple issues simultaneously. You might fix the diaphragm today, only to have the solenoid fail next month and the internal screens clog the month after that. Sometimes it’s smarter to start fresh.
Repeated failures within a short timeframe usually signal bigger problems lurking in your system. Maybe your water pressure is too high, or there’s a backflow issue, or your controller is sending wonky signals. These systemic problems need professional eyes.
When you’re dealing with complex repairs or system-wide mysteries, professional service makes sense. With 25+ years of Cape Cod experience, we’ve seen every weird valve problem our sandy soil and salt air can dish out. Sometimes what looks like a simple valve repair is actually a symptom of something much bigger. More info about repairs
Preventive Maintenance & Advanced Troubleshooting
Regular maintenance prevents most valve failures and extends system life significantly. Here’s your year-round maintenance calendar:
Spring startup should include flushing all lines before valve installation to remove debris accumulated during winter. Test each zone manually and check for winter damage.
Mid-season maintenance involves cleaning valve boxes of debris and inspecting for leaks or performance issues. This is when most problems first become apparent.
Annual winterization protects valves from freeze damage. Even Cape Cod’s mild winters can cause problems if systems aren’t properly drained.
Filter installation upstream of valves prevents debris from reaching internal components. This simple addition can double valve lifespan in sandy soil conditions.
Waterproof connectors should be used for all electrical connections. Replace any corroded wire nuts during annual inspections.
Pro-Level Tips
Advanced maintenance techniques can significantly improve system reliability:
Inline filters installed before valve manifolds catch debris before it reaches sensitive components. 100-mesh filters work well for most applications.
Master valve use provides an additional layer of protection by shutting off water supply when no zones are active. This prevents damage from stuck-open zone valves.
Zone balancing ensures each zone receives appropriate pressure and flow. Use flow control adjustments to fine-tune performance rather than relying solely on sprinkler head adjustments.
Smart controller integration can provide alerts for unusual water usage patterns that might indicate valve problems.
Frequently Asked Questions about Sprinkler System Valve Repair
Why does my valve keep running when the system is off?
A valve that won’t shut off is one of the most frustrating sprinkler system valve repair issues – and unfortunately, one of the most common here on Cape Cod. The culprit is almost always a torn or damaged diaphragm that can’t seal properly against the valve seat.
Think of it like trying to close a door with a warped frame – no matter how hard you push, it just won’t seal tight. When debris gets stuck under the diaphragm or the rubber develops even tiny tears, water keeps flowing even when your controller shows the zone as “off.”
Before you start taking things apart, try using the bleed screw if your valve has one. Sometimes a quick flush can dislodge sand or grit that’s preventing proper closure. If that doesn’t work, you’ll need to remove the bonnet and inspect the diaphragm for damage.
Cape Cod’s sandy soil makes this problem especially common – those tiny particles work their way into valve internals and act like sandpaper on rubber components. The good news? A new diaphragm typically costs under $15 and takes about 30 minutes to install.
How do I locate a buried valve without a locator tool?
Playing “find the buried valve” can feel like an expensive game of hide-and-seek, but there are several tricks that work surprisingly well. Start by following the wire path from where it leaves your controller and enters the ground. Valve boxes are usually positioned along this route, so you’re essentially following breadcrumbs.
Grab a thin metal rod or screwdriver and start probing the soil systematically. You’ll know you’ve found a valve box when you hit something hard and plastic rather than soft soil. The technique takes patience, but it works.
Look for visual clues in your landscape too. Valve boxes often create slight depressions in the lawn over time, or you might notice areas where the grass grows differently due to changed drainage patterns. Check near the beginning of each irrigation zone – valves are typically located close to the areas they serve rather than randomly scattered around your property.
If you’re still struggling, consider that many valve boxes end up buried under years of mulch, leaves, and soil buildup. Sometimes the “buried” box is only 2-3 inches down and just needs a little excavation around likely spots.
Should I replace the solenoid every time I change the diaphragm?
This is one of those “it depends” questions that comes up in almost every sprinkler system valve repair discussion. The short answer is no, you don’t need to replace the solenoid automatically, but there are good reasons why many people choose to do it anyway.
Solenoids can last for decades if they’re working properly. Test yours with a multimeter – it should show continuity and draw the correct amperage (typically 0.30 amps to open the valve and 0.19 amps to hold it open). If the electrical readings check out and the solenoid operates smoothly when you activate it manually, you can definitely reuse it.
However, here’s the practical reality: solenoid and diaphragm failures often go hand-in-hand. When a solenoid starts operating irregularly, it puts extra stress on the diaphragm. Conversely, a damaged diaphragm can cause the solenoid to work harder than designed, leading to premature electrical failure.
Many experienced repair folks follow the “while I’m in there” philosophy – if you’re already doing the work and have the valve apart, spending an extra $20-30 on a new solenoid can prevent another repair call six months down the road. It’s like changing your oil filter when you change the oil – not absolutely necessary every time, but usually smart preventive maintenance.
Conclusion & Next Steps
Congratulations! You’ve now got the knowledge and confidence to tackle most sprinkler system valve repair projects around your Cape Cod home. What started as mysterious wet spots or zones that wouldn’t cooperate can now be diagnosed and fixed with your own two hands.
The beauty of understanding valve repair goes beyond just saving money (though that’s certainly nice). You’re now equipped to keep your irrigation system running smoothly, which means your lawn stays healthy while you’re doing your part to conserve Cape Cod’s precious water resources. Every properly functioning valve is a small victory for both your wallet and our shared environment.
Most valve problems really do boil down to debris or worn rubber components – nothing too scary once you know what to look for. The key is catching issues early through regular maintenance rather than waiting for complete failures. A $15 diaphragm replacement in spring beats a $200 emergency repair call in the middle of summer.
Preventive maintenance is your best friend when it comes to irrigation systems. Those few minutes spent checking valve boxes and testing zones each season can prevent most of the headaches that send homeowners scrambling for professional help. Think of it as giving your system a quick health checkup.
Of course, there’s no shame in knowing when to call for backup. Complex electrical problems, multiple valve failures happening simultaneously, or issues with your main water line are all situations where professional expertise pays for itself. Some problems require specialized tools or years of experience to diagnose correctly.
That’s where our team comes in. After more than 25 years of working specifically with Cape Cod’s unique conditions – from our sandy soil to our salt air – we’ve seen just about every irrigation challenge our region can throw at a system. We know which valve brands hold up best in our climate and which installation techniques prevent the most common failures.
Whether you’re interested in upgrading to water-saving smart technology or need professional assistance with a repair that’s beyond your comfort zone, we’re here to help. Our goal is keeping your Cape Cod landscape beautiful and healthy while making sure your irrigation system runs efficiently year after year.
Ready to take the next step? Schedule service with our experienced team, and we’ll help you create a maintenance plan that keeps your system running smoothly for years to come.
