Saving Water, Time, and Money with Drip Sprinkler Repair
Drip sprinkler repair is a straightforward task that most Cape Cod homeowners can handle themselves with the right tools and knowledge. Here’s a quick guide to fixing common drip irrigation issues:
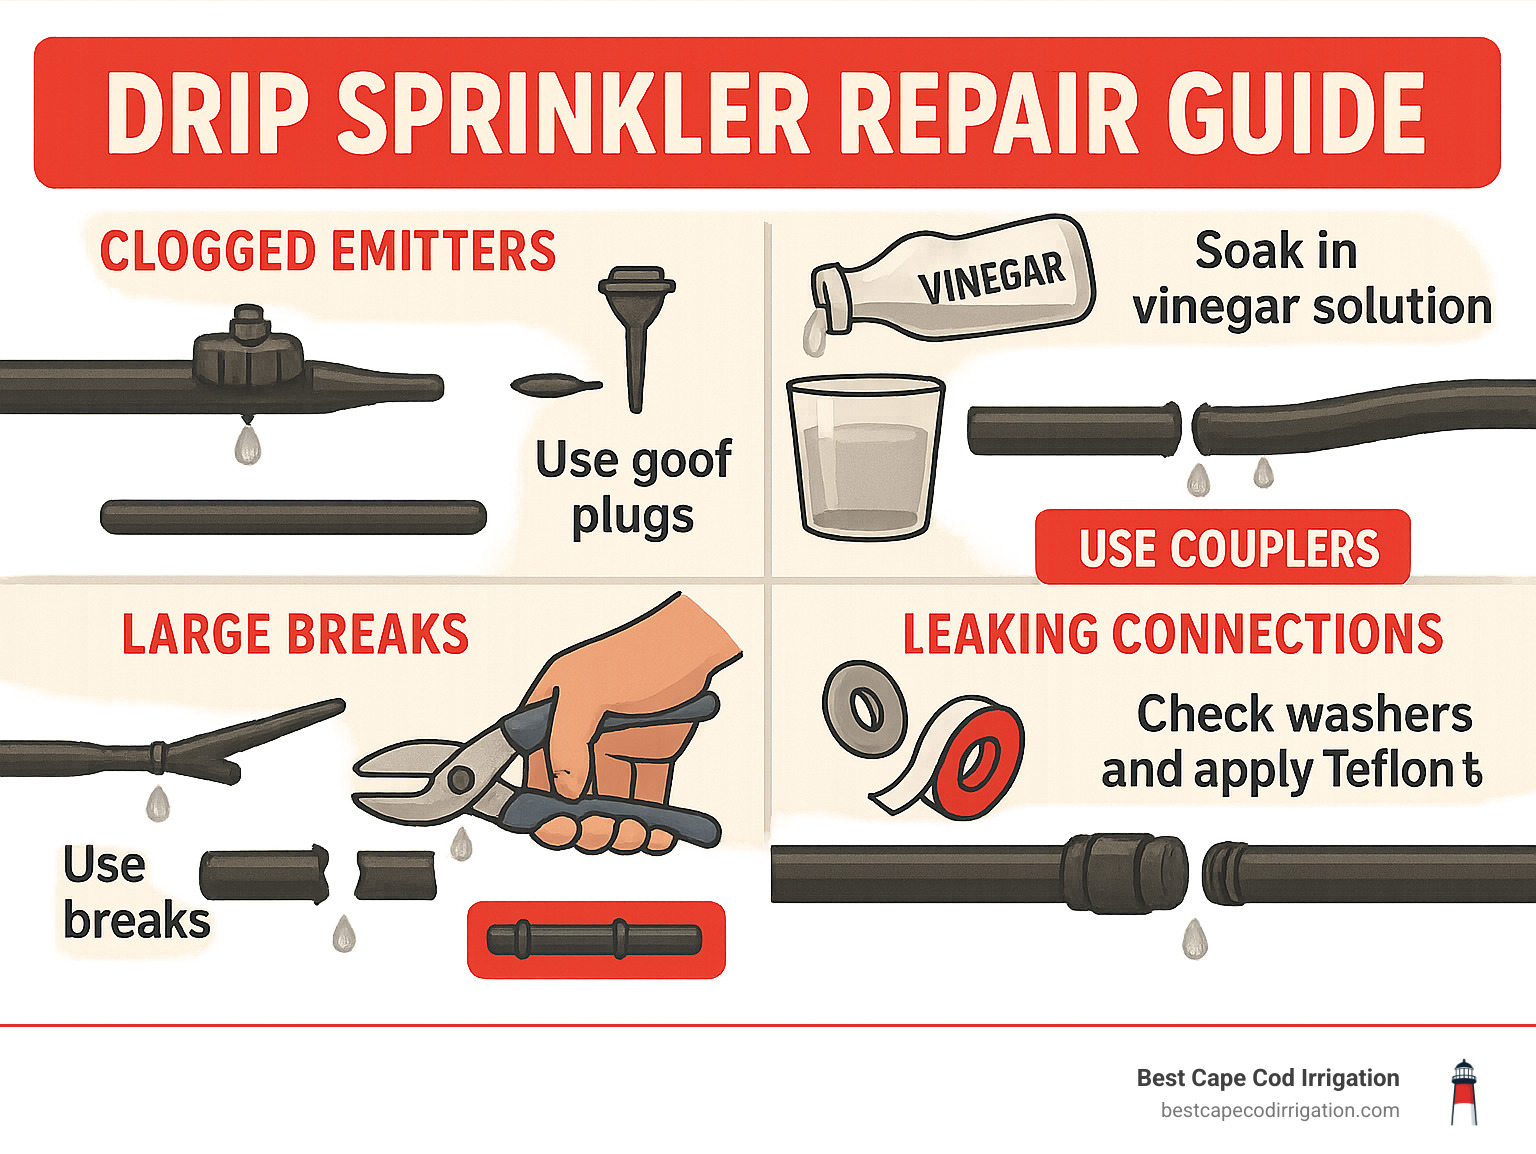
- Small holes/punctures: Insert a goof plug or use a small coupler
- Large breaks: Cut out damaged section and reconnect with a barbed coupler
- Clogged emitters: Soak in 1:1 vinegar-water solution or replace
- Leaking connections: Check for damaged washers, apply Teflon tape on pipe threads
- Pressure issues: Inspect for kinks, clogs, or install a pressure regulator (20-30 PSI ideal)
Drip irrigation systems are fantastic for conserving water and ensuring your plants receive precisely the moisture they need—especially important for Cape Cod’s sandy soils and semi-arid summer spells. But like any system, they occasionally need maintenance.
With regular maintenance and timely repairs, your drip irrigation system can provide years of efficient watering, reducing your water bills by up to 50% compared to traditional sprinklers.
Common Problems & Early Warning Signs
Do you know that feeling when you’re strolling through your garden and suddenly step into an unexpected puddle? Or when you notice some plants thriving while others look parched? These are classic signs that your drip irrigation system needs some TLC.
After helping Cape Cod gardeners for over 25 years, we’ve seen every drip sprinkler repair scenario imaginable. The most common culprits behind irrigation woes include clogged emitters from our region’s mineral-rich water, pin-hole leaks from sun damage, and tubing cuts from enthusiastic gardening or curious critters. We’ve also seen plenty of pressure spikes that can cause emitters to pop out, and uneven watering that leaves some plants swimming while others beg for a drink.
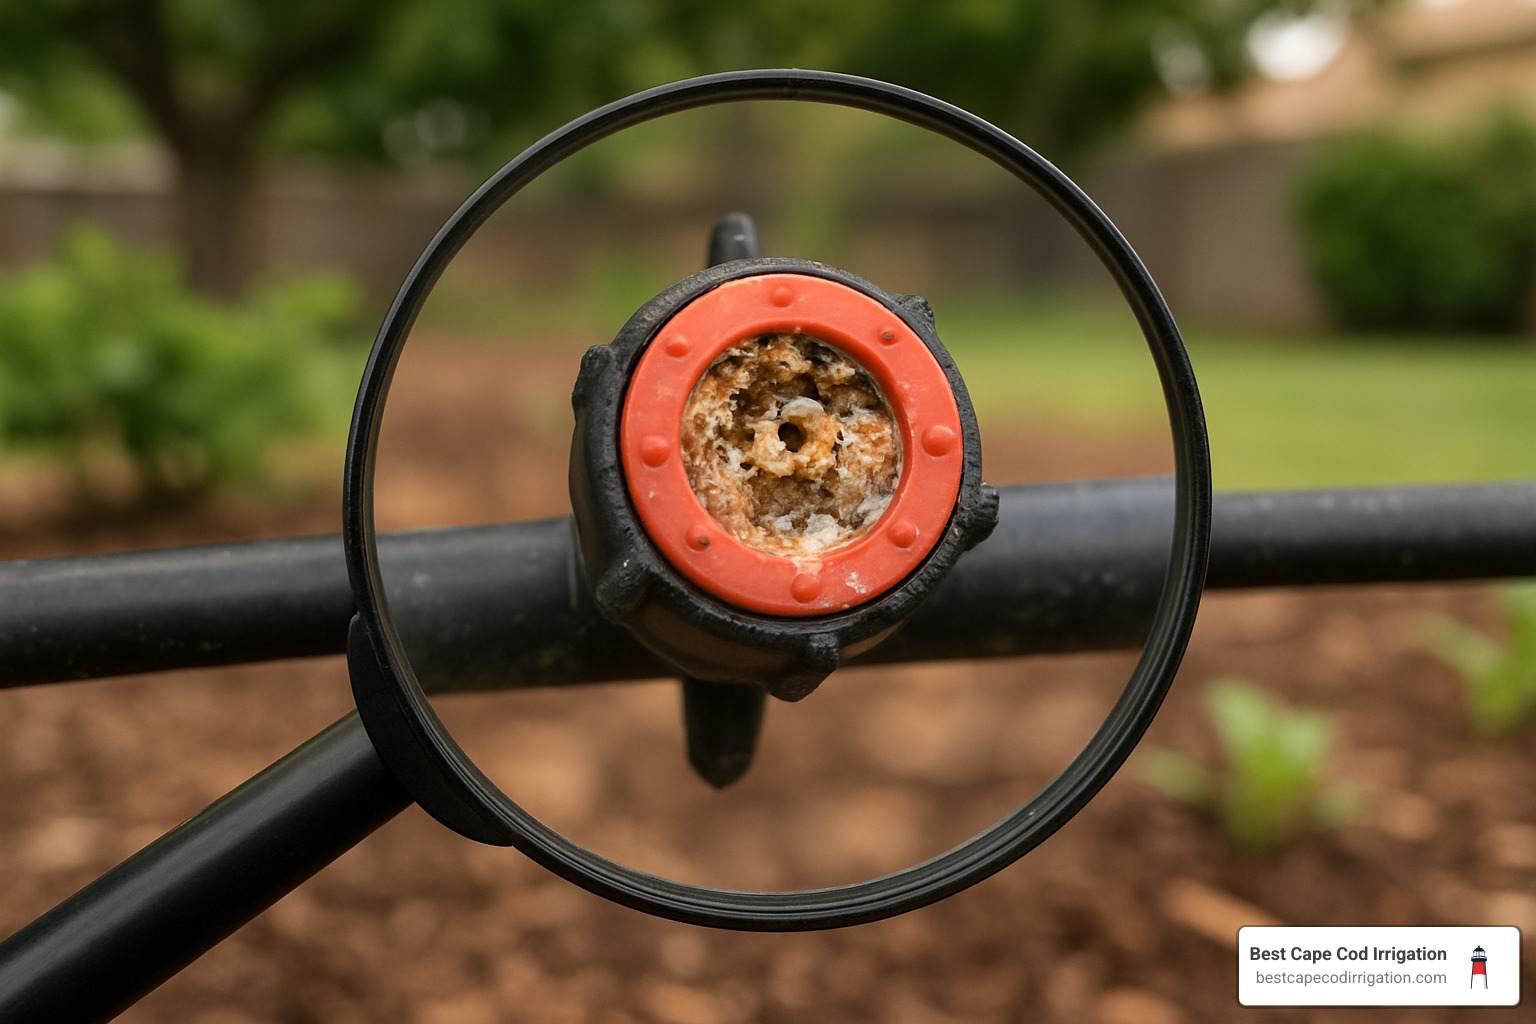
How to Identify a Faulty Emitter
Emitters are tiny but mighty components that can make or break your garden’s health. A properly functioning emitter should deliver a consistent drip. If you notice low flow or an irregular dribbling pattern instead of that steady drip-drip-drip, you’ve likely got a problem. One simple test we recommend is the water-vinegar soak test – just remove suspect emitters, soak them in a 50/50 solution of water and vinegar for a few hours, and see if that dissolves the mineral buildup.
Spotting Tubing Damage Before It Floods Your Beds
The best drip sprinkler repair is the one you make before a small issue becomes a garden disaster. Look for a moist soil line when the rest of your garden is dry – this telltale streak often reveals an underground leak. Sometimes you can actually hear a subtle audible hiss from pressurized water escaping a damaged line.
Early birds catch more than worms – they also catch irrigation leaks! A dawn inspection walk is ideal because the contrast between wet and dry areas is most visible in the early morning light. And for suspected-but-not-confirmed leaks, try our dye test trick: add a few drops of food coloring to your irrigation water and watch for colored water appearing where it shouldn’t.
DIY Toolkit & Materials Checklist for Drip Sprinkler Repair
Heading out to tackle a drip sprinkler repair without the right tools is like trying to cook dinner without ingredients—frustrating and ultimately fruitless! Here’s what you’ll need in your irrigation repair arsenal:
- Cutting tools: Sharp tubing cutter or good pruning shears for clean cuts
- Connectors: Barbed couplers for joining tubing sections and goof plugs for sealing small holes
- Pressure management: Quality pressure regulator (20-30 PSI) and clean filter screen
- Sealing materials: Teflon tape for threaded connections (not for hose threads)
- Replacement parts: Spare emitters in various flow rates (0.5, 1.0, and 2.0 GPH) and replacement tubing
- Safety gear: Gloves and safety glasses for protection
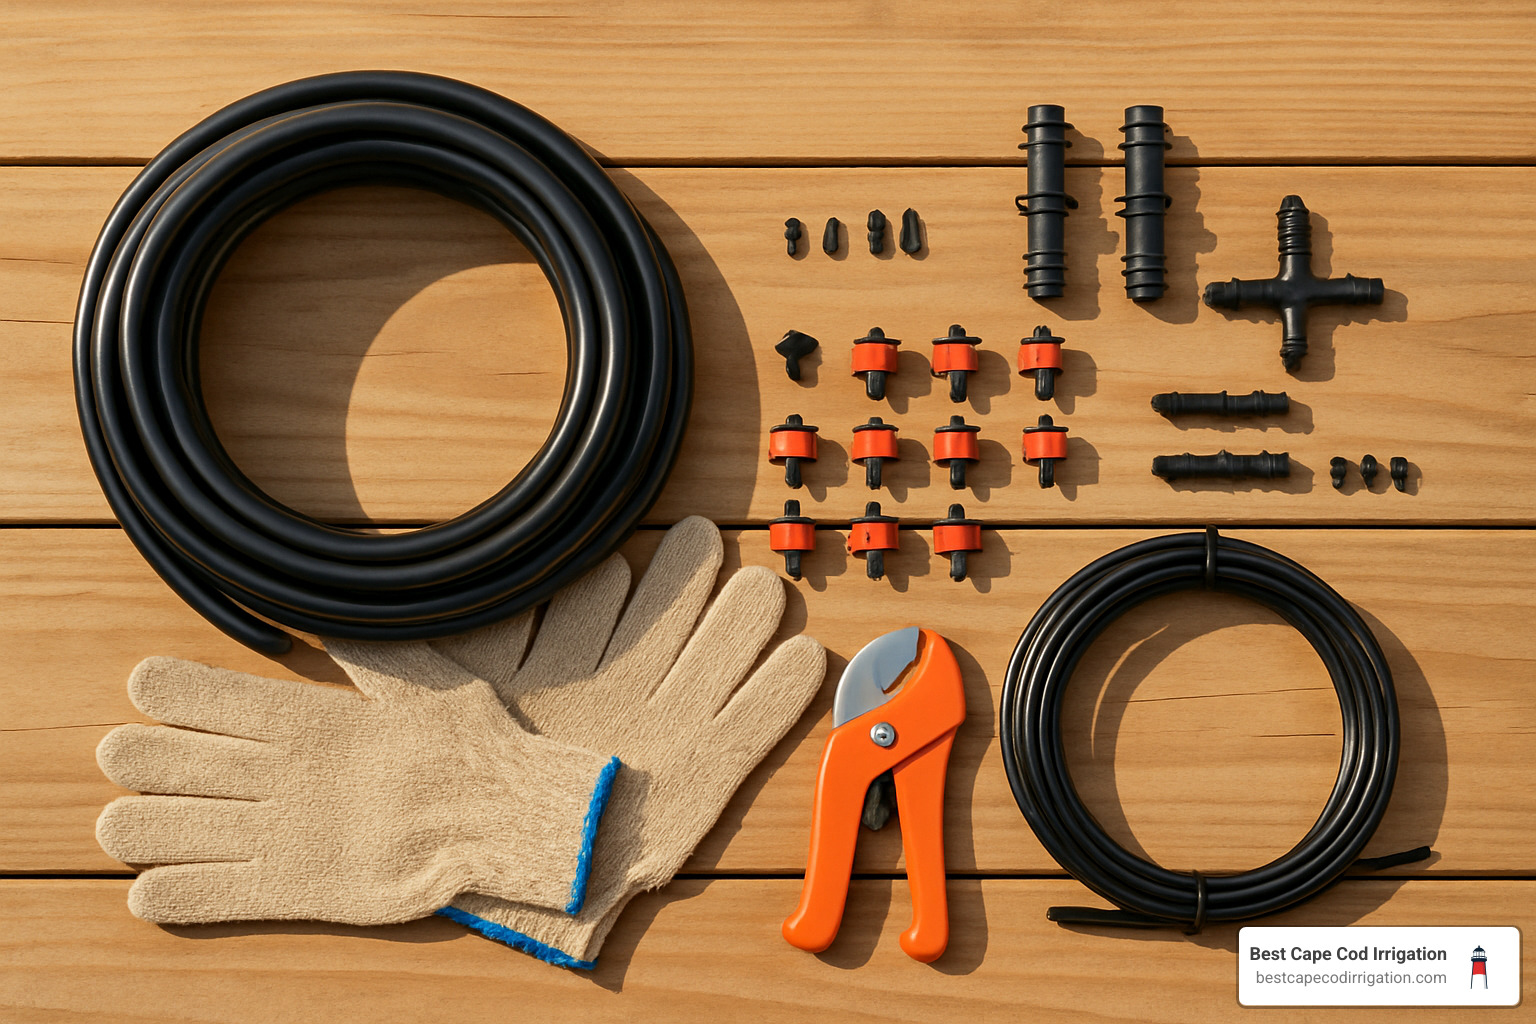
The beauty of drip sprinkler repair is that most fixes take under 10 minutes once you have these basics on hand. For ultimate convenience, consider investing in a comprehensive kit like the Rain Bird DRIPPAILQ, which packs over 100 parts to handle virtually any repair scenario.
At Best Cape Cod Irrigation, we’ve learned through our 25 years of experience that having these supplies ready means you can address problems immediately—rather than watching your beloved plants wilt while waiting for parts to arrive. The professional-grade components we stock significantly outperform those typically found at big box stores, offering longevity that withstands our unique coastal climate.
Want to learn more about the right fittings for your system? Check out barbed coupler basics or explore our Smart Irrigation Solutions for water-efficient options perfectly suited to Cape Cod gardens.
Step-by-Step Drip Sprinkler Repair Guide
Ready to tackle that drip sprinkler repair yourself? With a methodical approach, you’ll have your system flowing perfectly in no time.
- Shut off water completely to prevent unexpected showers
- Run a system check to pinpoint problem areas, then shut off again
- Carefully excavate around damaged areas using a garden trowel
- Make clean cuts with sharp tubing cutters
- Install appropriate fittings based on the type of damage
- Turn water on slowly to check for leaks
- Flush the system to clear out any debris
- Verify consistent pressure throughout your system
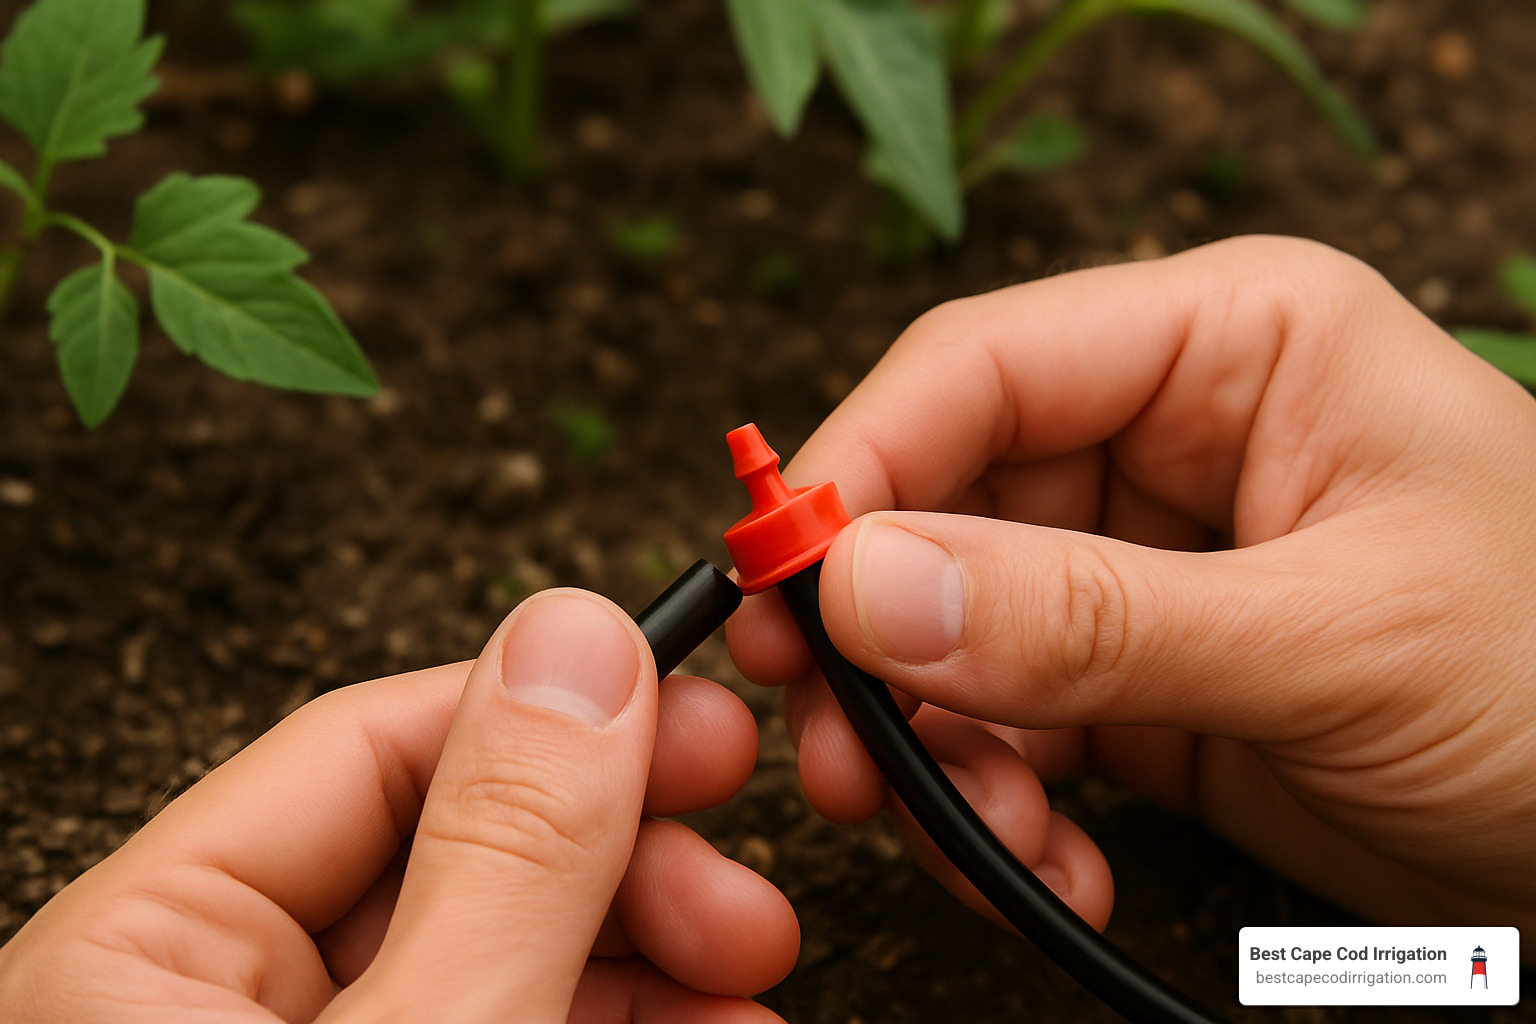
Small Hole or Puncture Drip Sprinkler Repair
For pinhole-sized punctures, simply insert a goof plug directly into the hole with a firm twist. For slightly larger holes (but still under 2 inches long), cut out the damaged section entirely and use a single barbed coupler to join the healthy tubing back together.

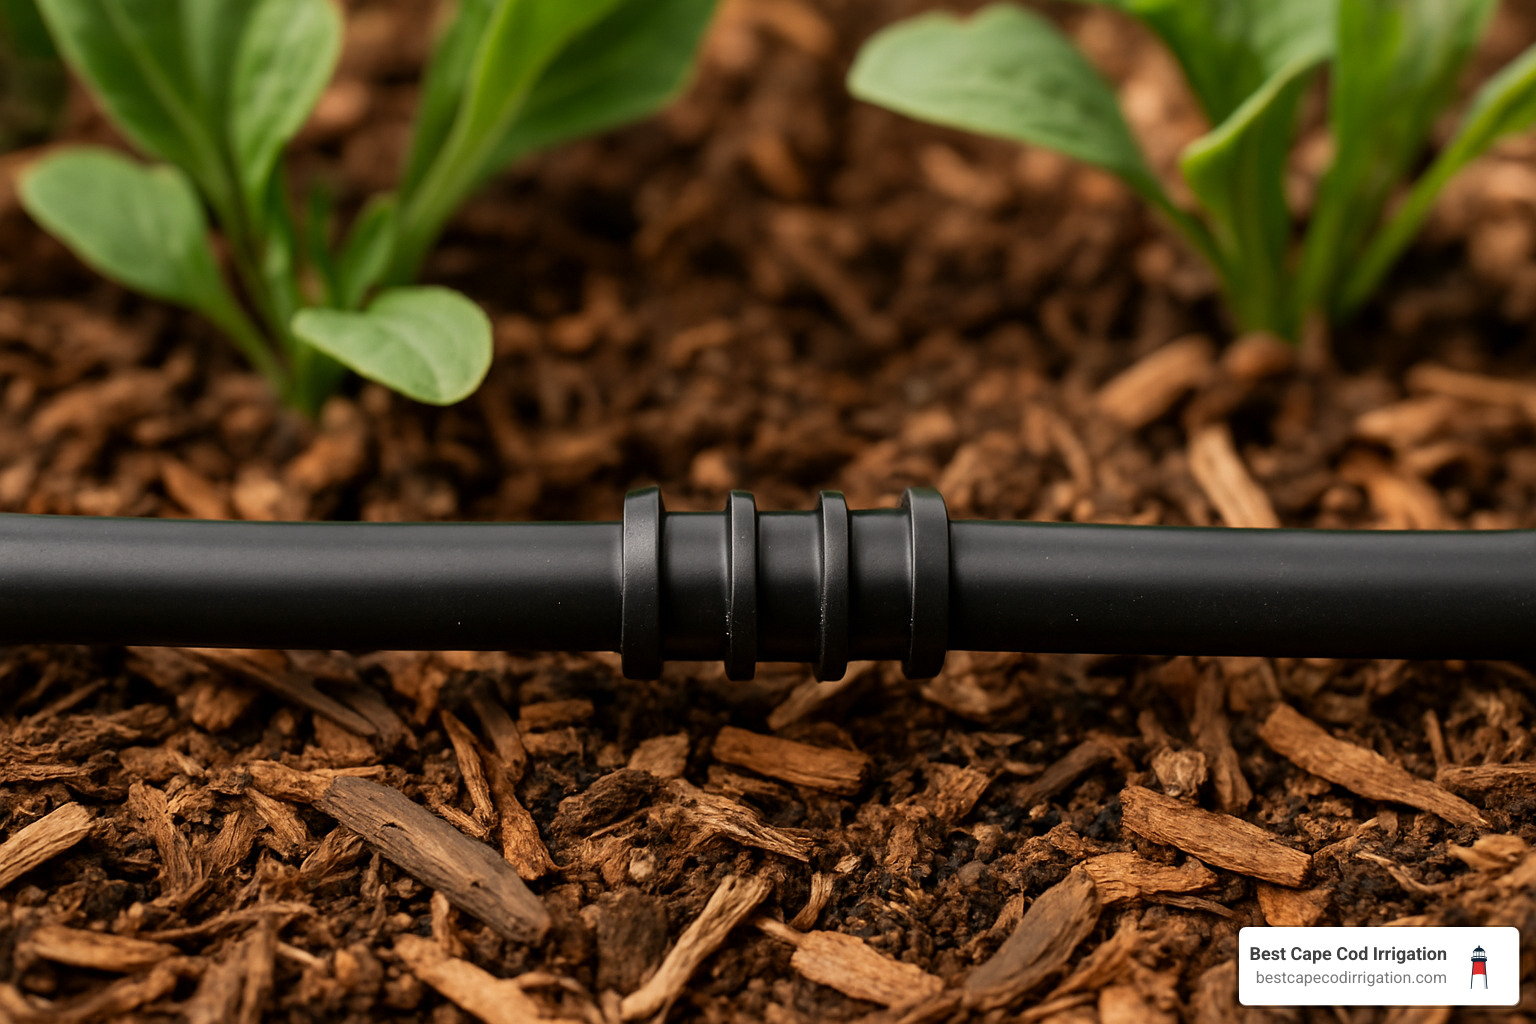
Large Break or Cut Drip Sprinkler Repair
For more significant damage, cut out the entire damaged section using clean, straight cuts. Measure and cut a replacement piece of tubing slightly longer than what you removed, then use two couplers—one for each end of your replacement section.
Clogged or Damaged Emitter Replacement
Before replacing clogged emitters, try cleaning them: remove the emitter, soak it in equal parts water and white vinegar for about 30 minutes, then gently scrub with an old toothbrush. If cleaning doesn’t work, simply remove the old emitter and insert a new one into the same hole.
Fixing Leaking Connections
For hose thread fittings (with rounded threads), check for deteriorated rubber washers and replace any that look cracked or compressed. For pipe thread fittings (NPT, with tapered threads), apply 3-4 wraps of Teflon tape in a clockwise direction. Hand-tight is sufficient for plastic fittings—over-tightening leads to cracks!
For more detailed information about irrigation repairs and maintenance, visit our irrigation repairs & maintenance page.
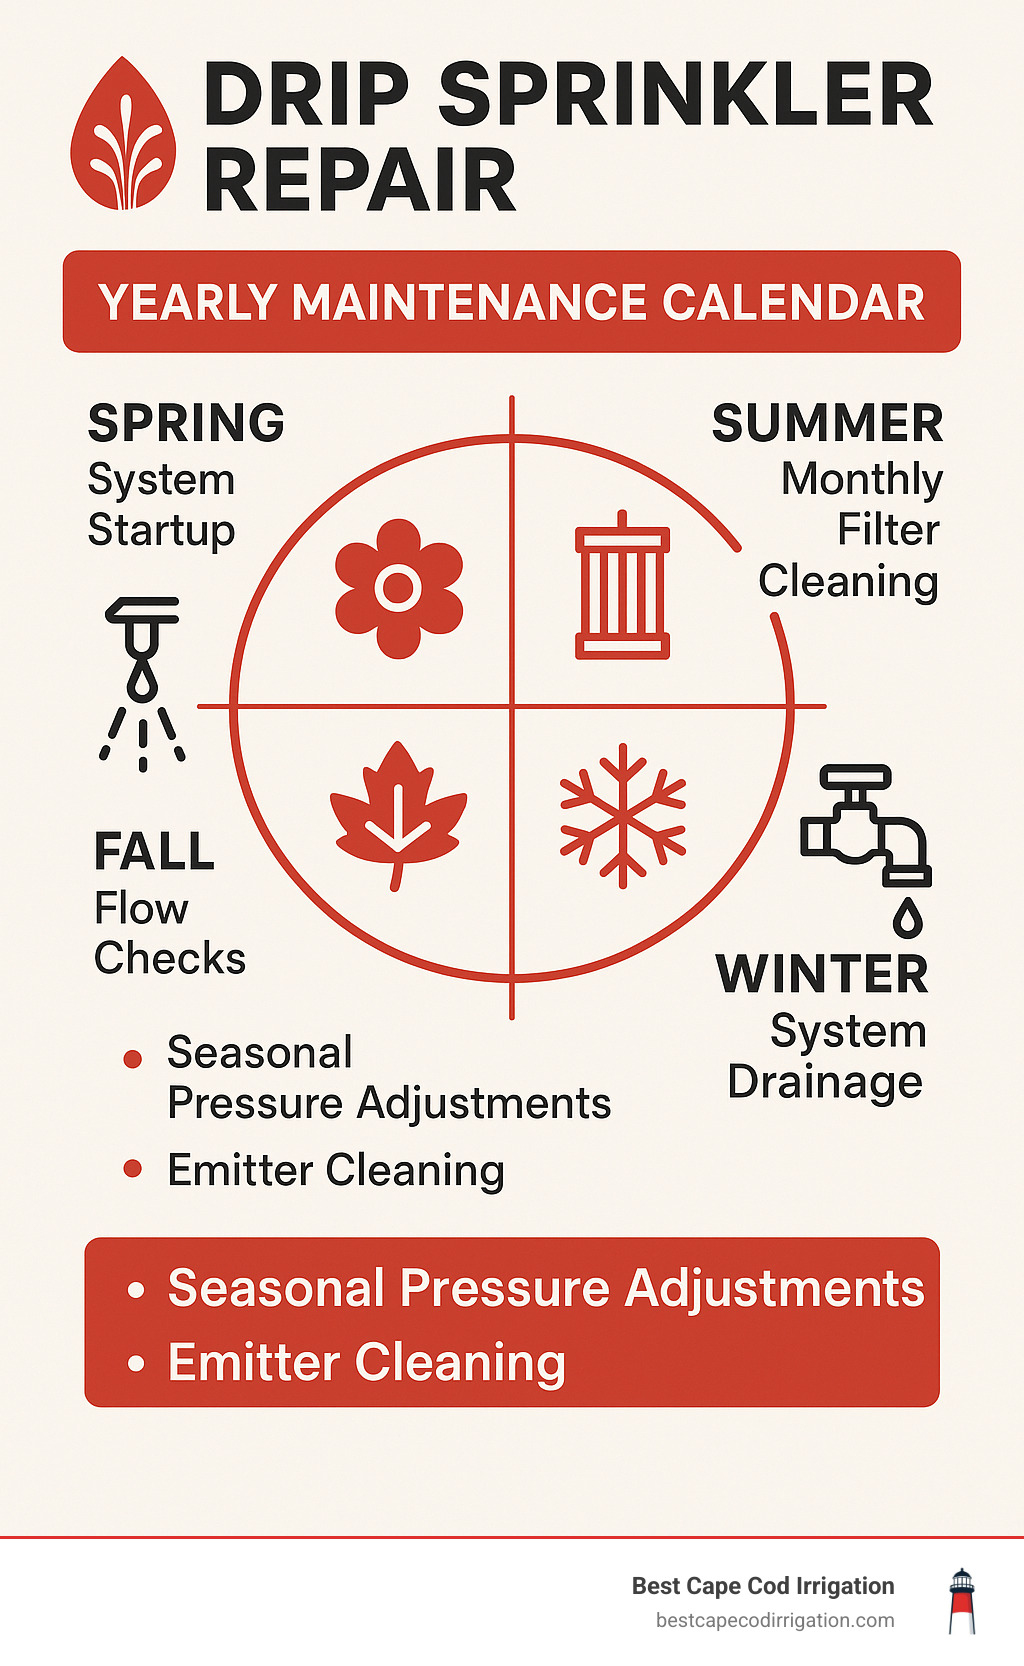
Maintenance, Troubleshooting & System Expansion
Taking care of your drip irrigation system is a bit like maintaining a car—regular attention prevents most problems before they start. Our experience shows that consistent maintenance prevents up to 80% of common drip system failures. Your seasonal checklist should include:
- Monthly flushing: Open end caps and let water run for 30 seconds to clear debris
- Filter cleaning: Rinse every 2-4 weeks during summer
- Pressure regulator check: Verify proper operation each season
- Timer adjustments: Adapt to seasonal weather changes
- Winterization: Drain system before first freeze
Diagnosing Pressure Loss & Uneven Water
Uneven watering often stems from pressure issues with several common culprits:
- Kinked tubing: Walk your lines and straighten any pinched sections
- Clogged filter: Make this your first check when troubleshooting
- Oversized zones: Too many emitters on one line can cause pressure drops
- Failing pressure regulator: Replace if you notice wild pressure swings
- Inline gauge test: Use temporary gauges to verify 20-30 PSI pressure
Expanding After a Repair Without Re-trenching
After completing a drip sprinkler repair, consider some painless expansion options:
- Self-dispensing 1/4″ tubing: Easily reach new areas without digging trenches
- Tees & stakes: Create branch lines to reach new planting areas
- Manifold conversions: Convert existing sprinkler heads to drip zones
- Capped lines: Install in areas planned for future plantings
At Best Cape Cod Irrigation, we typically recommend installing mainlines about 25% larger than your current needs to accommodate future expansion. Learn more about our approach to Irrigation System Installation on our website.
Average Costs, Safety Tips & When to Call a Pro
Before starting any drip sprinkler repair project, remember these safety essentials:
- Always wear gloves and safety glasses
- Properly shut off your water supply
- Call 811 before digging to avoid utility lines
- Work in good daylight for better visibility
When it comes to costs, drip sprinkler repair is typically quite budget-friendly. Based on internet estimates (not our actual pricing at Best Cape Cod Irrigation), most DIY repairs will cost between $10-$40 for parts. If you’d rather leave it to the professionals, internet estimates suggest basic service calls typically range from $90-$120, while more complex repairs or system redesigns can range anywhere from $300 at the low end to $900+ for extensive work.
Many homeowners ask about repair versus replacement. Here’s a quick comparison:
| Factor | Simple Repair | Full Replacement |
|---|---|---|
| Typical Longevity | 2-5 years | 10-15 years |
| Cost Range | $10-$40 DIY $90-$300+ Professional |
$500-$2,000+ |
| Best When | Damage is isolated | Multiple failures occur |
While most drip sprinkler repairs are manageable for the average homeowner, there are times when calling in experts makes sense:
- Electrical issues in timers or controllers
- Repairs involving main water lines or backflow preventers
- Persistent pressure problems that are difficult to diagnose
- Multiple failing zones indicating potential system-wide issues
With 25 years of experience in Cape Cod’s unique conditions, we can help you decide whether continued repairs or a system redesign makes more financial sense in the long run. Quality components installed correctly save money over time.
Frequently Asked Questions about Drip Sprinkler Repair
How often should I flush and clean emitters?
Here on Cape Cod, where our mineral-rich water leaves deposits, regular flushing is essential. We recommend a monthly system flush during growing season—simply open those end caps and let water rush through for about a minute.
As for emitters, they’ll usually need cleaning or replacement once or twice per season. If you’re in an area with particularly hard water, you might need more frequent maintenance. A quick visual inspection when you’re in your garden can prevent finding crispy plants later!
What PSI should my drip system run at?
The sweet spot for most drip systems falls between 20-30 PSI. When pressure climbs above 30 PSI, components can fail prematurely or even blow apart. Too little pressure, and your plants at the end of the line might be thirsty while others closer to the source drink happily.
If your household water pressure exceeds 40 PSI (which isn’t uncommon here on the Cape), a pressure regulator is an absolute must-have—consider it cheap insurance for your entire system.
Can I winterize without compressed air?
While compressed air provides the most thorough winterization, you can take a DIY approach if necessary:
- Shut off your water supply
- Open all drain valves and end caps throughout the system
- Remove and drain your main filter
- Disconnect any above-ground components that could trap water
- Add insulation to any exposed parts that can’t be removed or fully drained
That said, water hides in the strangest places in irrigation systems. A single tablespoon left behind can crack components when it freezes and expands. For complete protection, especially with our unpredictable freeze-thaw cycles, a professional blow-out service is the safest investment.
Conclusion
There’s something deeply satisfying about fixing your own drip sprinkler repair issues. As Cape Cod homeowners, we understand that our unique sandy soils and seasonal weather patterns demand irrigation systems that work flawlessly. When your system is running properly, it’s not just about keeping your garden lush—it’s about being a responsible steward of our precious water resources.
The repairs we’ve covered in this guide might seem simple, but they’re genuinely powerful. A ten-minute fix can save thousands of gallons of water over a season while keeping your plants thriving. Most homeowners are surprised to find they can handle these common issues with just a few basic tools and materials.
Of course, there are times when even the most dedicated DIYer might want to call in reinforcements. At Best Cape Cod Irrigation, our 25+ years of local expertise means we’ve seen and solved virtually every irrigation challenge our unique coastal environment can create.
Smart irrigation isn’t just a trendy phrase—it’s about using technology and know-how to water more efficiently. A well-maintained drip system typically uses about half the water of traditional sprinklers, which means your garden stays beautiful while your water bills shrink.
Whether you’re a dedicated DIYer or prefer to leave it to the professionals, maintaining your drip irrigation system is one of the smartest investments you can make in your landscape. After all, on Cape Cod, a beautiful garden isn’t just a luxury—it’s part of what makes this place special.
We’re always here to help with irrigation repairs and maintenance whenever you need a hand. Because at the end of the day, we all want the same thing: gorgeous, thriving gardens that don’t waste a drop of water.
