Why Spring Startup Timing Can Make or Break Your Irrigation System
When you start up sprinkler system in spring, timing and proper procedure are everything. Rush the process or skip key steps, and you could face burst pipes, damaged heads, or costly repairs that turn your Cape Cod lawn care dreams into a nightmare.
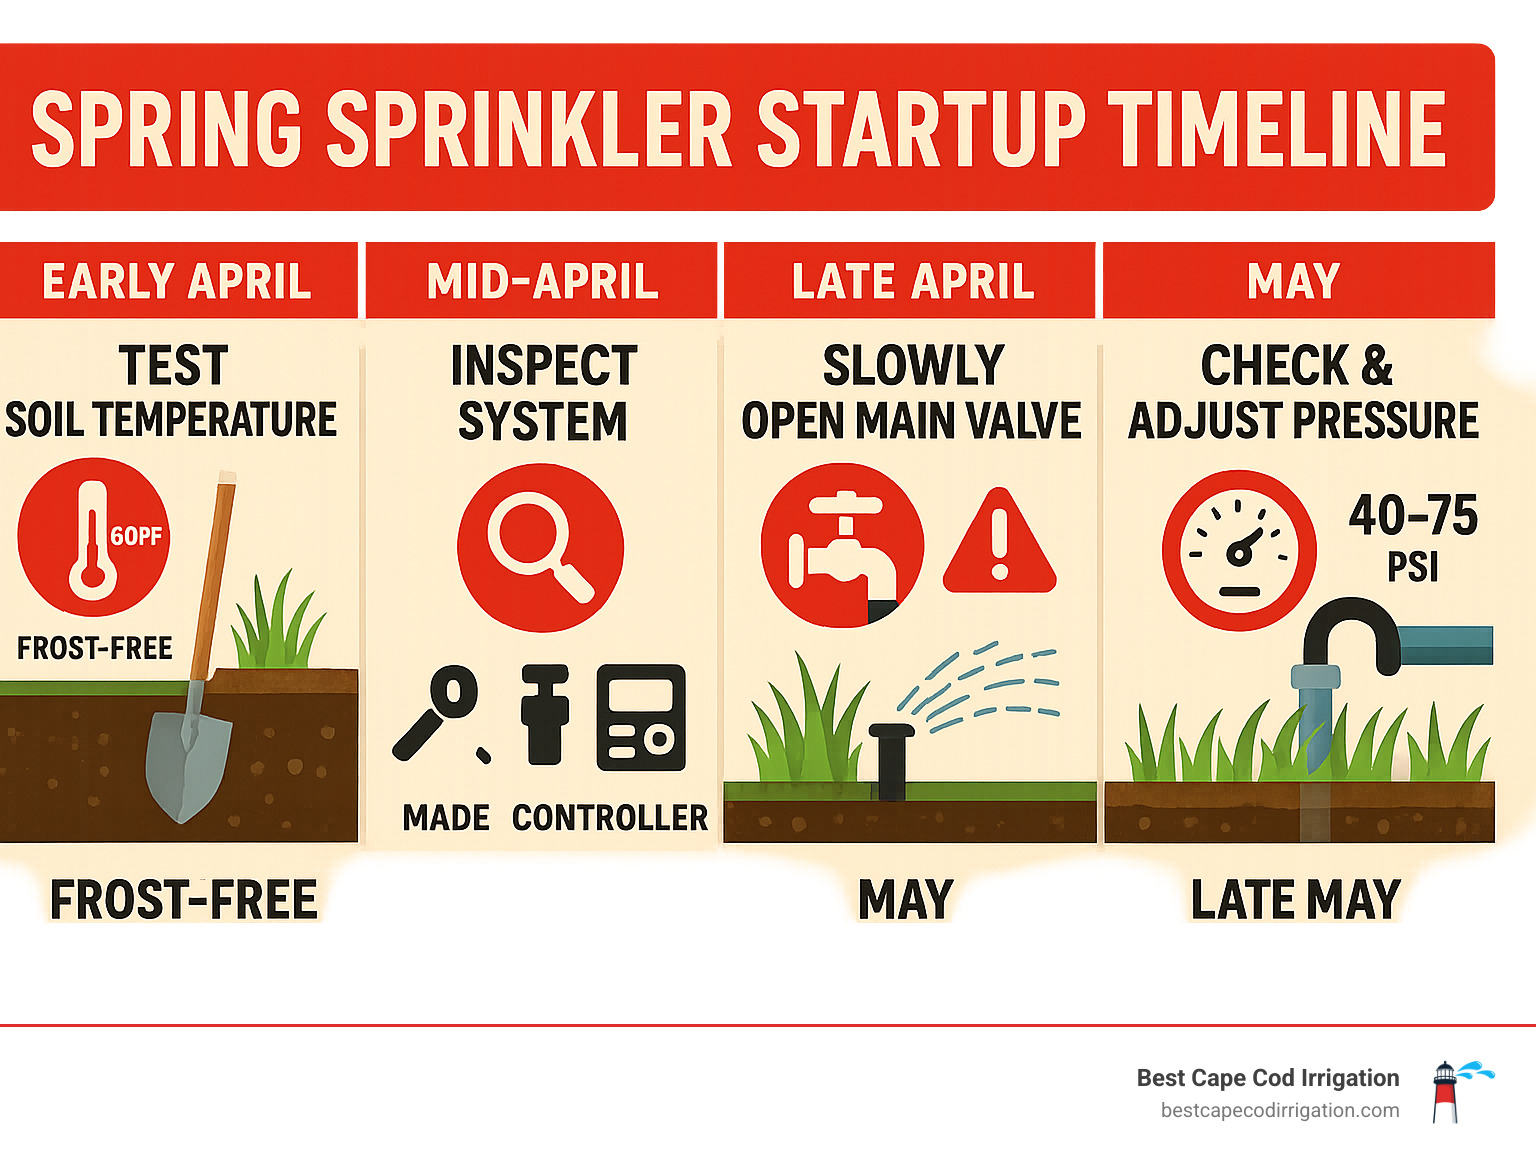
Quick Spring Startup Steps:
1. Wait for frost-free soil – Test 12 inches deep
2. Gather tools – Screwdriver, pliers, sprinkler key, batteries
3. Inspect for winter damage – Check heads, valves, controller
4. Open main valve slowly – Prevent water hammer damage
5. Test each zone manually – Look for leaks and proper coverage
6. Program controller – Adjust for spring watering needs
7. Check system pressure – Should be 40-75 PSI
If you live on Cape Cod, you know how harsh winters can be on outdoor systems. Research shows that approximately 80 percent of irrigation systems in cold climates need at least minor repairs after winter. The good news? Most startup issues are preventable with the right approach.
The key is patience. Starting your system while the ground is still frozen can crack pipes and damage expensive components. But wait too long, and your lawn suffers during those first warm spring days when grass is eager to green up.
This guide walks you through every step of safely bringing your sprinkler system back to life, from checking soil temperature to fine-tuning spray patterns.
Start up sprinkler system in spring vocab to learn:
– opening sprinkler system in spring
– sprinkler system startup
Timing Matters: When to Start Up Your Sprinkler System in Spring
Picture this: you’re eager to get your Cape Cod lawn looking magazine-ready, so you fire up your sprinkler system the first warm day in March. Two weeks later, you’re staring at a $1,500 repair bill for burst pipes. Sound familiar?
The most crucial decision when you start up sprinkler system in spring isn’t which zone to test first—it’s knowing when to begin. After 25+ years of serving Cape Cod homeowners, we’ve learned that patience during startup saves both money and headaches.
Your last frost date is your best friend here. For most of Cape Cod, that falls between mid-April and early May, but don’t just circle a calendar date. Mother Nature doesn’t follow schedules, and neither should your irrigation startup.
The magic number to remember is 12 inches of frost-free soil. This isn’t just a suggestion from overly cautious professionals—it’s your insurance policy against expensive repairs. When soil temperature reaches a steady 55°F at the 12-inch depth, you’re in the safe zone.
Here’s a trick we’ve shared with hundreds of happy customers: watch for forsythia blooms. When those cheerful yellow flowers appear and stick around for about a week, your soil has likely warmed enough for safe startup. It’s nature’s own timing system, and it rarely steers us wrong.
Scientific research on frost depth shows that Cape Cod’s sandy soils actually work in our favor—they thaw faster than clay-heavy areas inland. But every winter is different, so always test rather than assume.
Why Waiting for Thawed Ground Protects Your Investment
Ever wondered what happens when water freezes in your pipes? It’s not pretty. Water expands about 9% when it turns to ice, and in the confined space of irrigation lines, that expansion creates enough pressure to crack even the toughest PVC fittings.
We’ve seen pipe expansion destroy everything from simple elbow joints to expensive backflow preventers. The freeze damage risk isn’t just theoretical—it’s a reality that hits impatient homeowners every spring.
Last season alone, we helped repair systems where early startup caused costly repairs ranging from $200 for basic fitting replacements to over $2,000 for extensive underground damage. Every single one of these problems was completely preventable with proper timing.
Opening Sprinkler System in Spring requires patience, but your wallet will thank you.
Regional Startup Calendar for Cape Cod & New England
Cape Cod’s maritime climate is both a blessing and a challenge for irrigation timing. Our ocean proximity keeps temperatures moderate, but it also means spring weather can be as unpredictable as a tourist’s vacation plans.
Early April marks the beginning of our mid-April-to-mid-May window. This is when you should start your soil test method—grab a shovel and dig down 12 inches in a remote corner of your yard. Hit frozen ground? Wait another week and test again.
Mid-April often brings the first safe opportunities for startup, especially if we’ve had a mild winter. But don’t rush—check that long-range forecast for any surprise cold snaps that could set you back.
Early May hits the sweet spot for most Cape Cod properties. Soil has typically thawed completely, grass is waking up from winter dormancy, and the risk of hard frost drops significantly.
The forsythia bloom cue works beautifully across our entire service area, from Sandwich to Provincetown. When those bright yellow flowers appear and persist for about a week, soil temperatures have usually stabilized above that critical 55°F threshold.
Pre-Startup Checklist & Safety Precautions
Think of preparing to start up sprinkler system in spring like getting ready for a first date—you want everything to go smoothly, and a little preparation prevents embarrassing disasters. Before you touch any valves or flip any switches, taking time for proper safety precautions and system checks can save you from costly surprises.
Safety comes first when working with pressurized water systems and electrical components. Always wear safety glasses when working around fittings that might spray water unexpectedly. Keep your hands completely dry when handling controllers or any electrical connections—water and electricity make terrible dance partners.
Your pre-startup inspection acts like a detective investigation. Walk your entire property with a critical eye, looking for clues that winter left behind. Check that your main shut-off valve is completely closed before doing anything else—this prevents pressure surges that could damage components during inspection.
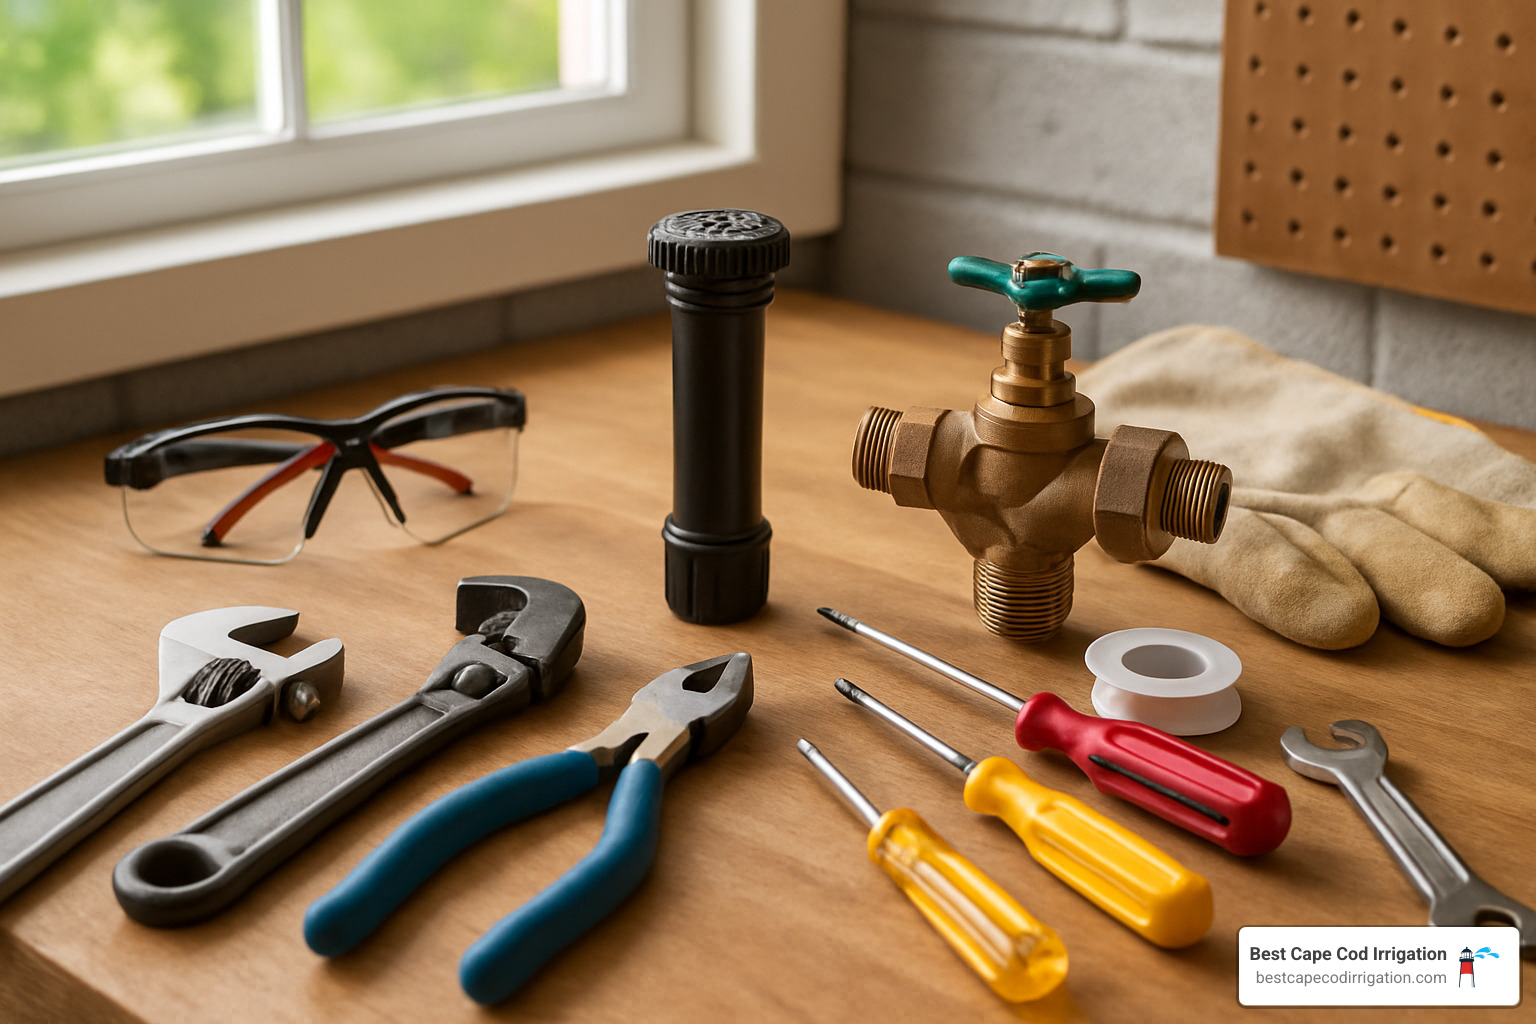
Tools & Supplies You’ll Need
Having the right tools makes startup feel less like wrestling with an octopus and more like a smooth operation. You don’t need a truck full of equipment, but having these essentials on hand prevents frustrating trips to the hardware store mid-project.
Essential tools include a flat-head screwdriver for valve adjustments, channel-lock pliers for stubborn fittings, and a screwdriver set with multiple sizes. Don’t forget a sprinkler adjustment key—these specialized tools match your specific sprinkler head types and make adjustments much easier.
Keep fresh batteries for your controller backup, Teflon tape for any threaded connections that need attention, and a notepad for recording issues you find. A pressure gauge helps verify your system is operating in the safe 40-75 PSI range, and having a few replacement nozzles for common head types can solve problems on the spot.
System Inspection for Winter Damage
Cape Cod winters can be tough on irrigation systems, with freeze-thaw cycles, salt spray, and the occasional nor’easter testing every component. Before adding water pressure, a thorough inspection can prevent turning small problems into expensive disasters.
Start your inspection by walking every sprinkler head location. Look for heads that appear pushed up, tilted sideways, or sitting at strange angles—these are telltale signs of frost heave. Winter’s freeze-thaw cycle can move heads several inches, turning your efficient watering pattern into an expensive sidewalk shower.
Remove valve box covers and inspect for standing water, which might indicate cracked valves or fittings. Look for obvious damage to valve assemblies, and make sure electrical connections appear dry and secure. Water in valve boxes during dry weather is never a good sign.
Your controller deserves special attention after winter. Check for any signs of moisture intrusion, corrosion on terminals, or damaged wiring. Replace the backup battery if it’s more than six months old—fresh batteries prevent losing your programming during spring storms.
If you find multiple issues during inspection, consider our Irrigation Repairs & Maintenance service. Sometimes professional assessment saves money compared to trial-and-error repairs.
Step-by-Step Guide to Start Up Sprinkler System in Spring
Here’s where things get exciting—and where patience becomes your best friend. When you start up sprinkler system in spring, the actual activation process is like waking up a sleeping giant. Do it gently, and everything runs smoothly. Rush it, and you might end up with cracked pipes and a hefty repair bill.
The secret sauce is gradual pressurization. Think about it—your irrigation lines have been bone dry all winter, sitting there like empty straws. Suddenly blasting them with full water pressure creates what we call water hammer, which sounds exactly as violent as it is.
Your sprinkler system is happiest running between 40-75 PSI. Too much pressure turns your nice even spray into useless mist that blows away in Cape Cod’s ocean breezes. Too little pressure leaves dry spots that turn your lawn into a patchwork quilt of green and brown.
Scientific research on water hammer shows these pressure spikes can hit over 1000 PSI—enough to turn a simple spring startup into a plumbing disaster.
Preparing Backflow Preventer & Valves
Your backflow preventer might not be the prettiest part of your irrigation system, but it’s definitely the most important for keeping your drinking water safe. This device prevents contaminated irrigation water from flowing backward into your home’s water supply—something your local health department takes very seriously.
For Pressure Vacuum Breakers (PVB), you’ll see two small test cocks that look like tiny valves. Close both of these by turning them so they’re perpendicular to the pipe direction. Then open both shutoff valves by turning the handles parallel to the pipes.
Reduced Pressure Zone (RPZ) devices work a bit differently. Close all test cocks completely first, then slowly open both shutoff valves. Keep an eye on the relief valve—it shouldn’t be weeping water. If it is, you might need professional attention.
Many Cape Cod towns require annual testing of backflow preventers by certified technicians. Check our FAQs for more details about local compliance requirements.
Opening the Main Water Supply—Slow and Steady
This is the moment that separates the pros from the weekend warriors. How you open that main shut-off valve determines whether you’ll be watering your lawn or calling a repair service.
The quarter-turn method is your friend here. Start by opening the valve just one-quarter turn and wait 30 seconds. You’ll hear some gurgling—that’s normal. Open to the half position and wait another 30 seconds. Move to three-quarters open, then finally to full open, pausing at each stage.
This slow approach lets pipes fill gradually and gives trapped air time to escape without creating pressure surges. It might feel tedious, but we’ve seen too many homeowners skip this step and end up with burst fittings.
| Pressure Range | What You’ll See | What to Do |
|---|---|---|
| Below 30 PSI | Weak, disappointing spray | Check for leaks, call for help |
| 30-40 PSI | Adequate coverage | Monitor performance |
| 40-75 PSI | Perfect even spray | Smile and enjoy |
| 75-90 PSI | Misty spray, stressed fittings | Add pressure regulator |
| Above 90 PSI | Excessive mist, damage risk | Reduce pressure immediately |
Purging Air & Flushing Each Zone
Now comes the fun part—watching your system come back to life, one zone at a time. Switch your controller to manual mode and activate each zone individually for 3-5 minutes. Don’t panic when the first sprinklers sputter and spray like they’re having a tantrum—that’s just trapped air working its way out.
Creating flush points can be helpful if you suspect debris in the lines. Temporarily remove the last sprinkler head on each zone to let any winter debris escape freely instead of clogging your nozzles. Just don’t forget to reinstall those heads before you finish up.
This zone-by-zone testing serves multiple purposes: it purges air from the system, flushes out any debris that accumulated over winter, and gives you a clear picture of what’s working and what needs attention before you set everything to automatic mode.
Testing, Programming & Fine-Tuning
Once your system is pressurized and basic operation is confirmed, the real work begins. This phase separates a functioning system from an efficient one that conserves water while keeping your landscape healthy.
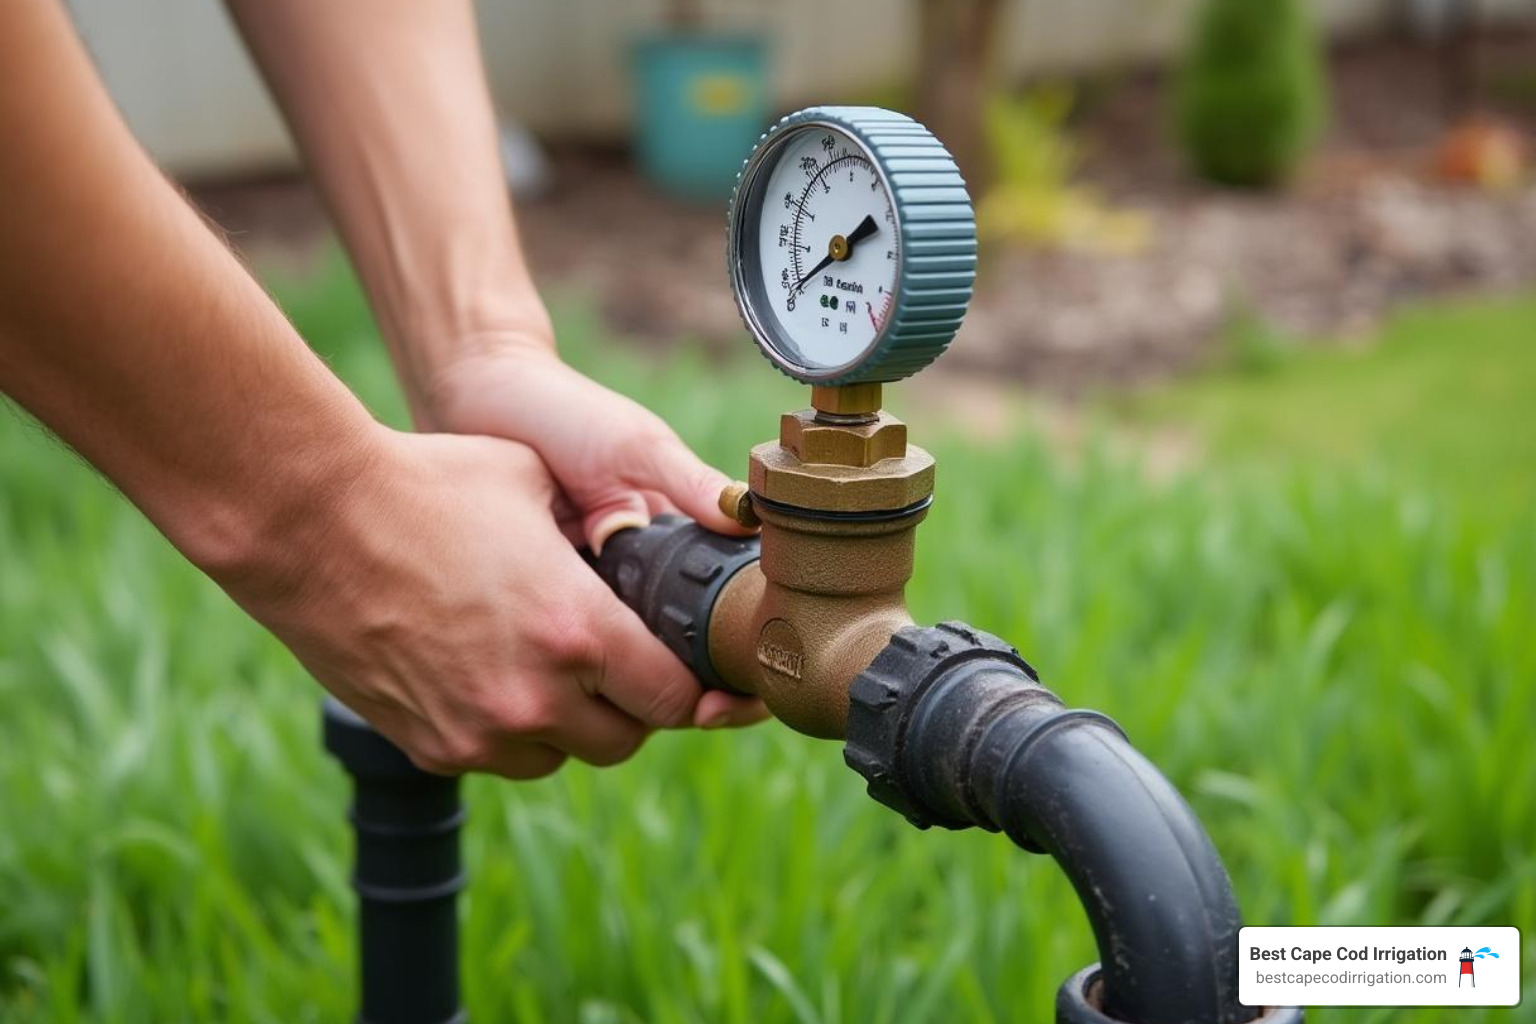
Checking & Adjusting System Pressure
Proper pressure is critical for efficient irrigation. Too high, and you get misting that wastes water and doesn’t penetrate soil effectively. Too low, and coverage becomes uneven with dry spots throughout your lawn.
Install a pressure gauge at a convenient hose connection or test port on your backflow preventer. Take readings with different zones running, as pressure can vary based on demand and pipe sizing.
Pressure Troubleshooting:
– High pressure (over 75 PSI): Install a pressure-reducing valve
– Low pressure (under 40 PSI): Check for leaks, partially closed valves, or undersized pipes
– Fluctuating pressure: May indicate pump problems or municipal supply issues
Programming the Controller for Spring Conditions
Spring programming differs significantly from summer settings. Cooler temperatures, higher humidity, and frequent rain mean your lawn needs less water than during peak summer heat.
Spring Programming Guidelines:
– Start times: Early morning (4-6 AM) for best absorption
– Run times: Reduce by 25-30% from summer settings
– Frequency: Every 2-3 days rather than daily
– Seasonal adjustment: Use 70-80% of full summer programming
Modern controllers often include seasonal adjustment features that automatically modify run times based on weather data. Consider evapotranspiration (ET) data from local weather stations to fine-tune watering schedules.
For detailed programming assistance, our Schedule Maintenance service includes controller optimization for seasonal efficiency.
Zone-by-Zone Performance Test
Walk each zone while it’s running and evaluate performance systematically. This is where you’ll catch most problems before they become expensive repairs or dead lawn areas.
Coverage Pattern Assessment:
– Look for even, overlapping spray patterns
– Note any areas receiving too much or too little water
– Check that spray reaches intended areas without overspray
– Verify heads are properly aligned and at correct grade
Leak Detection:
Underground leaks often show up as soggy spots, unusually green grass, or areas where heads don’t pop up properly. Start at the lowest-pressure head in each zone and walk toward the valve—leaks typically occur at fittings.
Accessory Maintenance: Rain Sensors & Smart Add-Ons
Don’t forget the accessories that make your system truly efficient. Rain sensors prevent unnecessary watering during storms, while smart weather integration can optimize schedules based on real-time conditions.
Rain Sensor Maintenance:
– Clean sensor cup of debris and spider webs
– Replace batteries if applicable (typically every 6 months)
– Test operation by manually triggering sensor
– Verify sensor location receives adequate rainfall
Smart Technology Integration:
Modern irrigation systems can integrate weather data, soil moisture sensors, and smartphone controls for maximum efficiency. These systems automatically adjust watering based on local weather forecasts, soil moisture levels, and plant water requirements.
Common Startup Problems & When to Call a Pro
Spring startup season brings its share of surprises, and after 25+ years serving Cape Cod, we’ve seen just about everything. The good news? Most problems fall into predictable categories, and knowing what you can tackle yourself versus when to call for help can save you both time and money.
Start up sprinkler system in spring issues typically range from simple DIY fixes to complex problems requiring professional expertise. The key is recognizing the difference before a small problem becomes an expensive disaster.
Simple issues like clogged nozzles or misaligned heads are perfect weekend projects. Pull out that screwdriver, clear some debris, and you’re back in business. But when you’re dealing with electrical faults, underground breaks, or backflow preventer problems, it’s time to step back and call the pros.
Based on internet research, professional irrigation services typically range from $75 to $300+ for spring startup, though complex repairs can reach $1,000 or more depending on the scope of work. These are general market averages, not specific pricing for any particular company. The investment often pays for itself by catching problems early and ensuring your system runs efficiently all season.
Controller error codes often appear after winter, usually indicating electrical issues or programming corruption. Sometimes a simple reset and fresh batteries solve the problem. Other times, moisture intrusion has damaged internal components, requiring replacement.
Cracked heads are another frequent find during startup. Frost heave pushes heads up and down, creating stress fractures that only become apparent under pressure. You might not see the crack until water starts spraying sideways instead of in the intended pattern.
For professional guidance on major system issues, check out our VIDEO LIBRARY for visual troubleshooting help.
DIY Fixes for Minor Issues
Some problems are perfectly suited for the DIY approach, and tackling them yourself builds confidence while saving money. Nozzle swaps top the list of homeowner-friendly repairs. When a nozzle clogs or cracks, simply unscrew the old one and thread in a replacement. Keep a few common sizes on hand for quick fixes.
Head height adjustments require patience but not special skills. Heads pushed up by frost heave need gentle persuasion back to ground level. Dig carefully around the head, check for damage, and adjust height so the top sits flush with soil grade. This prevents mower damage and ensures proper spray patterns.
Controller resets solve many mysterious problems that develop over winter. Before resetting, write down your current programming—you’ll need to reprogram everything afterward. Replace the backup battery while you’re at it, especially if it’s been more than six months since the last change.
Signs You Need Professional Help
Certain problems wave red flags that scream “call a professional.” Backflow certification requirements top this list. Most municipalities require annual testing by certified technicians, and attempting repairs yourself can create serious contamination risks for your drinking water supply.
Electrical faults in valves or controllers demand professional attention. Water and electricity create dangerous combinations, and irrigation systems involve both high-pressure water and buried electrical connections. If zones won’t activate, controllers randomly reset, or you see any signs of electrical problems, step away from the DIY approach.
Underground breaks require specialized leak detection equipment and excavation experience. What looks like a simple pipe repair often involves multiple damaged fittings, proper bedding material, and pressure testing to ensure lasting repairs.
For comprehensive system evaluation and major repairs, our Irrigation System Installation team brings decades of Cape Cod experience to complex problems that go beyond simple startup issues.
Frequently Asked Questions about How to Start Up Sprinkler System in Spring
After helping Cape Cod homeowners for over 25 years, we’ve heard just about every question imaginable when it comes to spring startup. Here are the ones that come up most often—and the answers that can save you time, money, and headaches.
What is water hammer and how do I avoid it?
Think of water hammer as your irrigation system’s version of road rage. When flowing water suddenly hits a closed valve or gets forced through air-filled pipes, it creates a shock wave that can travel through your entire system at incredible speed.
Water hammer happens when you open valves too quickly after winter shutdown. Those empty pipes fill with rushing water that has nowhere to go, creating pressure waves that can crack fittings, burst pipes, and destroy expensive components.
The good news? It’s completely preventable when you start up sprinkler system in spring properly. Open your main valve slowly—we recommend the quarter-turn method, waiting 30 seconds between each stage. This gives air time to escape gradually and prevents those damaging pressure surges.
How do I know my soil is frost-free?
Your soil will tell you when it’s ready, but you need to ask the right question. The shovel test is your best friend here: grab a spade and dig down 12 inches in several spots around your property. Hit frozen ground? Wait another week and try again.
We’ve learned that soil temperature matters more than air temperature. Your soil needs to reach 55°F consistently for at least one week before it’s safe to start up. Sandy Cape Cod soils typically thaw faster than clay, but don’t assume—always test.
Nature provides some helpful hints too. Forsythia bushes in full bloom are a reliable indicator that soil temperatures have stabilized. These yellow flowers don’t lie—they’ve been Cape Cod’s unofficial irrigation startup signal for decades.
What pressure should my sprinkler system run at?
Getting pressure right is like finding the sweet spot on your garden hose—too little and coverage suffers, too much and you’re wasting water through misting.
Most residential systems work best between 40-75 PSI. Below 40 PSI, you’ll get weak spray patterns and poor coverage that leaves dry spots in your lawn. Above 75 PSI, you’ll see excessive misting that looks impressive but doesn’t actually water your grass effectively.
Test your pressure with a gauge at your backflow preventer or any hose connection while zones are running. Pressure can vary between zones, so check a few different areas to get accurate readings.
Conclusion
There’s something deeply satisfying about that first moment when your sprinkler heads pop up after a long Cape Cod winter, ready to bring your lawn back to life. When you start up sprinkler system in spring the right way, you’re not just turning on water—you’re investing in months of worry-free irrigation ahead.
The patience you show during startup pays off all season long. Waiting for frost-free soil might feel like watching paint dry, but it’s the difference between a smooth season and expensive emergency repairs. Taking time to open valves slowly prevents water hammer damage that can turn a simple startup into a costly nightmare.
We’ve walked you through every step because, after 25+ years serving Cape Cod homeowners, we know that proper spring preparation is the secret to irrigation success. From that first soil temperature check to programming your controller for spring conditions, each step builds on the last.
The beauty of doing startup right is how it sets you up for the entire growing season. Systems that receive proper spring attention run more efficiently, use less water, and need fewer repairs. Your lawn gets the consistent moisture it craves, and you get the peace of mind that comes with a well-maintained system.
Remember the critical success factors: never rush the timing, always test each zone individually, and don’t ignore minor problems that could become major headaches. Whether you’re comfortable handling the technical aspects yourself or prefer professional service, the investment in proper startup typically improves water efficiency by up to 30% while extending your system’s lifespan.
For those times when you’d rather leave it to the experts—or when you find issues beyond your comfort zone—we’re here to help. Our smart technology integration and eco-friendly approach reflect our commitment to both performance and environmental responsibility.
Ready to get your system running smoothly? Whether you’re tackling the project yourself or want professional peace of mind, visit our More info about openings & winterization page to schedule service or get the guidance you need for a successful spring startup.
