Why Proper Sprinkler System Startup Matters
Sprinkler system startup is the critical process of safely reactivating your irrigation system after winter shutdown. Here’s what you need to know:
Essential Steps:
1. Wait for safe timing – After last frost (typically mid-May on Cape Cod)
2. Turn on water slowly – Prevent water hammer damage to pipes and fittings
3. Check backflow preventer – Ensure clean water protection
4. Test each zone – Verify proper operation and coverage
5. Program controller – Set seasonal watering schedules
Winter has a way of making everything sluggish—including your sprinkler system. As one irrigation expert puts it, your system has been “sleeping under its blanket of snow” all winter long. But rushing the startup process can cost you hundreds in repairs.
The stakes are real. Turning on your system too quickly can cause water hammer, which bursts fittings or pops off sprinkler heads. Starting too early risks freeze damage to pipes and backflow preventers. And skipping key inspection steps means hidden leaks can waste hundreds of gallons before you notice.
Cape Cod’s sandy soil and unpredictable spring weather make proper timing and technique even more critical. You want your lawn green and healthy—not your wallet drained by avoidable mistakes.
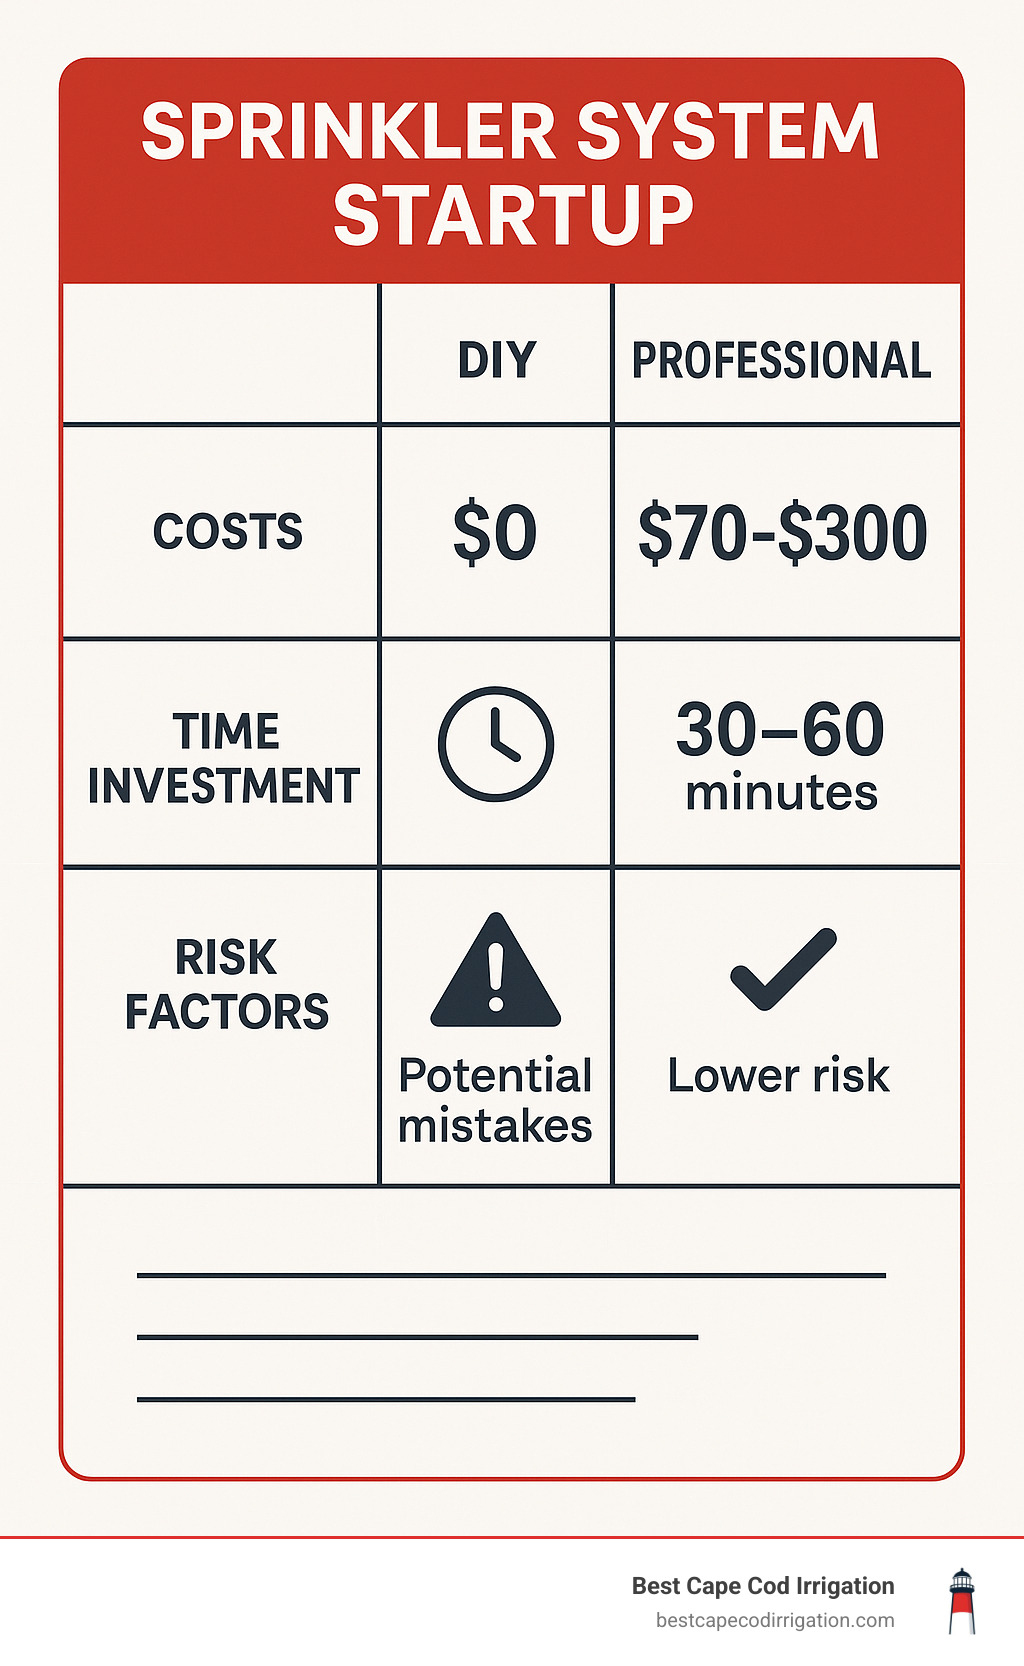
Professional startup services typically cost $70-$249 for standard residential systems (based on internet data, not specific company pricing), while DIY takes 30-60 minutes if done correctly.
Is It Time? When to Wake Your System Up
Getting the timing right for your sprinkler system startup is like waiting for the perfect moment to plant tomatoes—rush it, and you’ll pay the price. After helping Cape Cod homeowners for over 25 years, we’ve learned that Mother Nature sets the schedule, not your calendar.
The magic number you’re looking for is 55°F soil temperature sustained for about a week. This isn’t just an old wives’ tale—it’s the temperature at which your soil has truly thawed and won’t refreeze overnight. Most Cape Cod areas hit this sweet spot sometime between April and June, with coastal towns like Provincetown and Chatham often ready earlier than inland areas like Wareham.
Here’s a simple trick: grab a soil thermometer (or even a meat thermometer) and check your soil temperature at 6-inch depth for several days running. If it stays above 55°F, you’re in the clear. No thermometer? Look for forsythia bushes in full bloom—they’re nature’s way of saying the soil is warm enough.
Cape Cod’s maritime climate keeps us guessing. Our sandy soil drains beautifully but can still harbor frozen pockets deeper down. The ocean moderates temperatures along the coast, but don’t let that fool you into starting too early. We’ve seen plenty of “false springs” followed by surprise frosts that catch eager homeowners off guard.
Scientific research on safe start dates from water departments across the country confirms what we’ve experienced locally—patience prevents problems. Even Denver Water waits until early May, and they don’t deal with our unpredictable coastal weather patterns.
Risks of Early Sprinkler System Startup
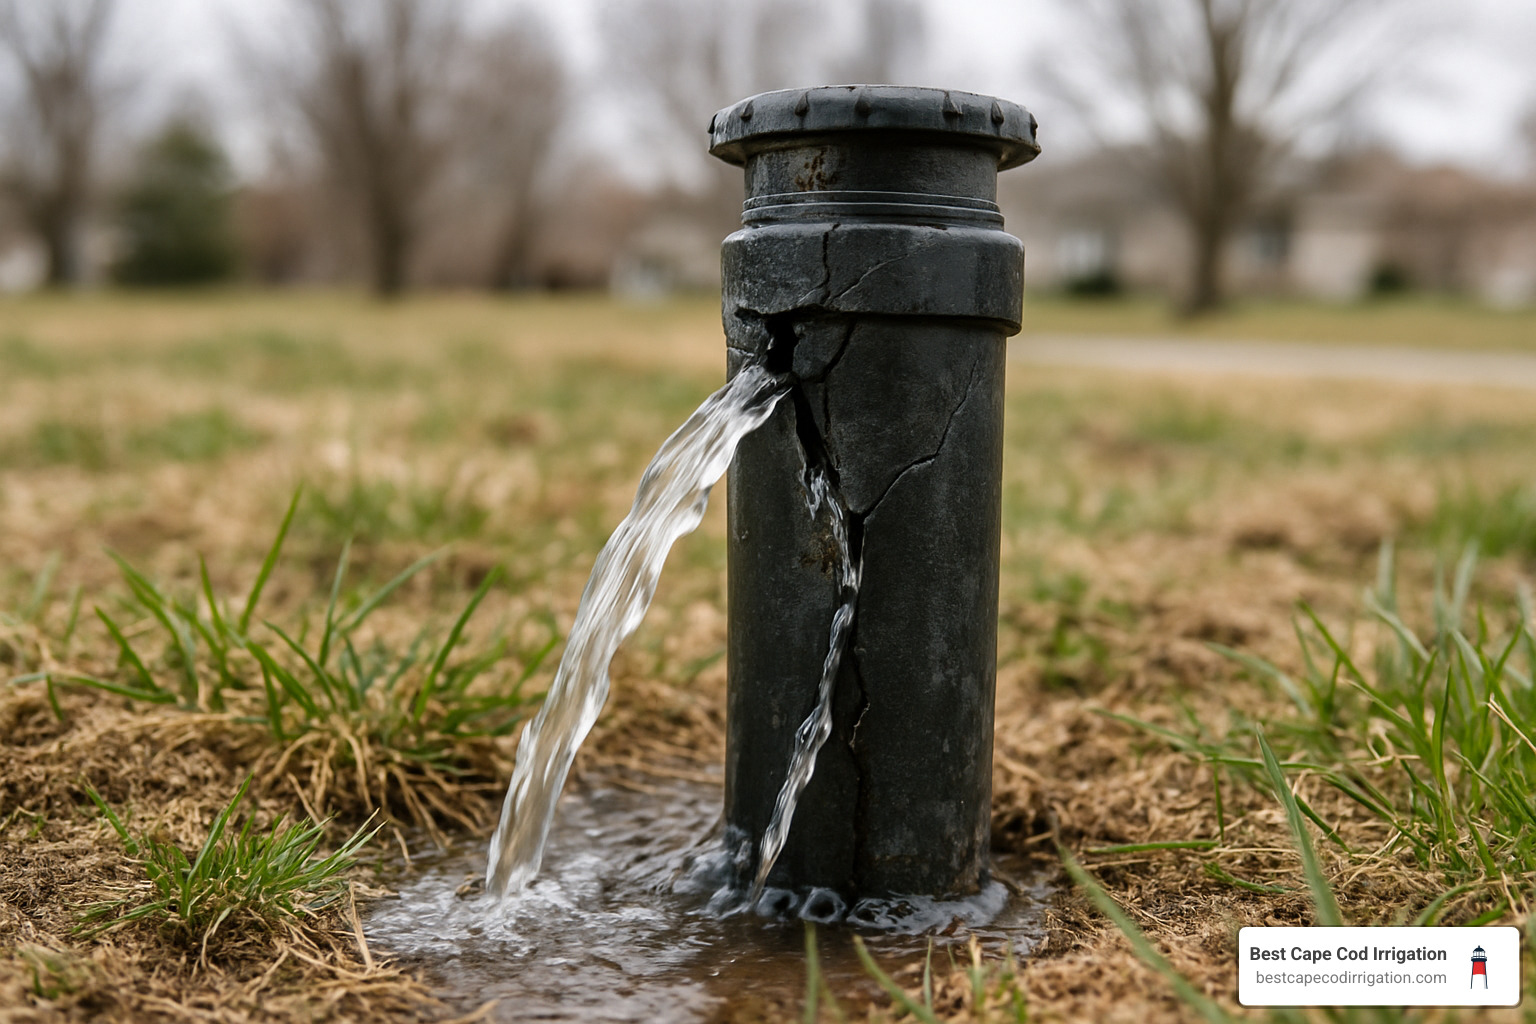
Start your system too early, and you might as well hand your credit card to a repair technician. Frozen water expands with incredible force—enough to turn your irrigation investment into an expensive pile of cracked pipes and busted fittings.
The sneaky part? Freeze damage doesn’t always announce itself immediately. You might think you dodged a bullet after an early startup, only to find weeks later that a hairline crack in a buried pipe has finally given way. Now you’re dealing with a soggy lawn, sky-high water bills, and excavation costs that make you wish you’d waited just one more week.
Backflow preventers take the worst beating during freeze events. These crucial devices protect your drinking water from contamination, but their brass components and internal mechanisms are sitting ducks when water inside them turns to ice. We’ve seen homeowners face replacement costs ranging from $200 to $800, plus the headache of coordinating inspections with the local water department.
The wasted water from burst pipes isn’t just expensive—it’s wasteful. A single cracked fitting can spray hundreds of gallons before you notice, turning your water-efficient irrigation system into an environmental nightmare. Better to wait a few extra days than deal with months of repairs and regret.
Gather Your Gear: Tools, Parts & Safety Items
Nothing ruins a smooth sprinkler system startup quite like finding you need a specific tool halfway through the process—especially when water is spraying everywhere and the hardware store closed five minutes ago. Smart preparation saves time, frustration, and potentially soggy shoes.
Start with your basic toolkit. A flathead screwdriver handles test cocks and small adjustments, while channel-lock pliers grip valve caps and fittings that winter has made stubborn. You’ll need a sprinkler valve key to access buried shutoffs—these L-shaped tools are worth their weight in gold when you’re hunting for that main valve.
Don’t forget the small stuff that makes a big difference. A small brush or old toothbrush clears debris from clogged nozzles, and keeping a notepad and pen handy lets you document problems as you find them. Trust us—after testing eight zones, you won’t remember which head in zone three was crooked.
Teflon tape is your friend for resealing connections that developed minor leaks over winter. Cape Cod’s freeze-thaw cycles are tough on fittings, so having spare sprinkler nozzles on hand prevents delays when you find cracked heads. And those controller batteries? Replace them if they’re over six months old—there’s nothing worse than programming your system only to lose all settings when weak batteries die.
Safety gear isn’t optional when dealing with pressurized water systems. Work gloves protect your hands from sharp metal edges on damaged components, while safety glasses shield your eyes from unexpected spray. Kneepads might seem excessive, but after crawling around adjusting ground-level heads for an hour, your knees will thank you.
Consider upgrading to smarter technology during startup. A soil moisture sensor prevents overwatering Cape Cod’s sandy soil, while a smart controller module lets you monitor your system remotely. A rain sensor automatically skips watering during our frequent spring storms—because watering during a downpour just looks silly to the neighbors.
Keep everything organized in a dedicated bucket or toolbox. There’s something deeply satisfying about having the right tool exactly when you need it, and your future self will appreciate the organization when problems pop up mid-season.
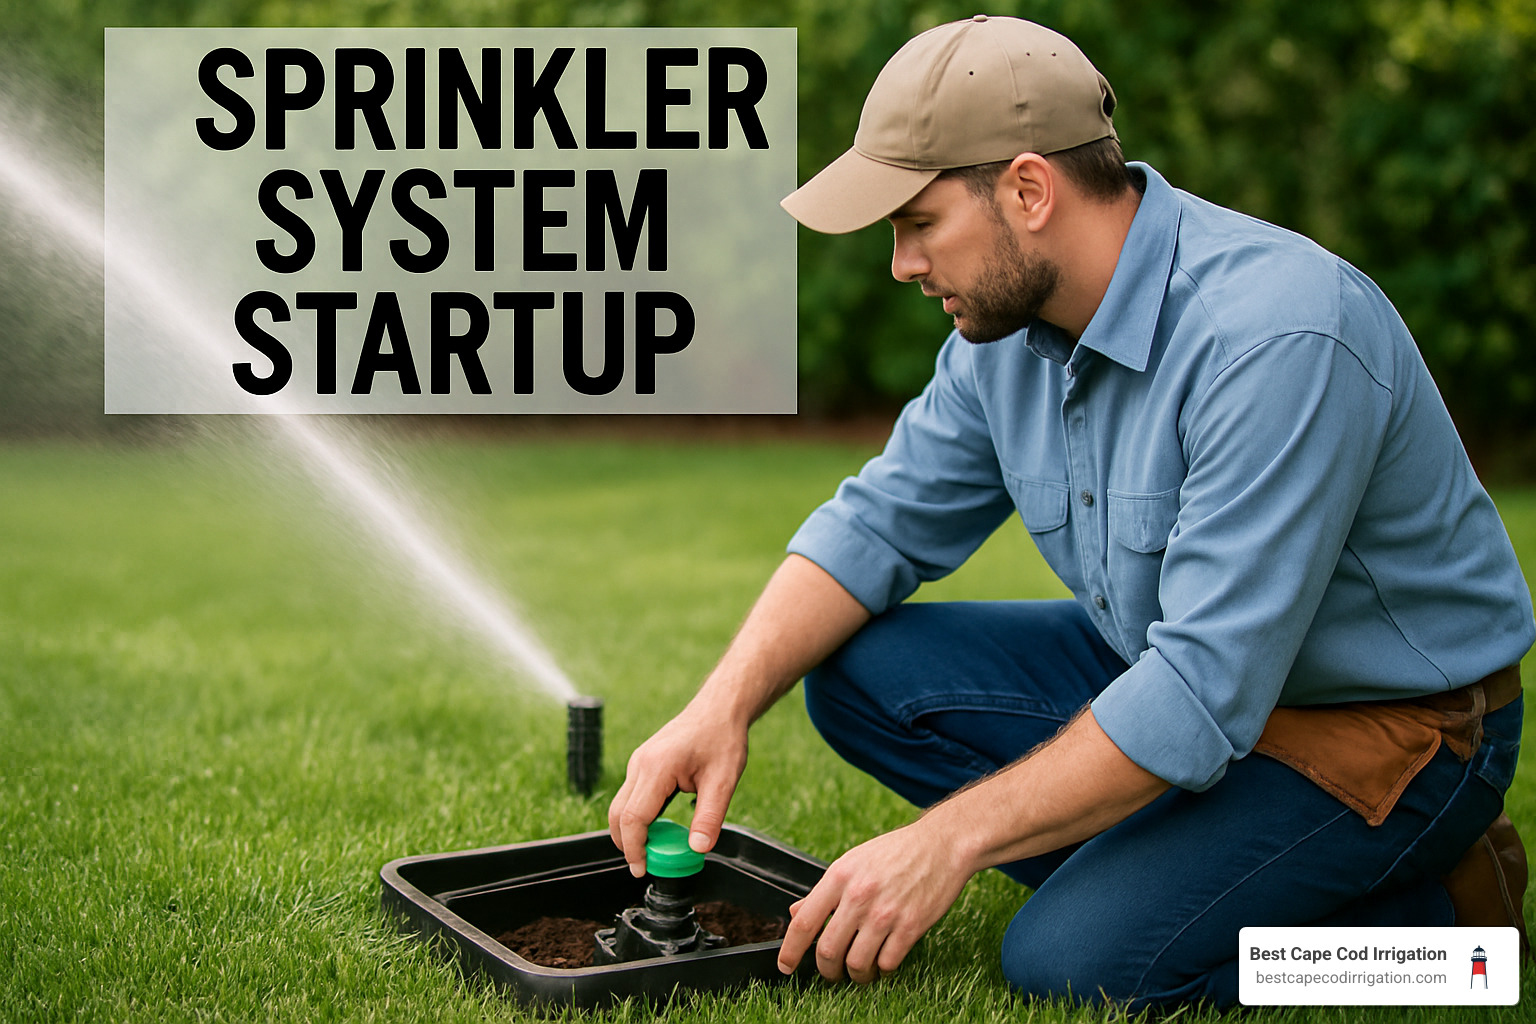
Step-by-Step Sprinkler System Startup
Now comes the main event. Follow these steps precisely, and you’ll avoid the costly mistakes that catch many homeowners off-guard. Remember: slow and steady wins this race.
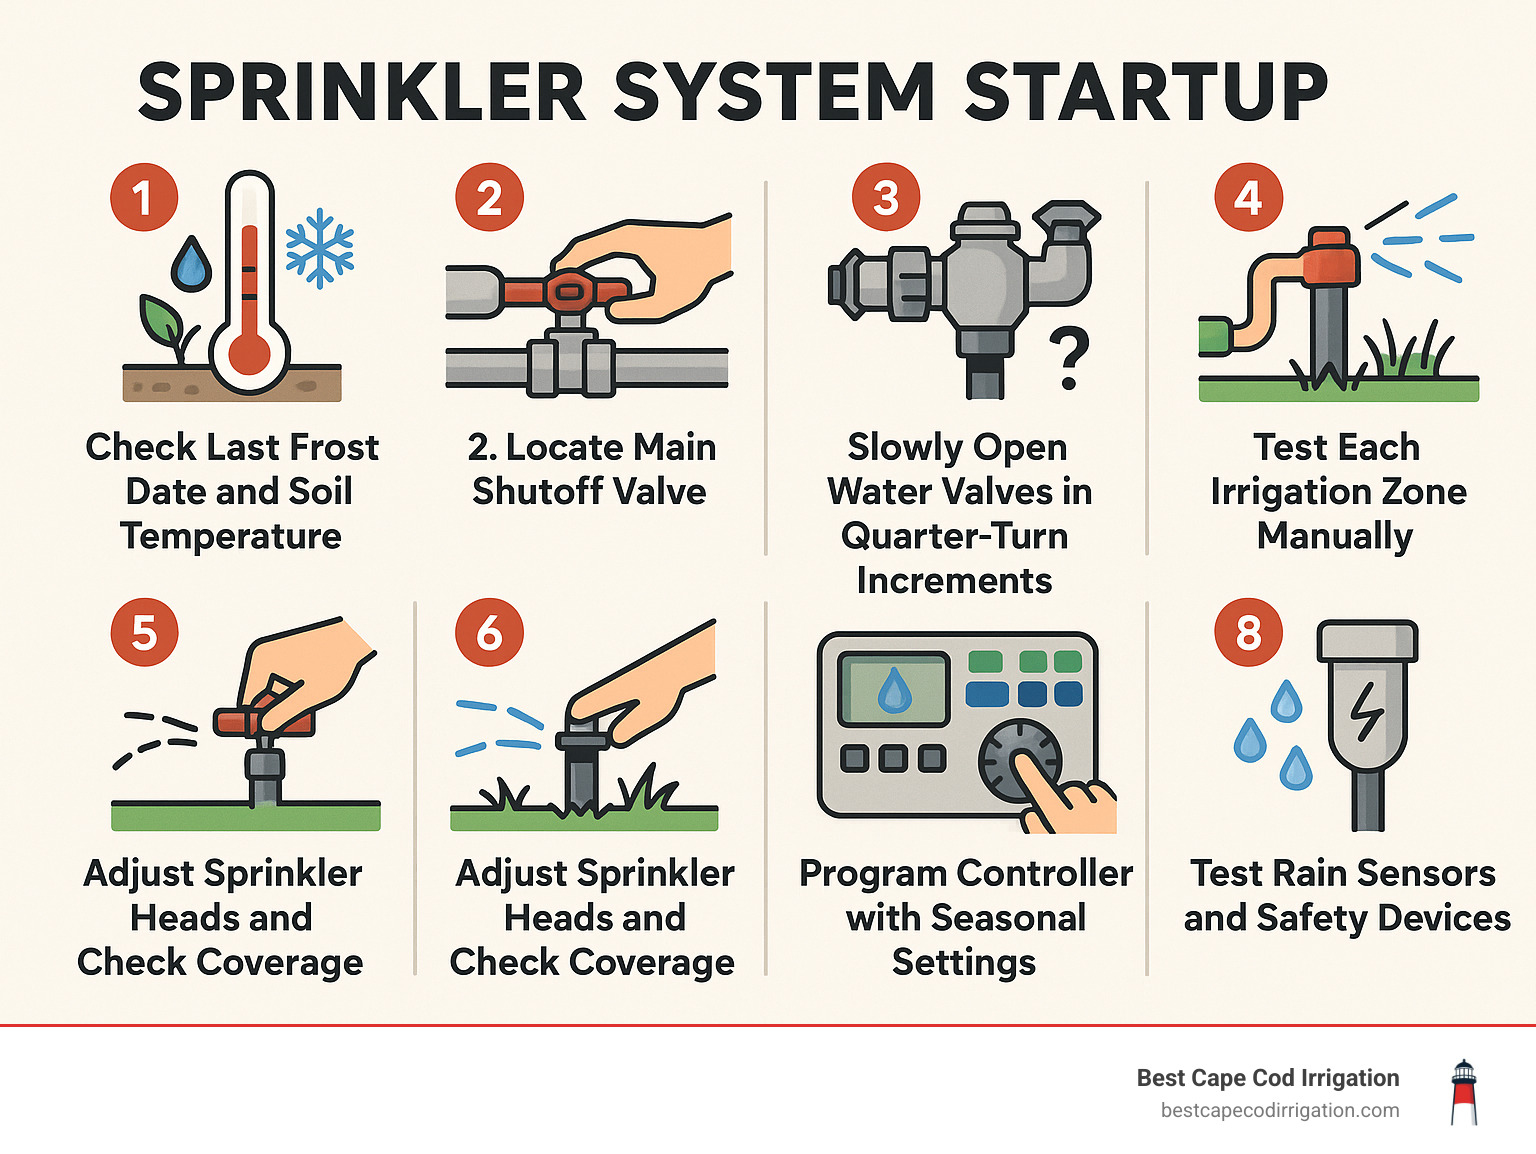
Step 1: Locate Your Main Shutoff Valve
Start inside your home. Look in the basement, crawl space, or utility room for pipes leading outside with a ball valve or gate valve. This controls water flow to your entire irrigation system. If you can’t find it indoors, check valve boxes in your yard—they’re usually rectangular plastic or concrete covers near your water meter.
Step 2: Inspect the Backflow Preventer
Before introducing any water pressure, examine your backflow prevention device. This is typically a brass assembly with two ball valves and test cocks, located above ground near where your irrigation system connects to your home’s water supply. Look for cracks, corrosion, or loose fittings. If you see damage, stop and call a professional—backflow preventer failures can contaminate your drinking water.
Opening Sprinkler System in Spring

Step 3: Prepare the Backflow Preventer
Close both test cocks by turning them perpendicular to their pipes using a flathead screwdriver. Don’t overtighten—plastic threads break easily. Next, open both ball valves by turning the handles parallel to the pipes. Replace any missing bleeder caps with new ones, wrapping the threads with Teflon tape for a watertight seal.
Step 4: Check Your Controller
Before pressurizing the system, inspect your irrigation controller. Replace the backup battery if it’s over six months old—a dead battery means losing all your programming during power outages. Set the correct date and time, but leave the system in “manual” mode for now.
Sprinkler System Startup: Turning On Water Safely
This is where many DIYers make expensive mistakes. Water hammer—the shock wave created when water suddenly starts or stops flowing—can burst pipes, crack fittings, and pop sprinkler heads right out of the ground.
The Quarter-Turn Method:
Open your main shutoff valve slowly, no more than a quarter-turn at first. Listen for the sound of water beginning to flow through the pipes. Wait 30 seconds, then open another quarter-turn. Continue this process until the valve is fully open—the entire process should take at least two minutes.
Why so slow? Empty irrigation pipes contain air that must escape gradually. Rush the process, and you create pressure waves that can damage components throughout your system. As one irrigation contractor notes: “High surge pressures and water hammer can crack or burst sprinkler main lines.”
Listen for Success:
You’ll hear water flowing, then gurgling as air escapes, then steady flow as pipes fill. Some systems make rumbling sounds as control valves seat properly—this is normal. What you don’t want to hear is sudden banging or hammering sounds, which indicate dangerous pressure spikes.
Scientific research on hydraulic shock confirms that gradual pressurization prevents the hydraulic shock that damages irrigation systems.
Inspect, Test & Program—Sprinkler System Startup Final Checks
With water flowing safely through your main lines, it’s time for the detailed inspection that separates professional-quality startups from amateur hour.
Zone-by-Zone Testing:
Manually activate each irrigation zone from your controller, running each for 3-5 minutes. Walk the entire zone while it operates, looking for:
– Sprinkler heads that don’t pop up (may be clogged with debris)
– Low water pressure (indicates possible line breaks)
– Geysers or unusual spray patterns (damaged nozzles)
– Soggy areas between heads (underground leaks)
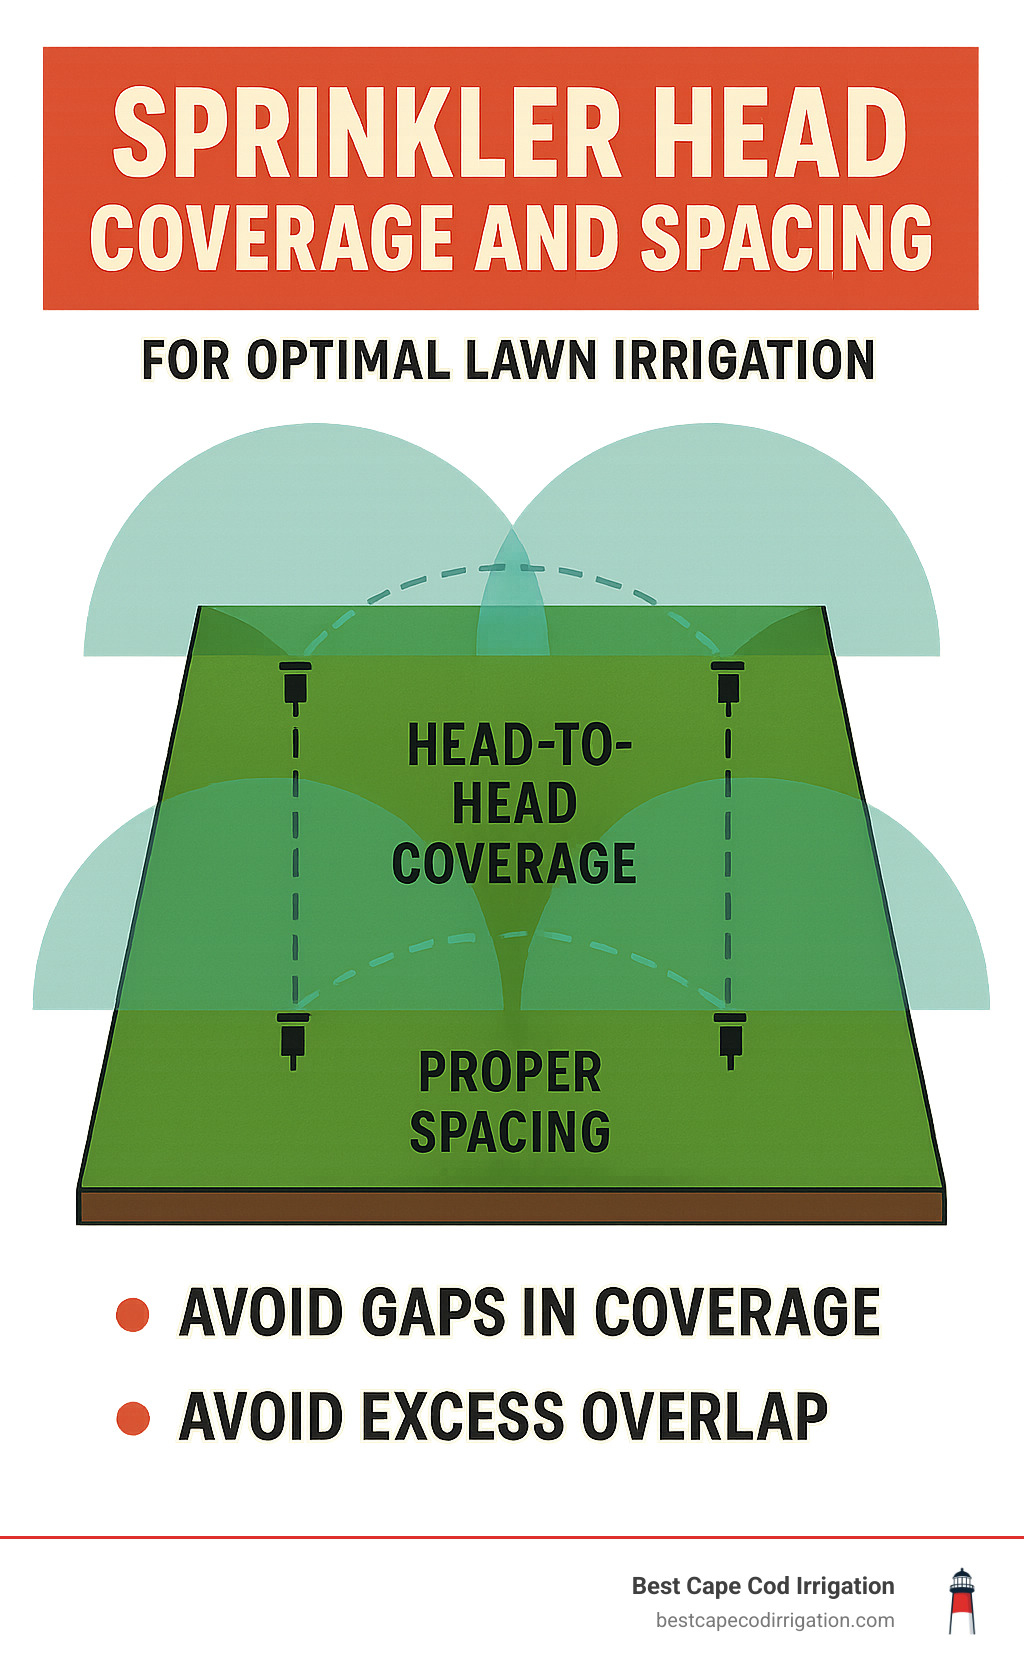
Head-to-Head Coverage Check:
Proper irrigation requires each sprinkler head to spray far enough to reach the next head—this is called “head-to-head coverage.” Gaps in coverage create dry spots, while overlaps waste water. Adjust spray patterns and distances using the screws or keys on each head.
Controller Programming:
Now set your controller for spring operation:
– Program current date and time
– Set initial run times (start conservative—10-15 minutes per zone)
– Schedule watering for early morning (4-8 AM reduces evaporation)
– Enable rain sensor if equipped
Rain Sensor Verification:
Test your rain sensor by manually triggering it (usually by lifting a small lever or pressing a button). Your controller should skip the next scheduled watering cycle. This simple device can save hundreds of gallons by preventing unnecessary watering during storms.
Troubleshooting & Ongoing Maintenance
Even the most careful sprinkler system startup can reveal surprises that winter left behind. Don’t worry—most issues are fixable with basic tools and a little detective work. The key is catching problems early before they turn into wallet-draining disasters.
Low water pressure is probably the most common post-winter surprise. If your sprinkler heads are barely spitting water instead of creating those satisfying arcs of coverage, you’ve likely got a leak somewhere underground. Start your investigation at the weakest head and work backward toward the valve box, looking for suspiciously green patches of grass or soggy soil. Sometimes these leaks are sneaky—they might take several hours of running the zone before water bubbles up to the surface.
When sprinkler heads refuse to pop up, winter debris is usually the culprit. Grass clippings, leaves, and even ice can jam the mechanism. Unscrew the head (counterclockwise, just like a jar lid) and give it a good cleaning. If you find cracks or broken plastic pieces, replace the entire head with an identical model. Mixing different head types in the same zone creates pressure problems that’ll drive you crazy all season long.
Geyser leaks are dramatic but fixable. When a sprinkler head shoots water straight up like it’s auditioning for Yellowstone National Park, you’ve got a broken connection underground. Shut off that zone immediately and start digging carefully around the head. Usually it’s a cracked riser pipe or loose fitting that shifted during freeze-thaw cycles.
Controller problems often trace back to moisture or unwanted visitors. Mice love chewing on irrigation wires during winter, and water has a way of finding its way into valve boxes. Check all wire connections for corrosion, bite marks, or loose wire nuts. A little electrical contact cleaner and fresh wire nuts can work miracles.
Your system needs attention throughout the growing season, not just at startup. Monthly walk-throughs while each zone runs help you spot problems before they escalate. Look for clogged nozzles (they’ll spray in weird patterns), misaligned heads (knocked around by mowers or foot traffic), and vegetation that’s grown up to block spray patterns.
Irrigation Repairs & Maintenance
Some fixes are perfect weekend warrior projects: replacing damaged nozzles, adjusting spray patterns, clearing blocked heads, and swapping controller batteries. Others—like major pipe repairs or electrical troubleshooting—are worth calling in the pros. After 25+ years of Cape Cod experience, we’ve learned that knowing when to DIY and when to call for backup saves both time and money in the long run.
The secret to low-maintenance irrigation is staying ahead of small problems before they become big ones. A monthly system check takes maybe 20 minutes but can prevent those surprise repair bills that always seem to arrive at the worst possible time.
DIY vs Professional Service & Average Costs
Here’s the million-dollar question—or should we say the couple-hundred-dollar question: should you tackle your sprinkler system startup yourself or call in the cavalry?
We get it. You’re handy around the house, you’ve watched a few YouTube videos, and how hard can it really be? Well, both approaches have their place, and the right choice depends on your comfort level with plumbing, your available time, and honestly, how much sleep you want to lose worrying about whether you did everything correctly.
Going the DIY route means you’ll learn your system inside and out—there’s real value in understanding every valve, every head, and every quirk your irrigation system has developed over the years. You’ll save on service costs and can start your system exactly when you think it’s time, not when you can get on someone’s schedule. Plus, there’s genuine satisfaction in successfully bringing your lawn back to life with your own two hands.
But let’s be real about the challenges. First-time DIY startups often take 2-4 hours instead of the 30-60 minutes professionals need. You’ll need to invest in tools and replacement parts, and there’s always that nagging worry about whether you missed something important. Most importantly, you’re responsible for any mistakes—and we’ve seen $1,000+ repair bills from well-intentioned homeowners who opened valves too quickly or missed critical damage signs.
Professional startup services bring expertise that’s hard to match. These folks have seen every possible problem and know exactly what to look for. They carry the right tools and replacement parts on their trucks, provide warranties on their work, and handle the mandatory backflow testing that most states require. The time savings alone can be worth it—professionals typically complete startups in under an hour.
Based on internet data (not specific company pricing), professional sprinkler system startup services typically range from $70-$300 for standard residential systems, with complex installations potentially reaching $750 or more. Annual maintenance packages that include spring startup, mid-season adjustments, and winterization typically cost $600-$900.
Many Cape Cod homeowners we work with choose a smart hybrid approach: they hire professionals for their first startup to learn the process and identify any system issues, then handle routine activations themselves. Every few years, they schedule professional service for thorough system health checks and updates.
Here’s something you can’t DIY around: most states require annual backflow preventer testing by certified technicians. This protects public water supplies from contamination and isn’t optional. When done separately, this testing typically costs $50-$150, but professional startup services often include it.
The peace of mind factor is real too. When a professional signs off on your startup, you know someone with 25+ years of experience has verified everything is working safely and efficiently. That’s worth something, especially when you’re talking about a system that protects both your landscape investment and your home’s water supply.
Frequently Asked Questions about Sprinkler System Startup
When should I schedule startup in Cape Cod?
For most Cape Cod locations, mid-May is the sweet spot for sprinkler system startup. But here’s the thing—our unique geography means timing can vary significantly even within a few miles.
Coastal areas like Falmouth, Sandwich, and Barnstable benefit from ocean moderation and can often start safely by May 10-15. The salt air and maritime influence keep temperatures more stable, reducing the risk of surprise late frosts.
Inland towns like Wareham, Bourne, and areas near the Cape Cod Canal face different conditions. These locations should wait until May 15-20 to be completely safe. Without ocean influence, inland areas experience more temperature swings and can get hit with unexpected cold snaps even into mid-May.
The real secret isn’t watching air temperature—it’s soil temperature. Your soil needs to reach 55°F and stay there for about a week. Even if daytime temperatures hit a gorgeous 70°F, soil can remain frozen deeper down, especially in shaded areas or where snow piled up during winter storms.
Here’s a simple test: dig one foot into your soil in a remote part of the yard. If you hit frozen ground at any point, wait another week and test again. Some folks use the “forsythia bloom” indicator—when these bright yellow flowers appear, soil has typically warmed enough for safe startup.
How do I prevent water hammer during startup?
Water hammer prevention is all about patience—something that’s hard to practice when you’re eager to see that first spray of the season! The key is treating your sprinkler system startup like waking up a sleeping giant: gently and gradually.
Open your main shutoff valve in quarter-turn increments, waiting 30 seconds between turns. Yes, it feels slow, but the entire process should take at least two minutes. You’ll hear a progression of sounds: first water flowing, then gurgling as air escapes, then steady flow as pipes fill completely.
Think of it this way—empty irrigation pipes are full of air that needs somewhere to go. Rush the process, and you create pressure waves that can burst fittings or literally pop sprinkler heads out of the ground like champagne corks. We’ve seen heads launched several feet into the air when homeowners opened valves too quickly.
Never open irrigation valves quickly—the sudden rush of water into empty pipes creates shock waves that travel through your entire system. Some professionals recommend removing the last sprinkler head in each zone to create a “flush point” that allows air to escape more easily, though this adds complexity for DIY startups.
Listen to your system during startup. Normal sounds include flowing water and some gurgling. What you don’t want to hear is sudden banging or hammering—that’s your system telling you to slow down.
Do I really need annual backflow testing?
Yes, annual backflow testing is legally required in most areas—it’s not optional, and for good reason. This isn’t bureaucratic red tape; it’s protecting everyone’s drinking water from serious contamination.
Backflow preventers protect public drinking water from contamination by preventing irrigation water from flowing backward into the clean water supply. Your irrigation water may contain fertilizers, pesticides, bacteria from pet waste, or other contaminants that you definitely don’t want in anyone’s drinking glass.
The testing must be performed by certified technicians using calibrated equipment. It’s not something you can DIY—the testing requires specialized pressure gauges and knowledge of exactly how these devices should function. The process takes about 15-30 minutes and typically costs $50-$150 when done separately, though many irrigation companies include it in their startup service.
Skipping this requirement isn’t just risky—it can result in fines and disconnection of your water service. Water departments take backflow prevention seriously because contamination incidents can affect entire neighborhoods.
Here’s the thing: backflow preventers can fail without obvious symptoms. Internal components wear out, seals degrade, and springs lose tension. Annual testing catches these problems before they become health hazards. It’s like getting your car inspected—a small investment that prevents much bigger problems down the road.
Conclusion
Getting your sprinkler system startup right is like setting the foundation for your entire growing season. When you take the time to do it properly—waiting for safe soil temperatures, opening valves slowly to avoid water hammer, and thoroughly testing each zone—you’re not just protecting your lawn. You’re safeguarding your investment and avoiding those wallet-draining repair bills that catch so many homeowners off guard.
The beauty of following our step-by-step process is how it builds on itself. Patience during startup prevents the costly pipe bursts and fitting failures that can turn a simple spring ritual into a plumbing nightmare. Those extra few minutes of careful valve opening and zone testing often save hundreds of dollars down the road.
Living on Cape Cod adds its own wrinkles to the process. Our sandy soil might drain beautifully, but it can also hide underground leaks for weeks. Our maritime climate keeps coastal areas warmer, but inland spots near the Canal can surprise you with late frosts. After 25+ years of working with these local conditions, we’ve learned that Cape Cod expertise really does matter when it comes to irrigation timing and techniques.
Beyond protecting your wallet, smart startup practices help preserve our precious Cape Cod environment. A properly activated and maintained system uses 20-30% less water than rushed or poorly managed setups. When you consider that every gallon saved helps protect our sole-source aquifer and delicate coastal ecosystem, those careful startup steps take on even greater meaning.
Whether you tackle the job yourself or bring in professionals, this isn’t a race. The homeowners who rush through startup in March often spend their summers dealing with the consequences. The ones who wait for proper conditions and follow proven procedures? They’re the ones enjoying lush, healthy lawns while their neighbors scramble to fix preventable problems.
If the whole process feels overwhelming, that’s completely normal. Professional startup services exist for good reason—sometimes the peace of mind and warranty protection are worth every penny. At Best Cape Cod Irrigation, we’ve perfected the startup process through decades of local experience, from the sandy soils of Sandwich to the unique microclimates of Chatham and everywhere in between.
Our Openings and Winterization services combine time-tested techniques with smart technology, ensuring your system awakens safely and runs efficiently all season long. Because when it comes to sprinkler system startup, there’s no substitute for doing it right the first time.
Don’t let startup mistakes turn your spring awakening into a summer of regrets. Start smart, start safe, and enjoy the worry-free watering that comes from 25+ years of Cape Cod irrigation expertise.
