Water Wisely: The Ultimate Guide to Drip Pipe Installation
Looking to install a drip irrigation system? Here’s what you need to know:
- Time Required: 1-4 hours depending on garden size
- Skill Level: Beginner-friendly
- Cost: $50-$100 per 100 square feet for DIY installation
- Water Savings: Up to 50% compared to sprinkler systems
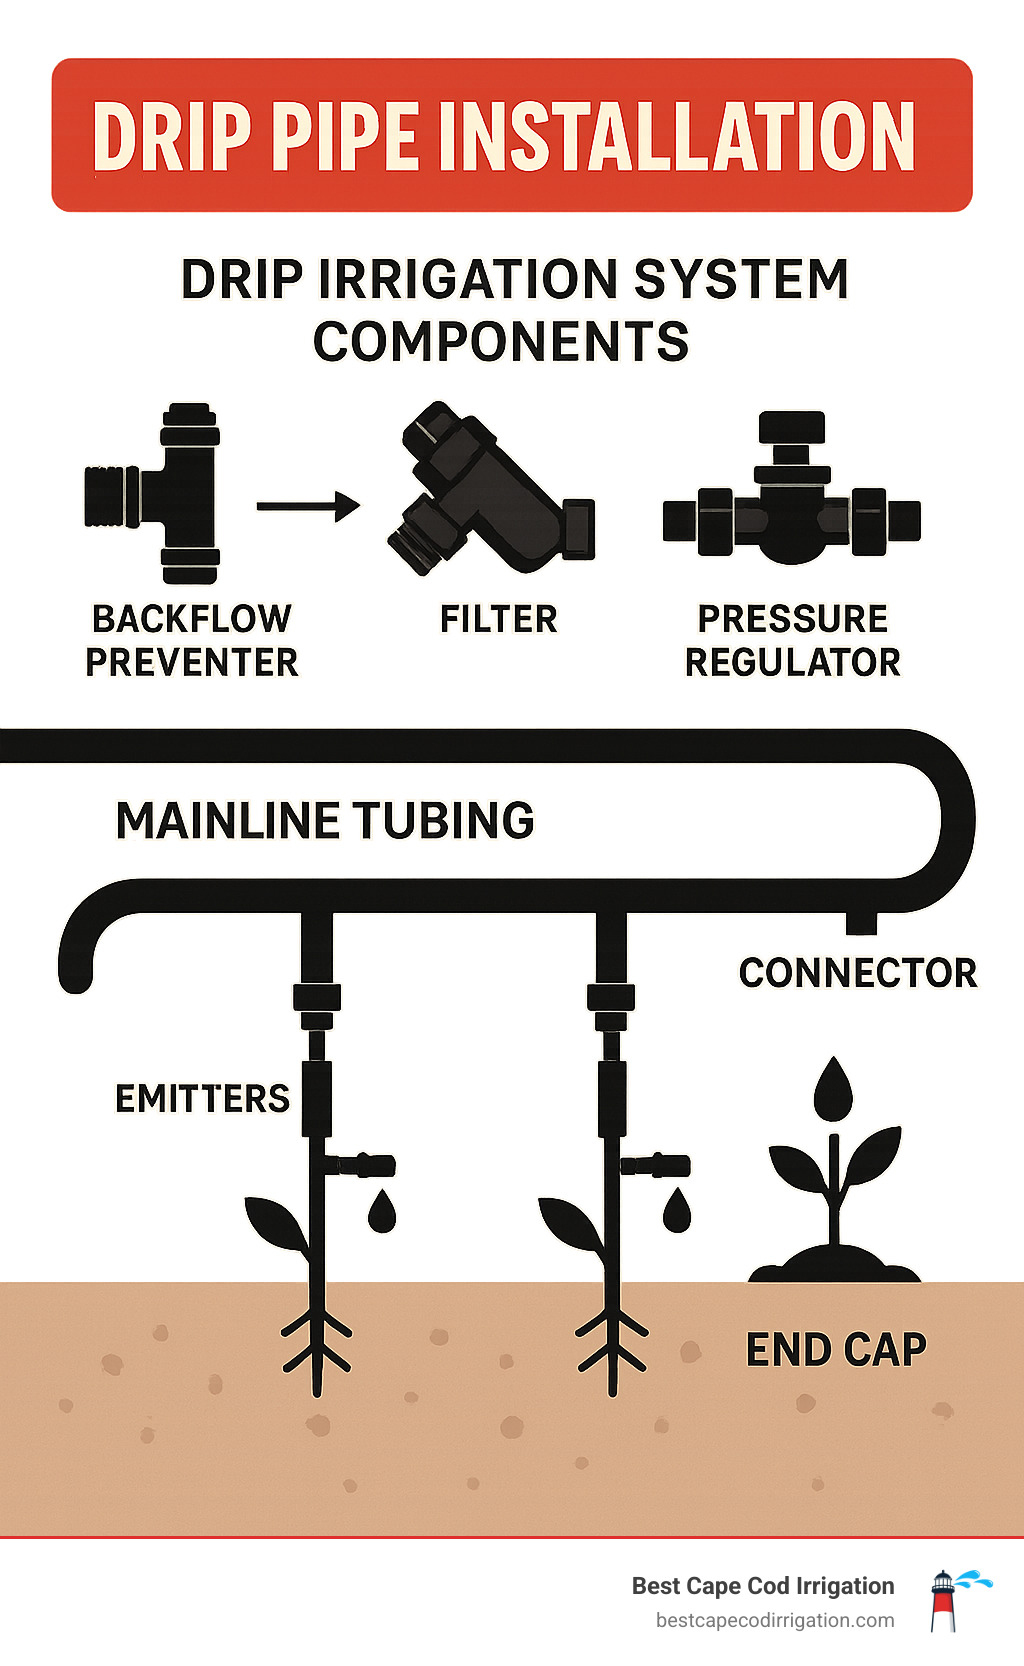
- Main Components: Backflow preventer, filter, pressure regulator, tubing, and emitters
Drip pipe installation is one of the smartest moves you can make for your Cape Cod garden. This efficient watering method delivers moisture directly to plant roots, perfect for our sandy soils that tend to drain quickly. Unlike traditional sprinklers that lose water to evaporation and runoff, drip irrigation systems allow plants to effectively absorb 90% of the applied water.
The beauty of drip irrigation lies in its simplicity. These systems apply water slowly and deeply to your plants’ root zones, giving dry soil time to absorb moisture that would otherwise evaporate or run off. This means healthier plants, significantly reduced water bills, and far less time spent dragging hoses around your yard.
For Cape Cod homeowners battling our unique climate challenges, a drip system can be a game-changer. It prevents fungal diseases by keeping foliage dry, reduces weed growth by watering only desired plants, and adapts easily to our irregular planting areas and container gardens.
The good news? You don’t need years of landscaping experience to install your own drip system. With basic tools and a little patience, you can set up a complete system in as little as a day. The investment pays for itself through water savings and reduced plant loss.
In this guide, we’ll walk through everything you need to know about drip pipe installation, from planning your layout to maintaining your system for years of trouble-free operation.
Drip Irrigation 101: How It Works & Why It Beats Sprinklers
Ever wondered why your neighbor’s garden looks so lush while using half the water you do? The secret might be drip pipe installation. Unlike traditional sprinklers that spray water skyward (where wind, evaporation, and the neighbor’s driveway often claim it), drip irrigation delivers moisture directly to your plants’ root zones where they need it most.
Think of drip irrigation as precision watering. Small devices called emitters release water slowly and steadily right at the base of your plants. Instead of measuring water output in gallons per minute like sprinklers, drip systems work in gallons per hour—giving your soil time to actually absorb the moisture rather than letting it run off.
Your plants will thank you for the switch. Studies show plants can effectively absorb about 90% of water applied through drip irrigation, compared to only 65-75% with traditional sprinklers. This translates to water savings of up to 50% while giving your plants exactly what they need.
The system operates at a gentle 20-30 PSI pressure—much lower than your home’s typical 40-80 PSI. This low-pressure approach not only saves water but prevents soil erosion and compaction that high-pressure systems can cause. Plus, it’s safer for your drinking water when properly installed with backflow prevention.

Benefits at a Glance
The advantages of drip pipe installation go far beyond just saving water. When you water only the soil around your plants (not the spaces between them), you’ll notice fewer weeds popping up to compete for resources. By keeping foliage dry, you’ll dramatically reduce disease risk from fungal problems that plague many Cape Cod gardens.
Your wallet will notice the difference too. With water savings of 30-50%, your summer water bills will shrink just as your garden thrives. The system delivers precise control over how much water each plant receives, which means healthier plants with less effort on your part.
Cape Cod’s sandy soils can be particularly challenging—they drain quickly and often leave plants thirsty. A properly designed drip system compensates for this by delivering water slowly enough for absorption while preventing wasteful runoff. Even during water restrictions, your garden can remain vibrant with significantly less water than conventional methods require.
Perhaps best of all, drip systems offer flexible design that works with any garden shape and easy expansion as your garden grows. Many of our customers start with one bed, then gradually add zones as they see the impressive results.
Core Components Explained
Building a drip system is a bit like putting together a simple puzzle. Here are the essential pieces:
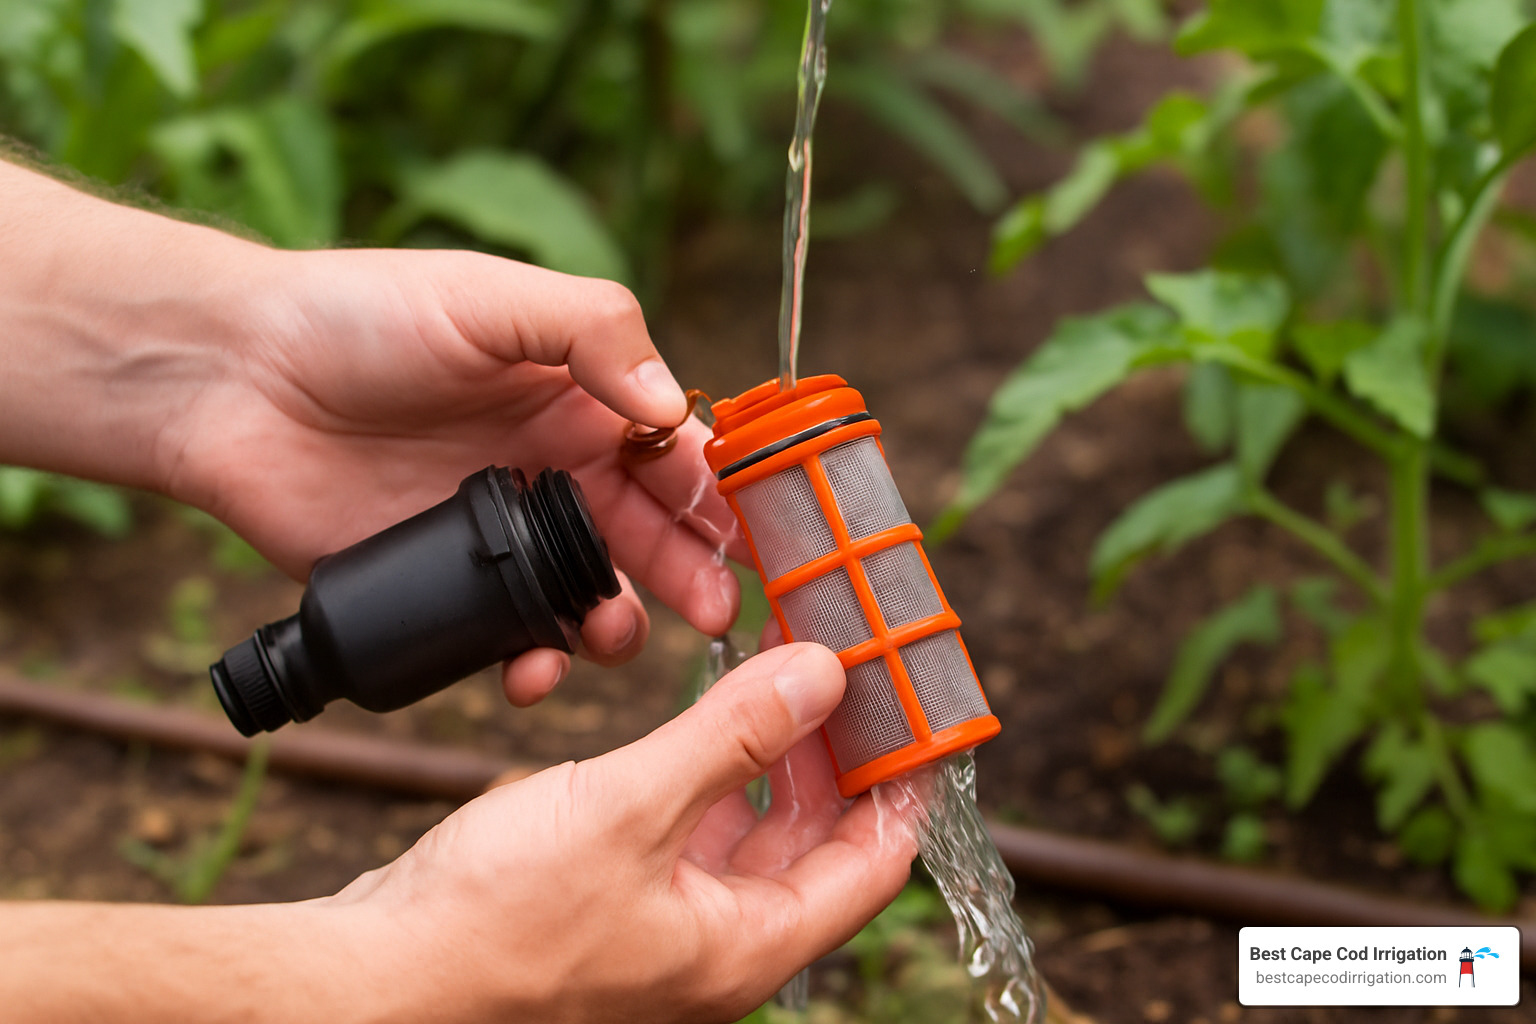
The filter is your system’s bodyguard, capturing sediment and debris that could clog your emitters. We typically install a 150-mesh filter that keeps your system running smoothly year after year.
Your home’s water pressure is too powerful for drip emitters, which is why a pressure regulator is essential. This device brings your water pressure down to the ideal 20-30 PSI range for drip irrigation.
The backbone of your system is the mainline tubing—usually 1/2-inch or 3/4-inch black polyethylene tubing that can handle up to 60 PSI. For most Cape Cod gardens, we recommend keeping individual runs under 200 feet for optimal performance.
From the mainline, smaller 1/4-inch microtubing (sometimes called “spaghetti tubing”) carries water to individual plants or containers. This allows for precise placement around your garden’s specific layout.
The stars of the show are the emitters that actually deliver water to your plants. These come in various flow rates (typically 0.5-2 GPH) to match different plants’ needs. Some emit water in drips, while others create tiny spray patterns for groundcover or closely spaced plants.
Every system needs end caps or flush valves to seal the ends of tubing. These can be removed periodically for system flushing and maintenance—keeping your system performing at its best.
Most importantly, a backflow preventer protects your drinking water supply from contamination. This isn’t just a good idea—it’s required by most building codes and should be installed at least 12 inches above the highest point in your irrigation system.
While optional, a timer or controller automates your watering schedule, ensuring your plants get consistent moisture even when you’re away. Options range from simple battery-operated hose timers to sophisticated smart controllers that adjust to weather conditions.
At Best Cape Cod Irrigation, we’ve installed countless drip systems custom to our unique local conditions. The right system can transform your gardening experience from a constant battle with hoses and sprinklers to a simple, efficient process that gives you more time to actually enjoy your garden.
Planning & Designing Your Dream Drip Layout
Before you buy a single component, taking time to properly plan your drip pipe installation will save you headaches and money. A thoughtful design ensures your plants get exactly the water they need—no more, no less.
Mapping Plants & Water Needs
Start with a simple sketch of your garden area. Don’t worry about artistic talent here—just grab some paper and draw a rough layout showing:
Your water source location is the starting point of your entire system. Mark it clearly, then add the positions of all your plants or planting beds. Don’t forget to include pathways, structures, and any obstacles that tubing will need to steer around. If your yard has slopes or grade changes, note these too—they’ll affect water pressure and flow.
Next comes one of the most important steps many DIYers skip: grouping plants by water needs, or creating “hydrozones.” This means clustering thirsty plants together and drought-tolerant ones in their own sections. Your vegetable garden and annual flowers might form one high-water zone, while your native perennials create a separate low-water zone.
Sun exposure matters too. That sunny south-facing bed will dry out faster than the shady north side of your house. Plants in full Cape Cod sun typically need more frequent watering than those enjoying afternoon shade.
For trees and larger shrubs, plan your emitter placement to cover 50-75% of the canopy area. As trees mature, you’ll want to expand this coverage. Consider creating “emitter loops” with multiple drippers spaced evenly around larger plants to encourage broad root development.
Container gardens deserve special attention. Since potting soil drains quickly, containers often need individual emitters with higher flow rates than in-ground plants. Clustering containers together can simplify your drip pipe installation while creating a beautiful, easy-to-maintain display.
Sizing Tubing & Choosing Emitters
With your layout mapped, you can calculate how much tubing you’ll need and select the right emitters for your plants and soil conditions:
For mainline tubing, the standard 1/2-inch polyethylene (PE) tubing can support approximately 220 gallons per hour total flow. Always add about 10% extra length to account for curves and thermal expansion—tubing stretches and contracts with temperature changes. To maintain proper pressure, limit individual runs to 200 feet or less. Most gardens work best with mainline tubing running either along bed perimeters or down the center of planting rows.
Your soil type plays a crucial role in emitter selection. Sandy Cape Cod soils drain quickly and need higher flow rates with closer emitter spacing. Clay soils absorb water slowly and benefit from lower flow rates with wider spacing. Here’s a simple guide:
| Soil Type | Recommended Flow Rate | Spacing Between Emitters |
|---|---|---|
| Sandy | 2 GPH | 10-12 inches |
| Loamy | 1 GPH | 16-18 inches |
| Clay | 0.5-1 GPH | 18-24 inches |
If your garden has slopes, consider pressure-compensating emitters. These smart little devices maintain consistent flow regardless of elevation changes, ensuring plants at the bottom of a hill don’t get waterlogged while those at the top stay thirsty.
For vegetable gardens with neat rows, drip line (tubing with built-in emitters) offers convenient, evenly spaced watering that’s perfect for crops with similar water needs.
Before finalizing your design and purchasing materials, complete these critical checks:
Test your water pressure with a simple pressure gauge attached to your outdoor faucet. Most residential systems run between 40-60 PSI, but knowing your exact pressure helps with component selection.
Calculate your total system flow by adding up the GPH of all planned emitters. This ensures you don’t exceed what your water source can deliver.
Call 811 at least three days before any digging to locate buried utilities. This free service can prevent costly and dangerous accidents.
Check local building codes regarding backflow prevention requirements. Most municipalities require these safety devices to protect drinking water from contamination.
At Best Cape Cod Irrigation, we’ve seen many DIY installations struggle because of inadequate planning. Taking the time to create a thoughtful design now ensures your Rain Bird Drip Irrigation System Installation works efficiently for years to come. Our 25+ years of local experience has taught us that proper planning isn’t just helpful—it’s essential for creating a system that thrives in Cape Cod’s unique conditions.
Step-by-Step Drip Pipe Installation
Now that your planning is complete, it’s time for the fun part – the actual drip pipe installation! Don’t worry if you’re new to this; most homeowners can complete a basic system in just a day with some patience and the right approach.
Drip Pipe Installation: Hooking Up to Your Water Source
The heart of your system starts with properly connecting to your water source. This “head assembly” is crucial for ensuring your system works correctly and safely.
Always follow this sequence for best results:
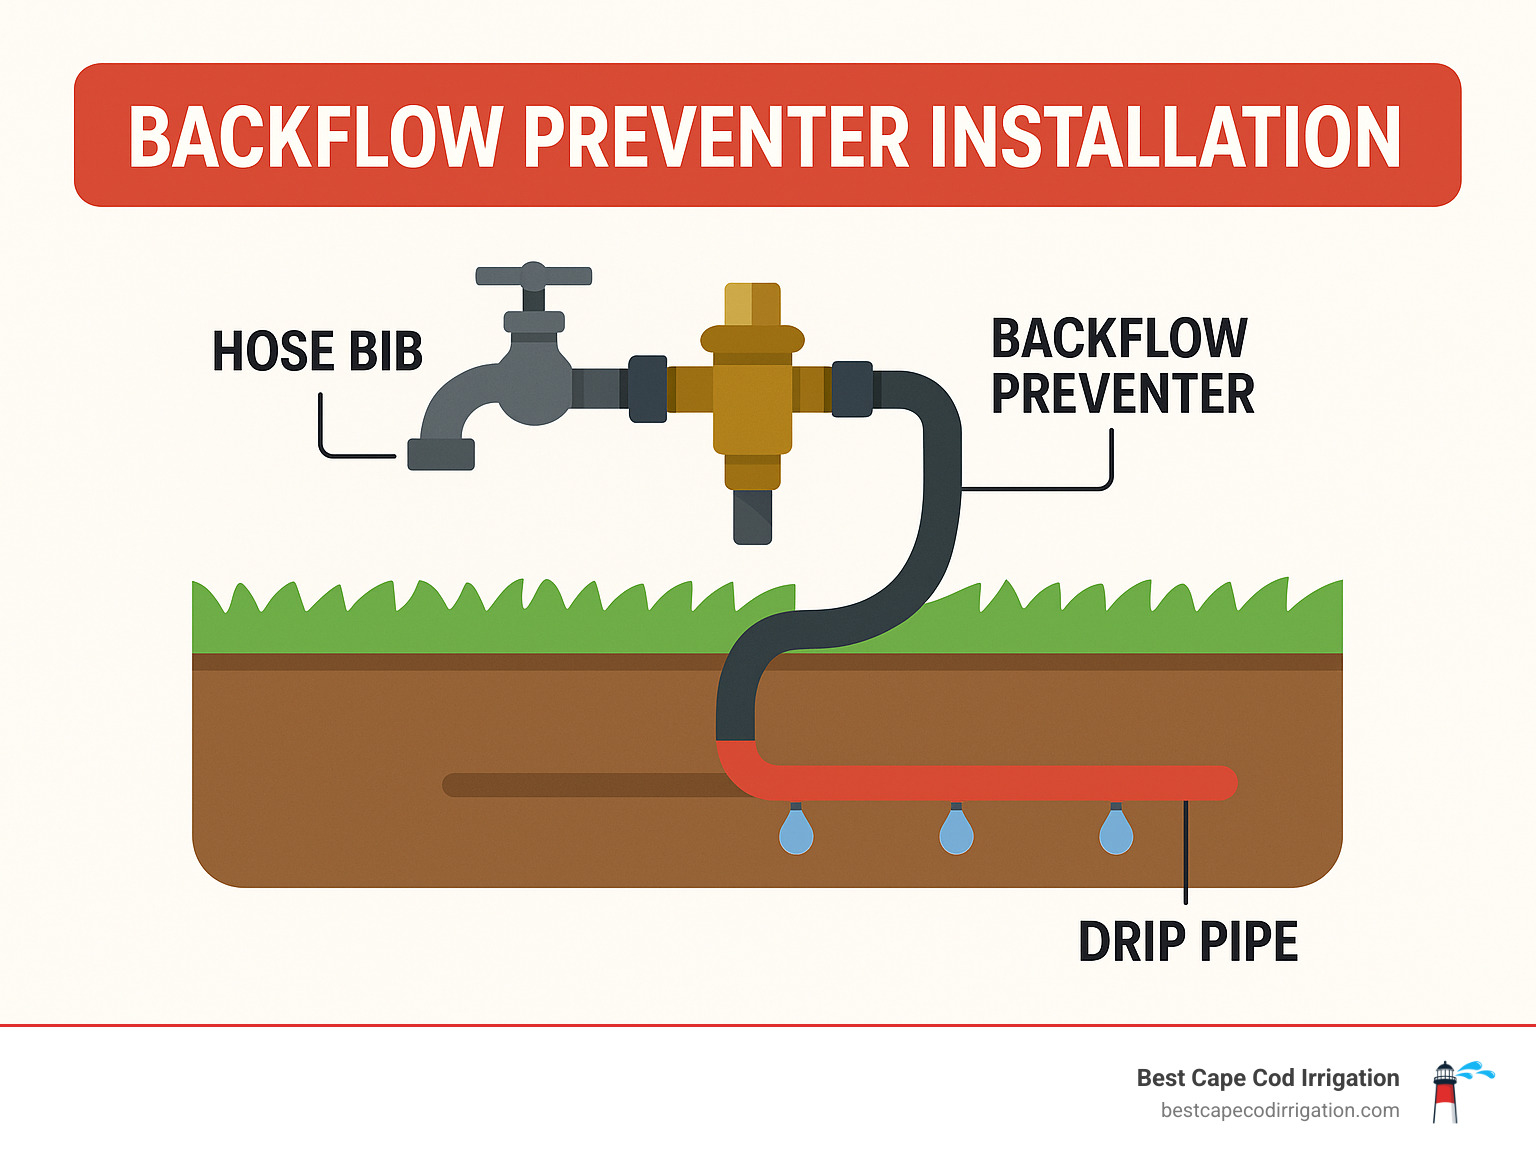
First, attach your timer (if using one) directly to the water source. Next comes the backflow preventer – this isn’t just a good idea, it’s typically required by code to protect your drinking water. Make sure it’s positioned at least 12 inches above the highest point in your irrigation system.
After the backflow preventer, install your filter. This small component plays a huge role in preventing clogged emitters and extending your system’s life. Finally, add the pressure regulator, which brings your home’s water pressure down to the gentle 20-30 PSI that drip systems need to function properly.
If you’re connecting to an outdoor faucet, consider using a Y-adapter so you can still connect a garden hose when needed. Always apply pipe thread sealant tape to threaded connections, and remember – hand-tight plus a quarter turn is perfect. Over-tightening can crack fittings!
For awkwardly positioned faucets, don’t hang heavy components directly from them. Instead, use a short section of garden hose to position your components on the ground or create a small support platform. Your faucet (and future self) will thank you when you’re not fixing broken connections later.
For more permanent installations that Cape Cod homeowners often prefer, you might consider installing an anti-siphon valve or connecting to an existing irrigation valve. Many of our customers have successfully retrofitted sprinkler risers with conversion kits for a cleaner installation.
Drip Pipe Installation: Laying & Securing Mainline Tubing
With your head assembly connected, it’s time to lay out the backbone of your system – the mainline tubing:
Choose a warm day if possible – polyethylene tubing becomes much more flexible and cooperative in warmer weather. When unrolling, avoid pulling the tubing which creates kinks. Instead, either place the coil on the ground and walk away with the end (stationary method) or hold the coil and walk your planned route letting it unroll behind you (mobile method).
Always add about 10% extra length to your measurements and create a gentle “snaking” pattern rather than pulling the tubing tight. This simple trick accommodates natural expansion and contraction as temperatures change and creates natural sediment traps.
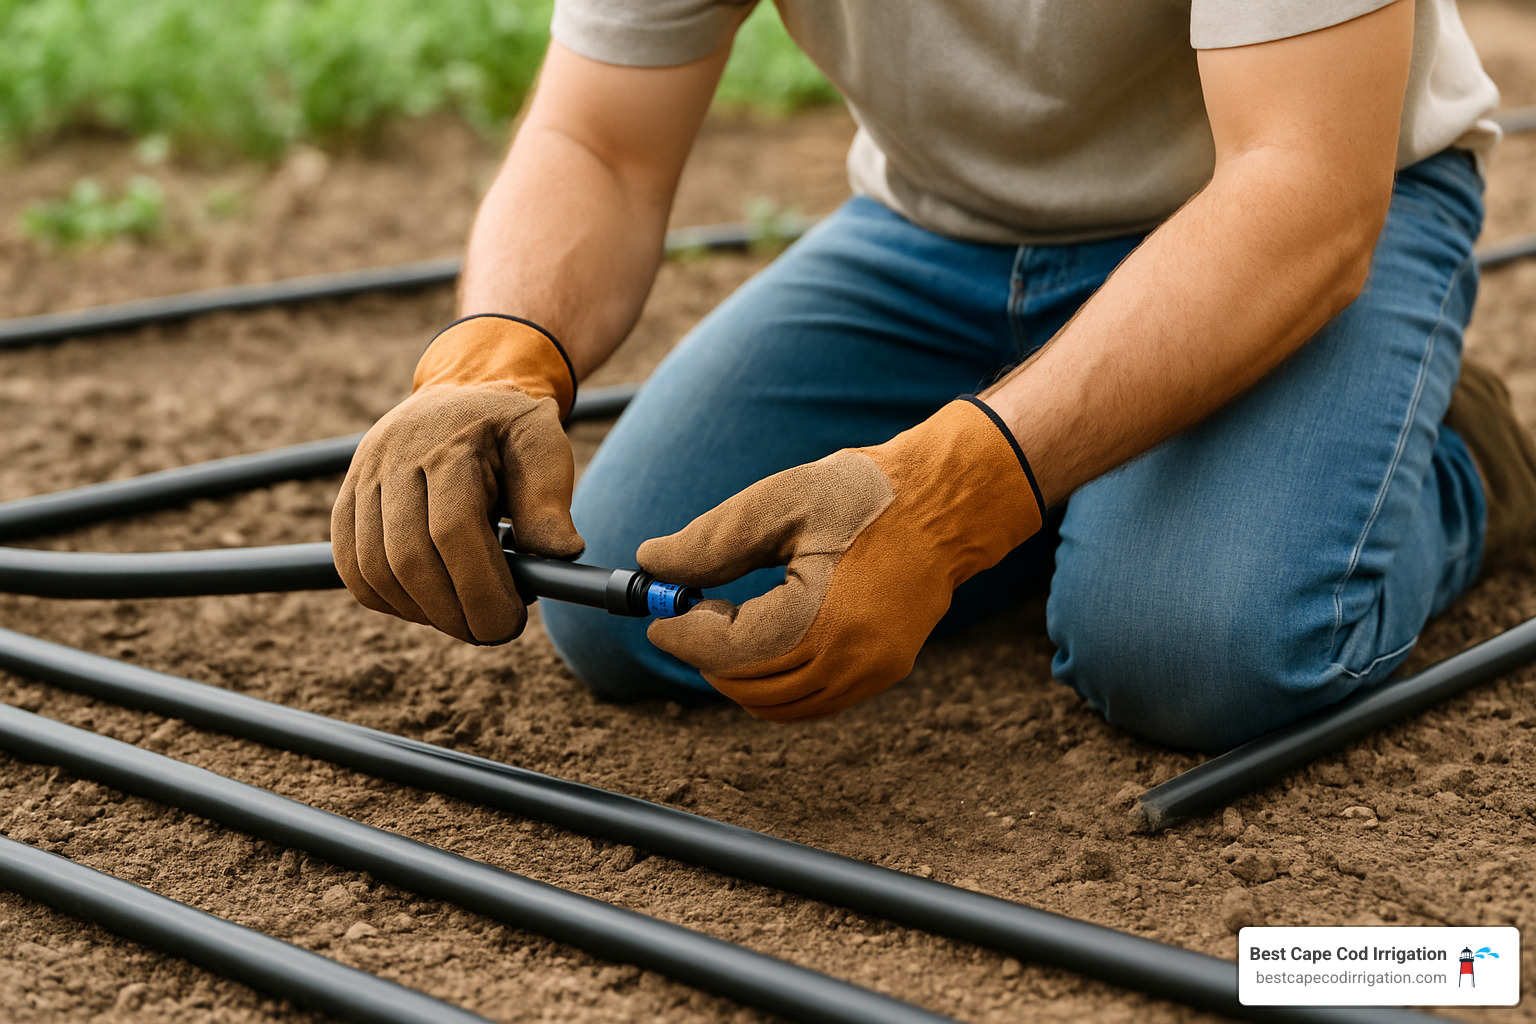
When cutting tubing, use pruning shears or a sharp utility knife for clean, square cuts that will form tight connections. Push tubing firmly onto barbed connectors until you feel it “seat” completely.
Don’t skip the stakes! Secure your tubing every 2-3 feet and near all fittings to prevent movement that could stress connections or create tripping hazards. This is especially important in Cape Cod’s sandy soils where tubing can shift easily.
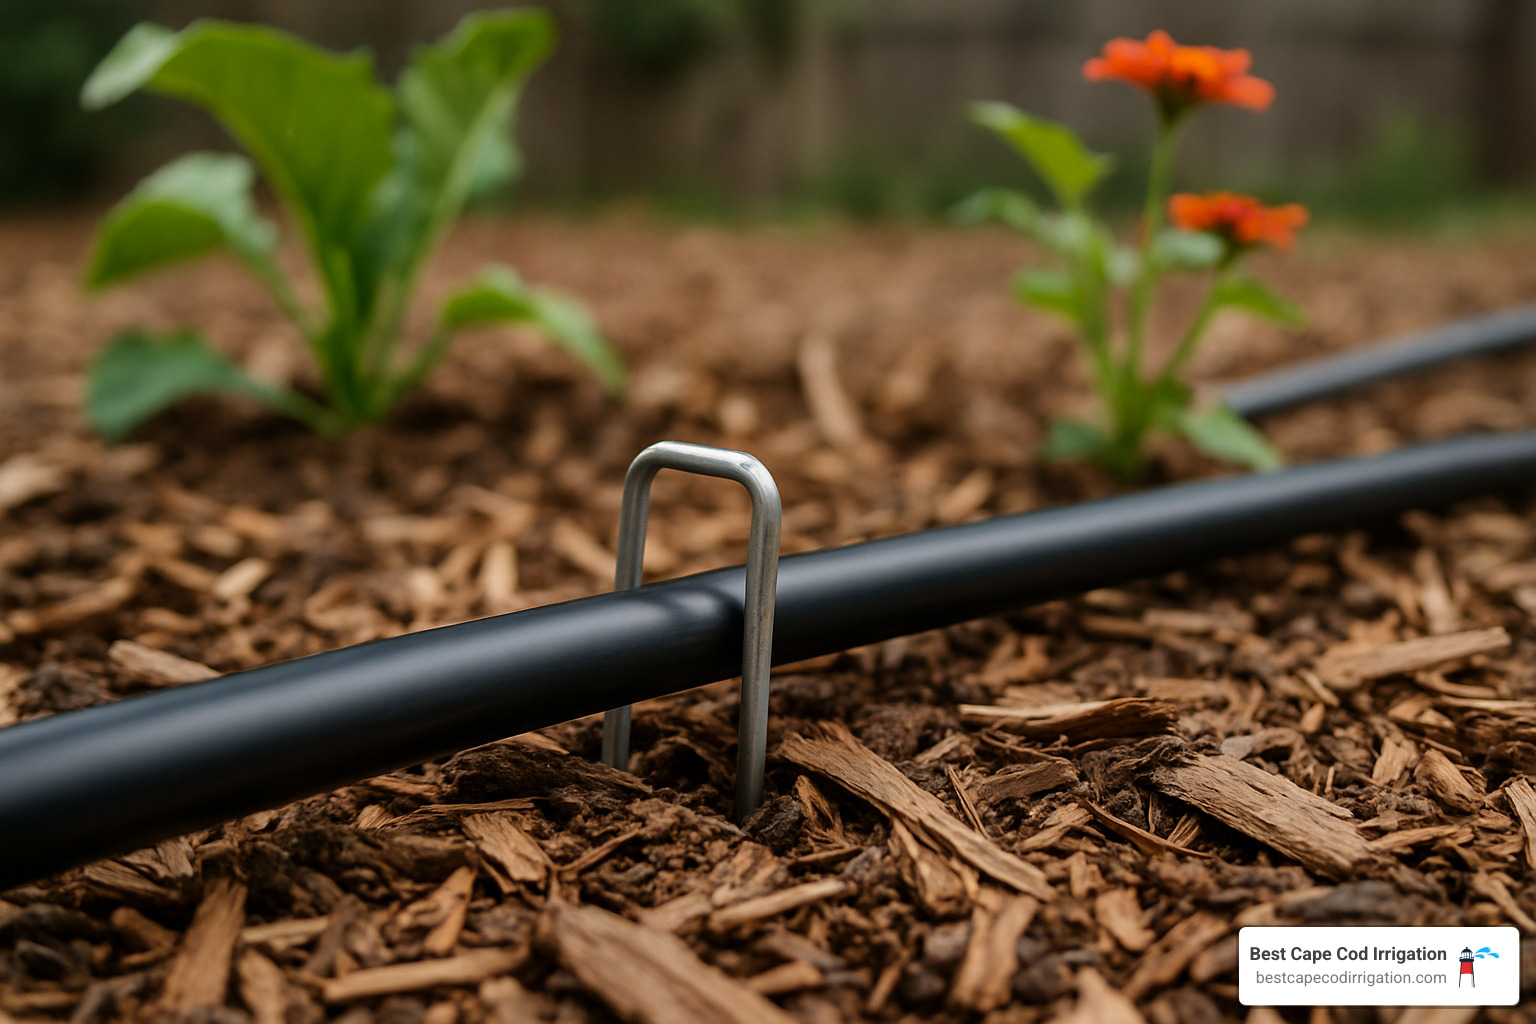
For curves and corners, think gentle bends rather than sharp angles. Use elbow fittings for 90-degree turns and place stakes on both sides of corners to maintain position. If you’re dealing with slopes (common in many Cape Cod landscapes), run tubing across the slope when possible and use extra stakes to prevent downhill migration.
Adding Branch Lines, Emitters & Micro-Sprayers
Now for the parts that actually deliver water to your plants:
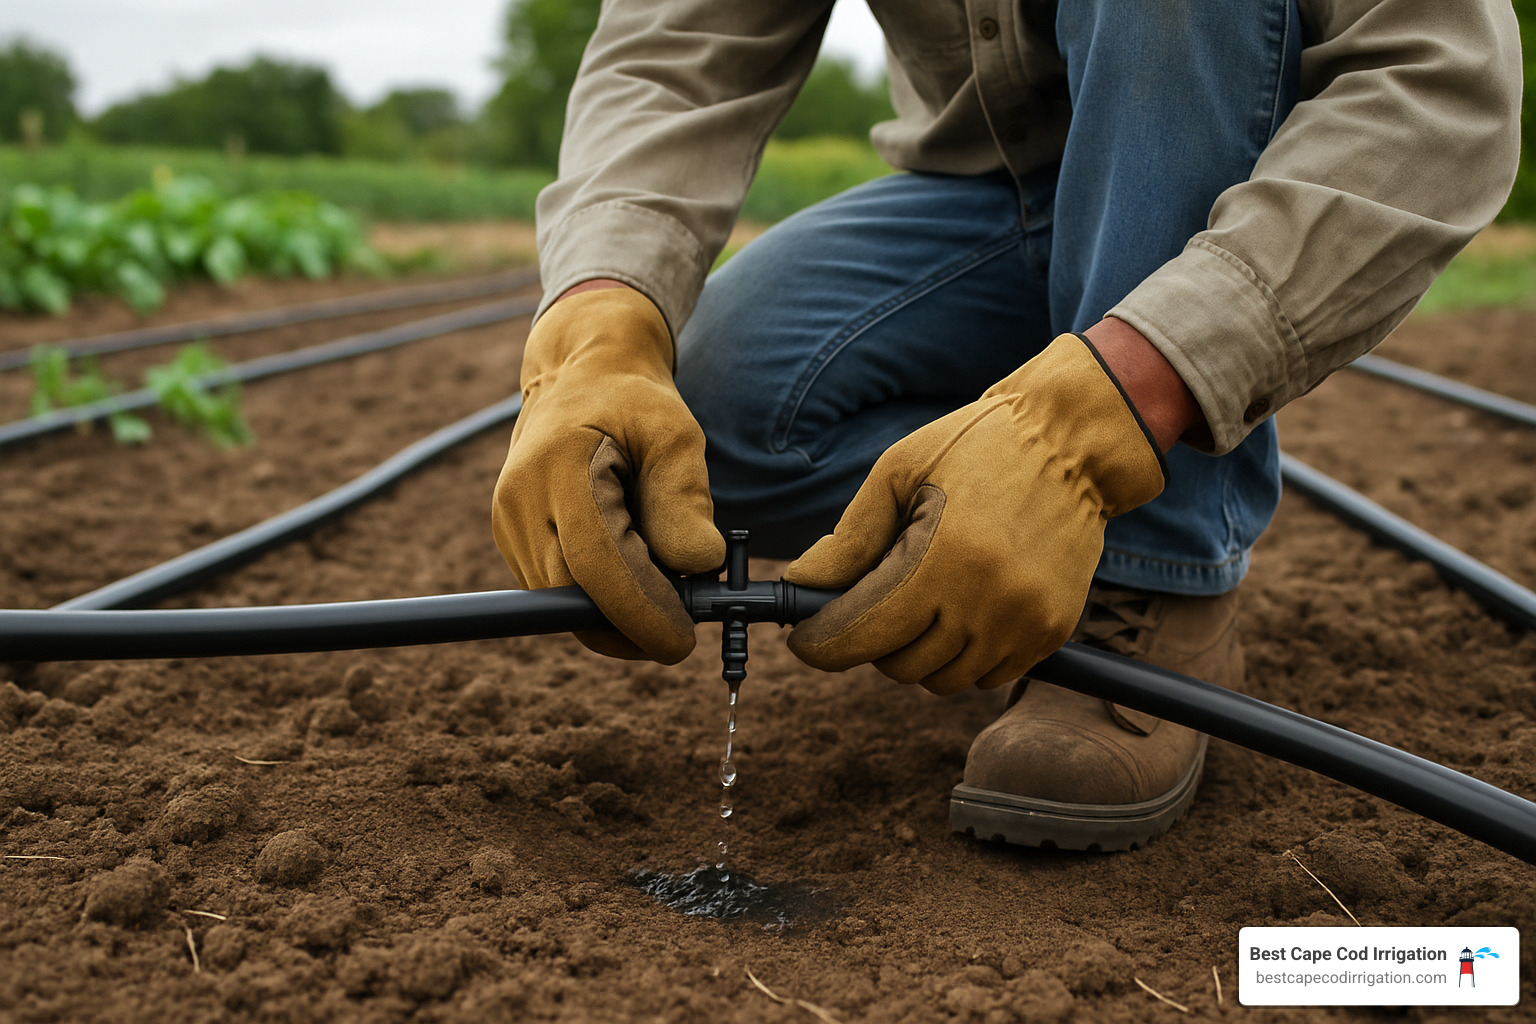
Start by installing tees for your branch lines using a proper hole-punch tool – never a standard drill bit, which creates ragged holes that leak. Press barbed tees firmly until they “click” into place. For extra security, especially in higher-pressure areas, add band clamps to secure these connections.
Next, connect your 1/4-inch microtubing to these barbed tees. This flexible “spaghetti tubing” is what allows you to precisely position water right where each plant needs it. For individual plants, you can either punch a hole in the mainline near each plant and insert a button dripper, or run microtubing with an emitter at the end.
For vegetable rows or flower beds, in-line drip tubing with pre-installed emitters at regular intervals works beautifully. If you’re watering ground cover or dense plantings, micro-sprayers on stakes provide excellent coverage.
Larger trees and shrubs benefit from “watering loops” – circles of 1/4-inch tubing around the drip line (outer edge of foliage) with multiple emitters to provide even moisture throughout the root zone.
Always position emitters about 6-12 inches from plant stems – halfway between the stem and the edge of the expected root zone. This encourages roots to grow outward for better stability and nutrient uptake.
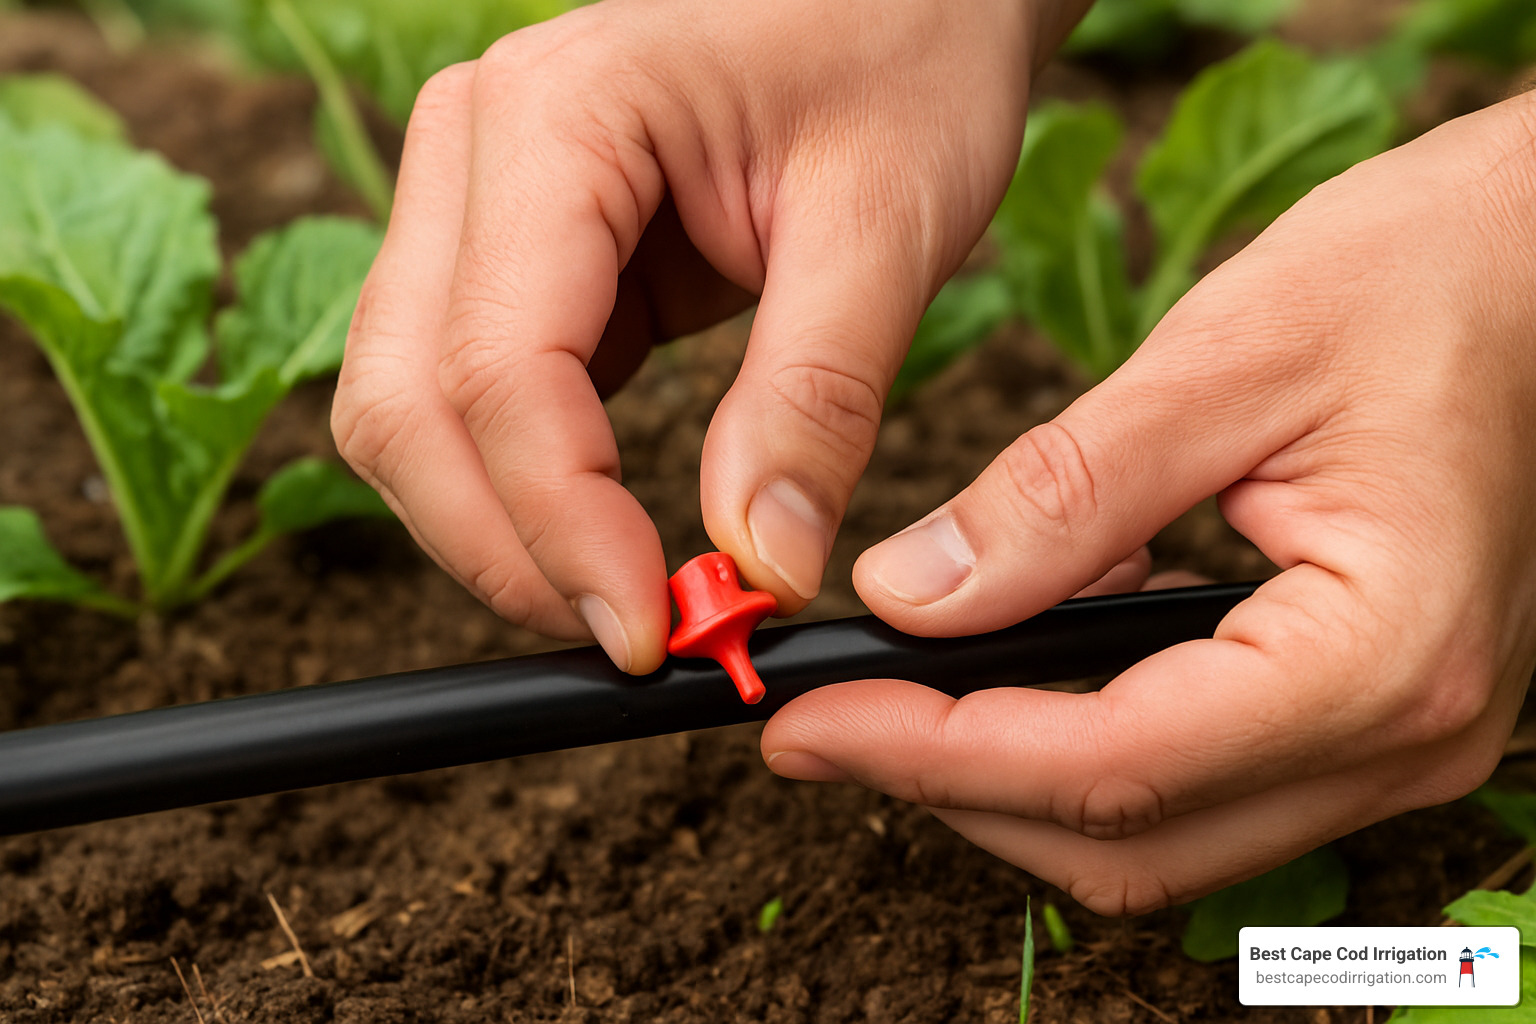
Made a mistake while punching holes? No problem! Keep some “goof plugs” handy to seal unwanted holes in your tubing. They’re inexpensive and can save you from replacing entire sections of tubing.
For container plants, which dry out quickly in Cape Cod’s summer breezes, use weighted drip stakes that sit in the pot and consider higher flow rates (2 GPH) to compensate for faster drainage. For hanging baskets, run microtubing up the back for discreet watering that won’t dampen your patio or deck.
Flush, Test & Program
Before considering your drip pipe installation complete, proper flushing and testing are essential:
First, flush the system before installing any end caps. Simply leave the ends open and turn on the water for several minutes until it runs clear. This removes manufacturing debris and dirt that could clog your emitters right from the start.
Next, cap the ends using figure-8 end clamps (which are reusable and allow for future expansion), compression end caps, or temporarily fold over the ends and secure with a clamp.
Now it’s time to test your handiwork. Turn on the system and check each emitter for proper flow, inspect all connections for leaks, and verify you have consistent pressure throughout the system. Make adjustments as needed – replace any clogged emitters, tighten leaking connections, and add emitters where coverage seems inadequate.
If you’re using a timer, program it to water deeply but infrequently – usually 30-60 minutes 2-3 times per week is a good starting point. You’ll need to adjust based on weather, soil moisture, and plant needs. New plants need more frequent watering until established, so you may need to run your system more often initially, then reduce frequency as plants develop deeper roots.
At Best Cape Cod Irrigation, we’ve installed countless drip systems across the Cape, and we’re always happy to provide guidance if you have questions during your drip pipe installation. Our 25 years of local experience means we understand exactly how these systems perform in our unique coastal environment.
Maintaining, Troubleshooting & Expanding Your System
Let’s face it—even the best irrigation systems need a little TLC. With proper maintenance, your drip pipe installation will reward you with years of trouble-free operation and lush, healthy plants.
Think of system maintenance like changing the oil in your car—a small investment of time that prevents costly problems down the road. At Best Cape Cod Irrigation, we’ve seen 20-year-old systems still running perfectly because their owners followed some simple care routines.
Monthly Maintenance Checklist:
Take a leisurely stroll through your garden once a month, coffee in hand, and give your system a quick once-over. Look for clogged or damaged emitters, check connections for leaks, and make sure your plants look properly hydrated. This five-minute inspection can save hours of troubleshooting later.
Don’t forget to clean your filter regularly—it’s the unsung hero of your system. Simply unscrew the housing, rinse the mesh element under running water, and you’re good to go. A clean filter prevents the frustrating game of “find the clogged emitter” later.
As seasons change, so should your watering schedule. Your timer isn’t psychic—it needs you to adjust its programming as days get longer or shorter and temperatures rise and fall. Your plants will thank you for this attention to detail with vibrant growth and fewer pest problems.
When winter approaches on Cape Cod, remember to drain your system completely if you’re in an area prone to freezing. Nothing damages irrigation components faster than expanding ice. A quick blow-out with compressed air can save you a complete system replacement in spring.
For those pesky clogged emitters, a simple home remedy often works wonders. Soak them in plain white vinegar for a few hours—the mild acid dissolves mineral buildup that causes most clogs. If that doesn’t work, a fine wire or replacement emitter will get things flowing again. For whole-system mineral buildup (common with hard water), consider adding a fertilizer filter to your setup even if you’re not injecting fertilizer—it provides excellent secondary filtration.
Common Mistakes to Avoid
After installing hundreds of systems across Cape Cod’s varied landscapes, we’ve seen homeowners make the same drip pipe installation mistakes time and again. Let’s help you avoid them:
Skipping the filter is like driving without oil—eventually, something’s going to break. Even crystal-clear municipal water contains tiny particles that will clog your emitters over time.
Forgetting the pressure regulator might seem harmless, but excessive pressure will damage components and create misting at emitters—exactly what you’re trying to avoid with a drip system. Those tiny water droplets evaporate before they reach your plants’ roots.
Overcrowding your system with too many emitters on a single line is another common pitfall. 1/2-inch tubing can only support about 220 gallons per hour. Exceed that, and your plants at the end of the line will be thirsty.
Using the wrong emitter spacing for your soil type leads to soggy spots and dry patches. Sandy Cape Cod soils need closer spacing than clay soils since water moves downward quickly rather than spreading horizontally.
Unsecured tubing isn’t just a tripping hazard—it creates stress on connections that leads to leaks and disconnects. Those few extra stakes are worth their weight in gold.
Don’t forget to plan for future plant growth. That cute little maple sapling will eventually need expanded coverage as its root system grows. Leave room in your design for additional emitters down the road.
When & How to Upgrade with Tech
Ready to take your irrigation game to the next level? Smart technology can make your drip pipe installation even more efficient and convenient.
Weather-based controllers are like having a personal meteorologist for your garden. These smart devices automatically adjust watering schedules based on local conditions, potentially saving an additional 15-30% on water usage. They’ll skip watering when it rains and increase run times during heat waves—all without you lifting a finger.
Soil moisture sensors take the guesswork out of watering by measuring actual moisture levels in your soil. Why water on Tuesday if Monday’s rain already saturated the ground? These sensors prevent overwatering by canceling scheduled cycles when moisture levels are adequate.
For leak detection, nothing beats a flow meter. These devices monitor water usage patterns and can alert you to unusual flow—like when that rogue shovel punctures your mainline or a fitting works loose. Some models even automatically shut off the water to prevent damage.
WiFi-enabled timers let you control your system from anywhere using your smartphone. Heading home from vacation early? Turn on your system remotely to give thirsty plants a drink before you arrive. Unexpected guests? Delay watering until after they leave.
The best part? Many Cape Cod municipalities and water districts offer substantial rebates for smart irrigation controllers. These rebates can offset 50% or more of the controller cost, making the upgrade very affordable. It’s like getting paid to save water!
At Best Cape Cod Irrigation, we’ve seen customers lower water bills by hundreds of dollars annually after upgrading to smart controllers. The technology typically pays for itself within one or two growing seasons.
Whether you need help maintaining your existing system or are ready to upgrade to smart irrigation technology, our team of experts is ready to help with professional irrigation repairs & maintenance custom to Cape Cod’s unique conditions.
Frequently Asked Questions About Drip Pipe Installation
How much does a DIY drip system cost?
When homeowners ask me about drip pipe installation costs, I always smile and tell them it’s one of the most budget-friendly landscaping projects they can tackle. The investment varies based on your garden’s size and how fancy you want to get with components:
For a modest vegetable garden or flower bed (about 100 square feet), expect to spend between $50-$100 for a basic setup with manual controls. This gets you the essential components—tubing, emitters, and basic fittings.
If you’re looking for more convenience with timers and additional emitter types, a mid-range system typically runs $100-$200 per 100 square feet. This sweet spot balances quality and affordability for most Cape Cod gardens.
For gardening enthusiasts who want all the bells and whistles—smart controllers, premium-grade components, and specialized emitters—plan on $200-$300+ per 100 square feet. These systems practically pay for themselves through water savings and reduced plant replacement costs.
To put these numbers in perspective, hiring a professional for the same installation typically costs $300-$900+ per 100 square feet, depending on your property’s complexity and current labor rates. The DIY approach offers substantial savings, especially if you’re willing to spend a Saturday getting your hands a little dirty!
How long will installation take?
Time is precious on Cape Cod, especially during our beautiful summer months, so it’s fair to wonder how much of your weekend a drip pipe installation might consume.
For a small garden setup under 100 square feet, set aside about an hour once you’ve gathered all your supplies. This is perfect for a container garden or modest vegetable patch.
Medium gardens between 100-500 square feet typically require 2-2.5 hours from start to finish. This covers most residential foundation plantings or larger vegetable gardens.
Larger landscapes over 500 square feet or systems with multiple zones will need 3-4+ hours, particularly if you’re navigating around existing landscaping or incorporating different watering needs.
If this is your first irrigation project, I recommend adding about 50% to these estimates and perhaps inviting a friend to help (and maybe bribing them with lunch!). The good news? Once you’ve installed your first system, expansions and additions go much faster as you’ll already understand the basics.
Do I need a backflow preventer?
Yes, you absolutely need a backflow preventer—this isn’t just good practice, it’s typically required by law. These devices prevent potentially contaminated water from your garden from flowing backward into your clean drinking water supply.
Most Cape Cod towns have specific code requirements about which type you’ll need:
Hose bib vacuum breakers are the simplest option for truly basic systems that connect to outdoor faucets. They’re inexpensive ($5-15) and easy to install without tools.
Pressure vacuum breakers (PVBs) offer more protection and must be installed at least 12 inches above the highest point in your irrigation system. These are the most common choice for residential installations.
Anti-siphon valves serve double duty by combining a control valve with backflow prevention features—a space-saving option for smaller yards.
Before starting your drip pipe installation, I recommend checking with your local building department or water utility to confirm requirements. At Best Cape Cod Irrigation, we’re thoroughly familiar with regulations throughout the Cape and can guide you toward a compliant installation that keeps your water safe.
Conclusion
When it comes to creating a more efficient, eco-friendly landscape, drip pipe installation is truly one of the smartest investments you can make for your Cape Cod property. The beauty of this system isn’t just in the water savings—though cutting your usage by up to 50% is certainly impressive—but in how it transforms your entire gardening experience.
Imagine watching your plants thrive with consistent, precise watering that reaches exactly where they need it most. Picture yourself enjoying summer evenings in your garden instead of standing with a hose in hand. That’s the reality that awaits after your drip pipe installation is complete.
Throughout this guide, we’ve walked through the entire process, from planning to maintenance. Now you have all the knowledge needed to create a custom system that works perfectly for your unique landscape. Even the most beautifully designed gardens can struggle without proper irrigation—and on Cape Cod, with our sandy soils and occasional water restrictions, efficient watering isn’t just nice to have, it’s essential.
What makes drip pipe installation particularly valuable for Cape Cod gardens is how it adapts to our local conditions. The system delivers moisture slowly and directly to plant roots, allowing even our quick-draining sandy soils to absorb water effectively before it percolates away. This means stronger root systems, healthier plants, and landscapes that remain vibrant even during dry spells.
While many homeowners successfully install their own systems, others prefer professional guidance—especially for larger properties or more complex designs. At Best Cape Cod Irrigation, we bring over 25 years of local experience to every project. We understand the unique microclimates across the Cape, from the windswept outer beaches to the more sheltered mid-Cape areas, and can design systems that respond perfectly to these varied conditions.
Our team specializes in creating custom, eco-friendly irrigation systems that maximize efficiency while minimizing environmental impact. Whether you’re looking to install a brand new system or upgrade an existing one with smart technology, we can help you create the perfect solution for your property.
The investment you make in proper irrigation today will continue paying dividends for years to come—in lower water bills, reduced plant replacement costs, and countless hours saved on manual watering. Plus, there’s the peace of mind that comes from knowing your landscape is receiving exactly what it needs, even when you’re away.
Ready to transform your approach to watering? Whether you choose the DIY route or prefer professional installation, the switch to drip irrigation marks the beginning of a more sustainable, stress-free approach to maintaining your Cape Cod landscape.
Your garden deserves the best—and so do you. Let’s make every drop count.
