Grow Fresh Food Year-Round With Minimal Effort
Looking to build a diy self watering hydroponic system? Here’s what you need to know:
- Cost: Complete systems can be built for under $150 including seeds and nutrients
- Time Investment: 2-3 hours to build a basic system
- Core Components: Reservoir, grow sites, wicking mechanism or pump, nutrient solution
- Skill Level: Beginner-friendly with basic tools (drill, saw, utility knife)
- Space Required: As little as 2 square feet for a starter system
Returning home to find wilted plants is never pleasant – especially when you’ve invested weeks nurturing them. If you’re tired of daily watering chores or want to grow fresh produce year-round with minimal effort, a self-watering hydroponic system might be your solution.
I’ve seen how these systems transform gardening. One container grower reported harvesting over 5 kg (13 lbs) of runner beans from a single self-watering setup – roughly double what traditional containers produce. That’s because plants receive consistent moisture and nutrients exactly when needed.
Unlike traditional soil gardening, hydroponics delivers water and nutrients directly to plant roots in a highly efficient manner. The “self-watering” aspect means the system maintains proper moisture levels automatically, either through passive wicking or a simple pump mechanism.
The beauty of DIY hydroponic systems is their adaptability. You can build one using common household items like storage totes, buckets, or even recycled plastic bottles. Solar-powered pumps eliminate the need for electrical outlets, making these systems truly versatile.
As one home hydroponic gardener put it: “I have the worst luck with remembering to water my tomatoes on a regular basis—I’ve nearly killed them three times this spring already.” That’s exactly the problem these systems solve.
Whether you’re an apartment dweller with limited space, a busy professional with little time for daily garden maintenance, or someone looking to maximize yields with minimal water usage, a DIY self-watering hydroponic system offers an neat solution.
How Does a Self-Watering Hydroponic System Work?
Ever wondered how plants can thrive without soil? The magic behind a diy self watering hydroponic system is surprisingly simple. These systems deliver the perfect trio plants need: water, nutrients, and oxygen—all without the messiness of traditional gardening.
Think of it as creating a plant paradise where roots get exactly what they need, when they need it. Let me walk you through how these clever systems work.
Wick Systems
Remember those science experiments with paper towels absorbing colored water? Wick systems work on the same principle. A simple cotton rope or fabric strip draws nutrient solution upward from a reservoir to your plants through capillary action—like a plant drinking through a straw! No electricity, no moving parts—just physics doing its thing.
Kratky Method
If you’re just starting out, the Kratky method is your new best friend. It’s hydroponics at its simplest: suspend plants in net pots above nutrient solution, with roots partially dipping in. As your plants drink up water, they create their own air gap—the upper roots breathe oxygen while lower roots sip nutrients. One gardener told me, “Using the Kratky method for a truly passive, no-pump hydroponic setup” transformed his lettuce growing game completely.
Deep Water Culture (DWC)
DWC systems are like a bubbling spa for your plant roots. They hang directly in nutrient-rich water that’s constantly aerated by an air pump and stone. Those bubbles aren’t just pretty—they’re oxygen delivery vehicles preventing root rot while your plants feast on nutrients. The only catch? You’ll need electricity for that air pump.
Ebb and Flow (Flood and Drain)
Think of this as a plant tide system. The growing area periodically floods with nutrient solution, then drains back to the reservoir. This rhythmic cycle ensures roots get both their drinks and their breaths. With a simple timer and pump, the entire process runs on autopilot.
Drip Systems
Precision is the name of the game with drip systems. Nutrient solution travels from a reservoir through tubing to drip directly at each plant’s base. Any excess solution finds its way back to the reservoir—nothing wasted! This method gives you fine-tuned control over exactly how much moisture each plant receives.
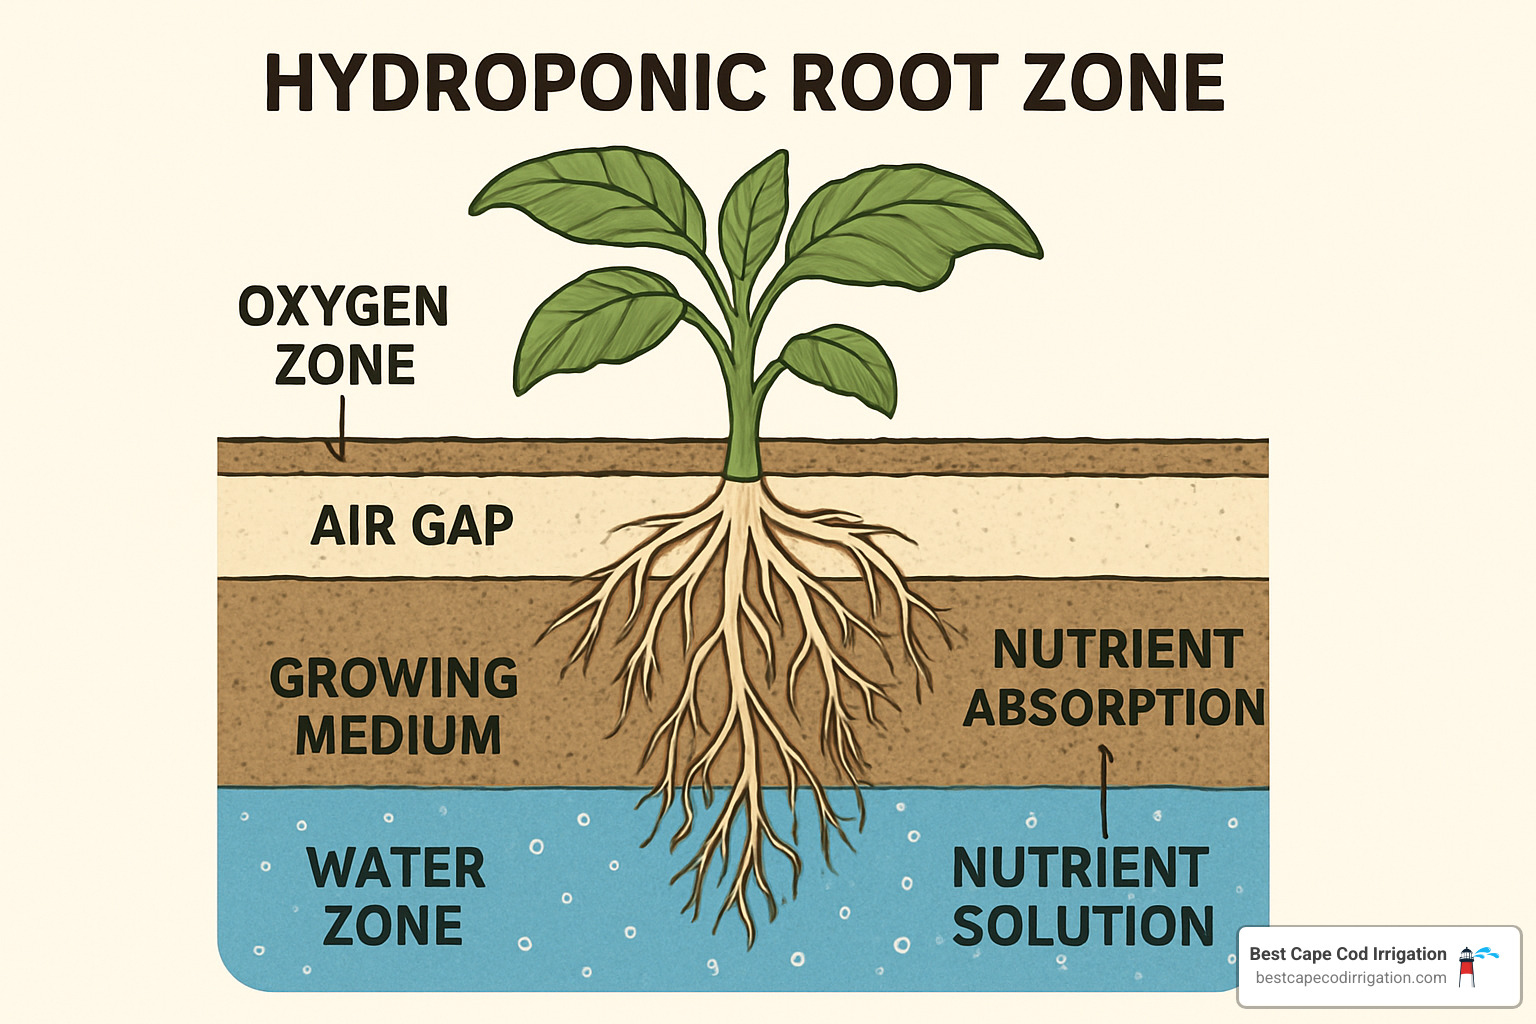
The secret ingredient in all these systems is the air gap. Without it, your plants would essentially drown. As one seasoned hydroponic gardener explained to me: “In soil, pore spaces provide root oxygen; hydroponic systems require alternative methods to aerate water.” This breathing room is non-negotiable for healthy plants.
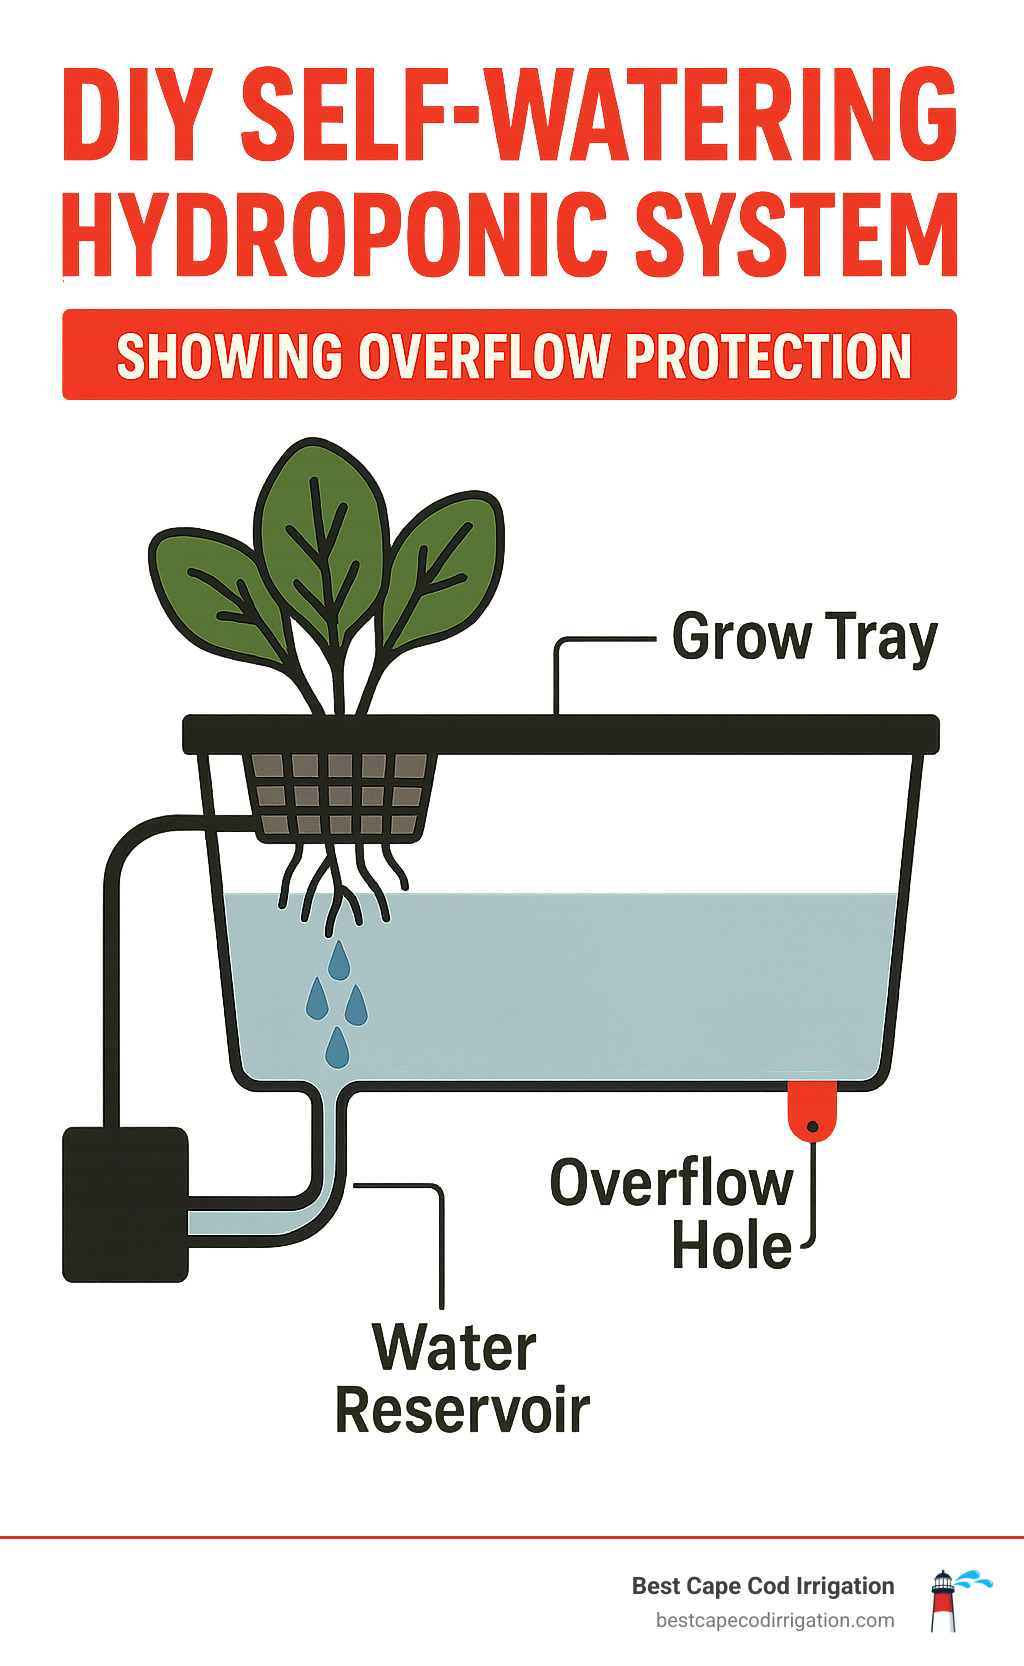
Smart systems also include a simple overflow hole—typically drilled at a specific height—to prevent flooding disasters. It’s like having a bathtub drain that kicks in automatically when water gets too high.
If you’re interested in applying similar targeted water delivery principles to your yard, we at Best Cape Cod Irrigation can help you learn more about Rain Bird drip installation. These systems use the same fundamental concept—delivering water precisely where it’s needed, when it’s needed.
Planning Your Build: Designs, Costs & Gear
Thinking about creating your own diy self watering hydroponic system? Let’s talk about what you’ll need before you start drilling holes and connecting tubes. The beauty of these projects is that they’re incredibly flexible – you can build one that fits your space, budget, and gardening goals.
System Types and Design Considerations
I’ve helped dozens of gardeners choose the right hydroponic setup, and these five designs tend to work best for beginners:
A Bucket Array System connects multiple one-gallon buckets to a central reservoir. This setup is perfect if you want to grow different plants with varying nutrient needs. I’ve seen beautiful arrays with strawberries, basil, and lettuce all thriving side by side.
The Storage Tote DWC (Deep Water Culture) is probably the simplest option – just a large plastic container with grow sites cut into the lid. One gardener I know started with a 27-gallon tote and now harvests enough lettuce to share with her entire apartment building.
For those with limited space, a Sub-Irrigation Planter uses a clever false bottom with PVC “feet” that wick water upward from below. These are remarkably efficient with water and perfect for apartment balconies.
Bottle Systems repurpose plastic bottles into mini gardens – ideal for herbs on a kitchen windowsill. They’re practically free to make and surprisingly productive.
Rain Gutter Channels create continuous growing spaces using standard gutters with a reservoir at one end. These work beautifully along a fence or wall where space is limited.
Budget Breakdown
The cost-effectiveness of DIY hydroponics is one of its biggest selling points. As one enthusiastic builder told me: “You don’t need to spend thousands of dollars to grow salad, tomatoes, or strawberries hydroponically. Here’s how to do it for less than $150, everything included.”
Most systems can be built with basic components like a solar or aquarium pump ($14-20), a five-gallon bucket with lid ($6), additional one-gallon buckets ($33 for 12), grow baskets ($9 for 50), silicon tubing ($10), barbed fittings ($8-12), plant food ($26), rockwool plugs ($10), and seeds ($18).
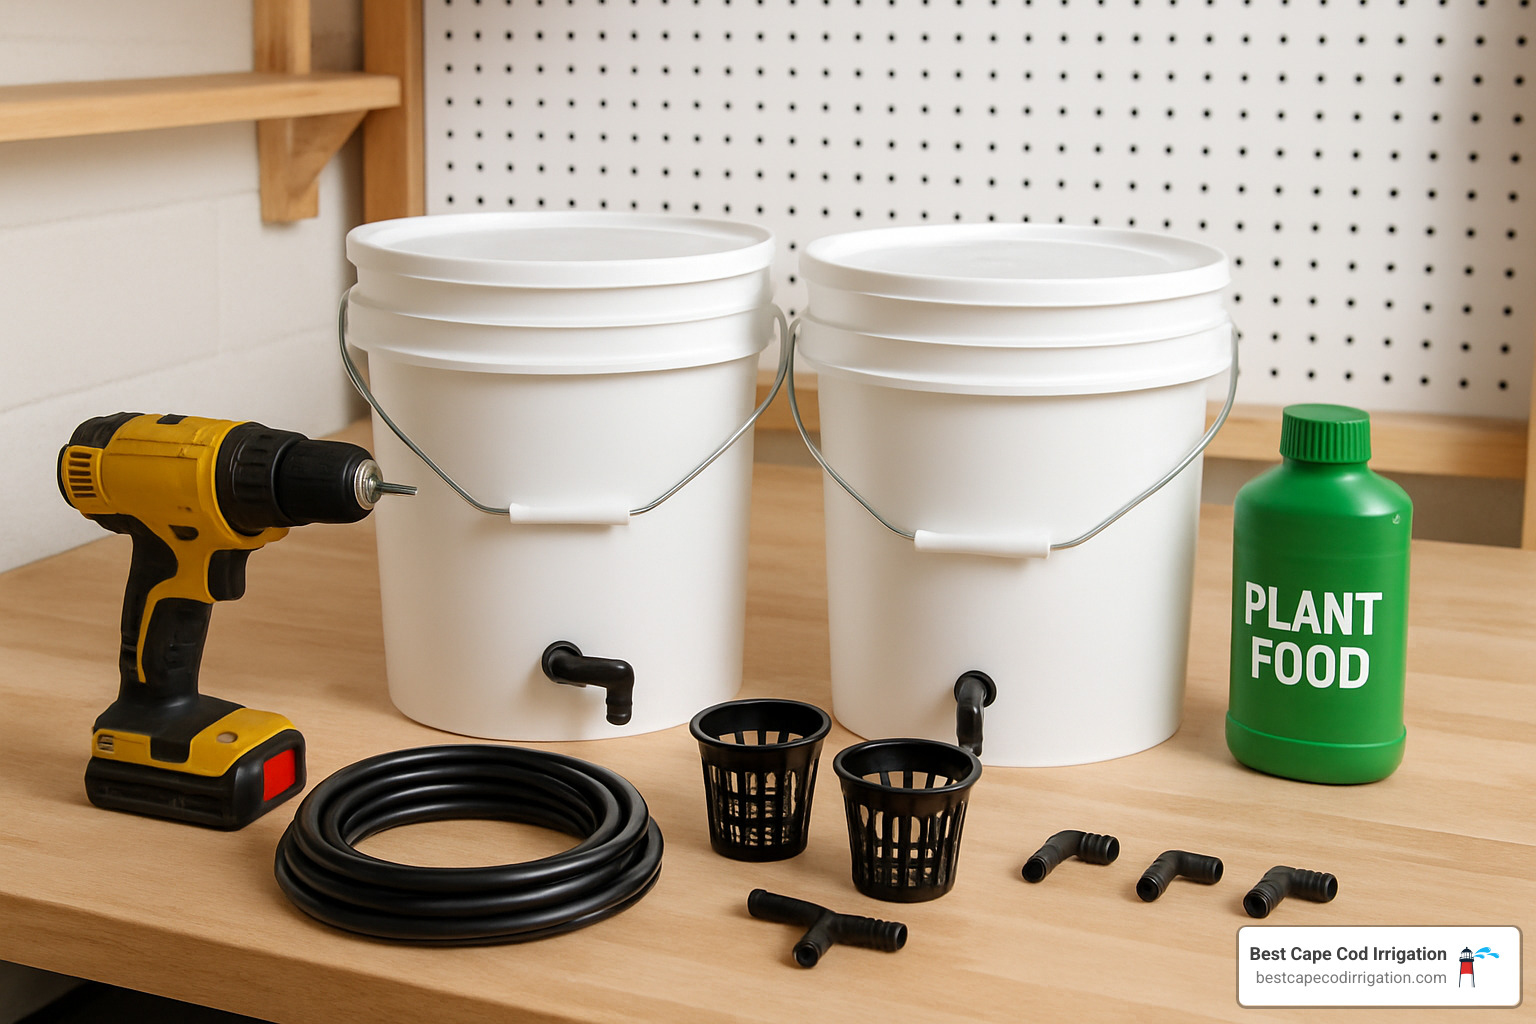
Essential Tools
You probably already own most of the tools you’ll need: a drill with various bits (including a 2″ hole saw for net pots), utility knife, measuring tape, caulk gun with waterproof silicone, pliers, and maybe a hacksaw for cutting PVC pipe. Nothing fancy required!
Comparison of System Types
| System Type | Complexity | Cost | Maintenance | Best For | Limitations |
|---|---|---|---|---|---|
| Wick System | Very Low | $20-50 | Monthly solution change | Herbs, lettuce | Small plants only |
| Kratky Method | Low | $30-80 | Refill as needed | Leafy greens, herbs | Limited plant size |
| DWC | Medium | $70-150 | Bi-weekly solution change | Most vegetables | Requires electricity |
| Drip System | Medium-High | $100-150 | Weekly cleaning | All plants, larger gardens | More parts to maintain |
I always recommend beginners start with either a Kratky or wick system. They’re nearly foolproof and teach you the basics without overwhelming you with technical details. One of my clients started with a simple Kratky lettuce setup and was harvesting her first salad within 30 days!
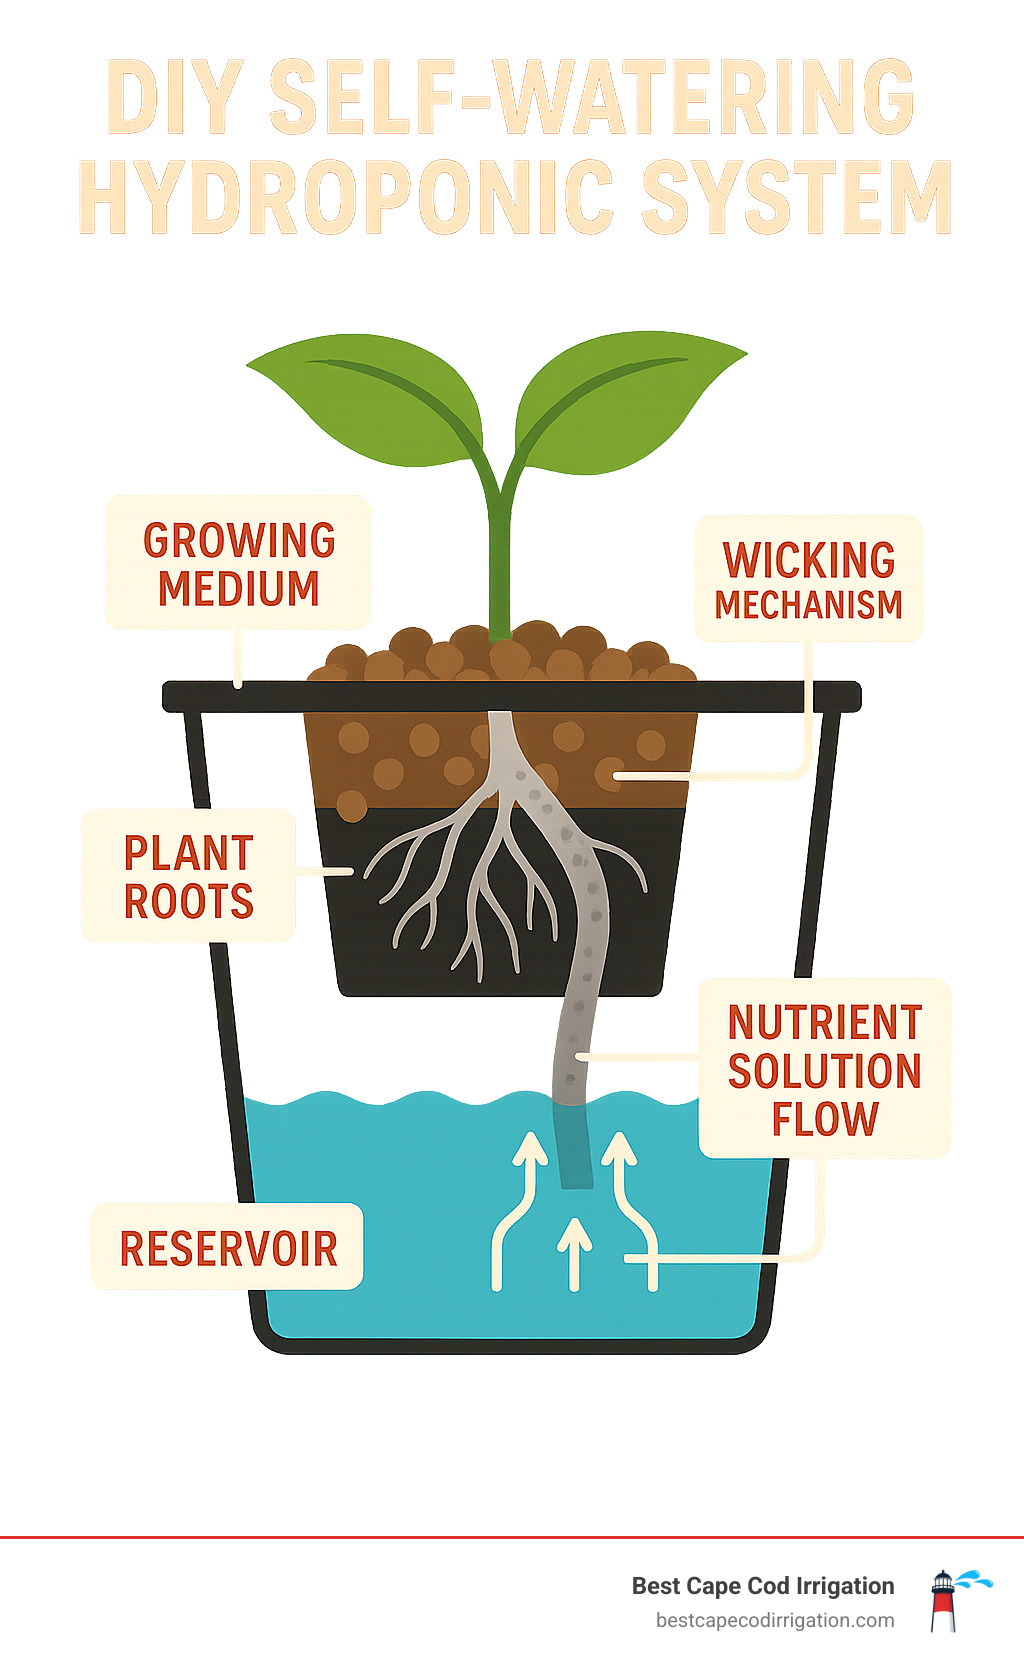
Key Components
Every successful diy self watering hydroponic system needs these essential elements:
Your reservoir must be opaque to prevent algae growth – a 55-liter (14.5 gallon) dark storage container works perfectly for most beginners. I learned this lesson the hard way when my first clear-sided system turned into a green slimy mess within two weeks!
Growing sites are typically net pots or grow baskets that hold your plants while allowing roots to reach the nutrient solution below. The growing medium – usually rockwool, clay pebbles, or coconut coir – supports roots and retains moisture.
You’ll need nutrient solution specifically formulated for hydroponics since plants can’t access soil nutrients. The delivery system can be passive (wicks, Kratky method) or active (using a pump and drip lines).
At Best Cape Cod Irrigation, we’ve noticed that these principles of efficient water delivery mirror what we do with outdoor irrigation systems. Taking time to plan your system carefully now will save you countless headaches down the road. Just like our irrigation designs, the best hydroponic systems are the ones you can set up and then almost forget about while they quietly do their job.
Step-by-Step: Build Your DIY Self Watering Hydroponic System
Ready to get your hands dirty? Let’s roll up our sleeves and build a versatile diy self watering hydroponic system that combines Deep Water Culture with drip irrigation for the best of both worlds.
Step 1 – Gather & Prep Materials
Before you begin, round up everything you’ll need:
You’ll want an opaque storage container (27-55 gallons works great), container lid, 3-inch net pots, growing medium (clay pebbles or rockwool are perfect), and a submersible pump. Don’t forget silicon tubing (1/4″ inner diameter), barbed fittings, a 2″ hole saw, silicone caulk, nutrient solution (A & B components), and a pH testing kit with adjusters. An air pump and stone are optional but recommended.
I’ve learned from experience that barbed fittings are absolutely worth it. As one builder told me, “Barb fittings make life so much easier that you shouldn’t skip them.” They create those secure, leak-free connections between your tubing and containers that will save you headaches down the road.
Step 2 – Assemble Reservoir & Grow Sites for your diy self watering hydroponic system
Start by giving your container a thorough cleaning. Is it clear or translucent? You’ll want to paint it black first, then white on top. This one-two punch blocks light and prevents the algae that would love to take up residence in your nutrient solution.
Next, grab your lid and mark where you’ll place your plants. For lettuce and herbs, I’ve found 6 inches of spacing works well, while tomatoes and larger plants need 12-15 inches to spread out. Now comes the fun part – use your 2″ hole saw to cut clean holes for your 3″ net pots. They’ll sit snugly with their lips preventing them from falling through.
Don’t forget the overflow port! Drill a 1 cm diameter hole about 12 cm above the bottom of your container. This simple addition prevents overfilling and maintains that crucial air gap your plant roots need for oxygen.
A builder friend once shared this gem with me: “Place wood under the lid when drilling to avoid cracking.” This five-second step can save you from having to replace your lid – definitely worth it!
Step 3 – Plumbing & Pump Setup
Place your submersible pump in the reservoir’s bottom. Using a solar pump? Position it so the cord can reach outside to the solar panel. Attach an inline filter to your pump output – trust me, you don’t want clogged drip lines later.
Run silicon tubing from the pump up through a small hole in the lid, and add a flow-control clamp to the main line. As one resourceful builder finded, “You can improvise a flow-control clamp from a chopstick and zip-ties” if you’re in a pinch!
For multiple plants, create a simple manifold from PVC pipe with holes drilled for each drip line, or use barbed T-fittings to split the flow. Before adding plants or nutrients, fill the reservoir with plain water and run the system to check for leaks.
This system follows many of the same principles we use at Best Cape Cod Irrigation when designing efficient watering systems for larger outdoor applications.
Step 4 – Automate the diy self watering hydroponic system
Here’s where the magic happens – turning your system into a self-running garden that works even when you’re away.
Connect your pump to a simple outlet timer. Most plants thrive with 15-30 minutes of water flow per hour during daylight. For more advanced control, consider a smart relay like a Shelly Pro 1. One tech-savvy grower advised: “In the Shelly app go to Networks → Wi-Fi 1 → Set static IP address” to ensure reliable connectivity.
When it comes to fail-safe measures, if you’re using an electric solenoid valve, choose a “normally closed” type that automatically shuts off during power failures. For even more precision, you can integrate soil moisture sensors to trigger watering only when needed rather than on a fixed schedule.
At Best Cape Cod Irrigation, we offer similar technology through our Smart Irrigation Solutions that create efficient, water-saving systems for outdoor applications.
Step 5 – Planting, Nutrients & First Run
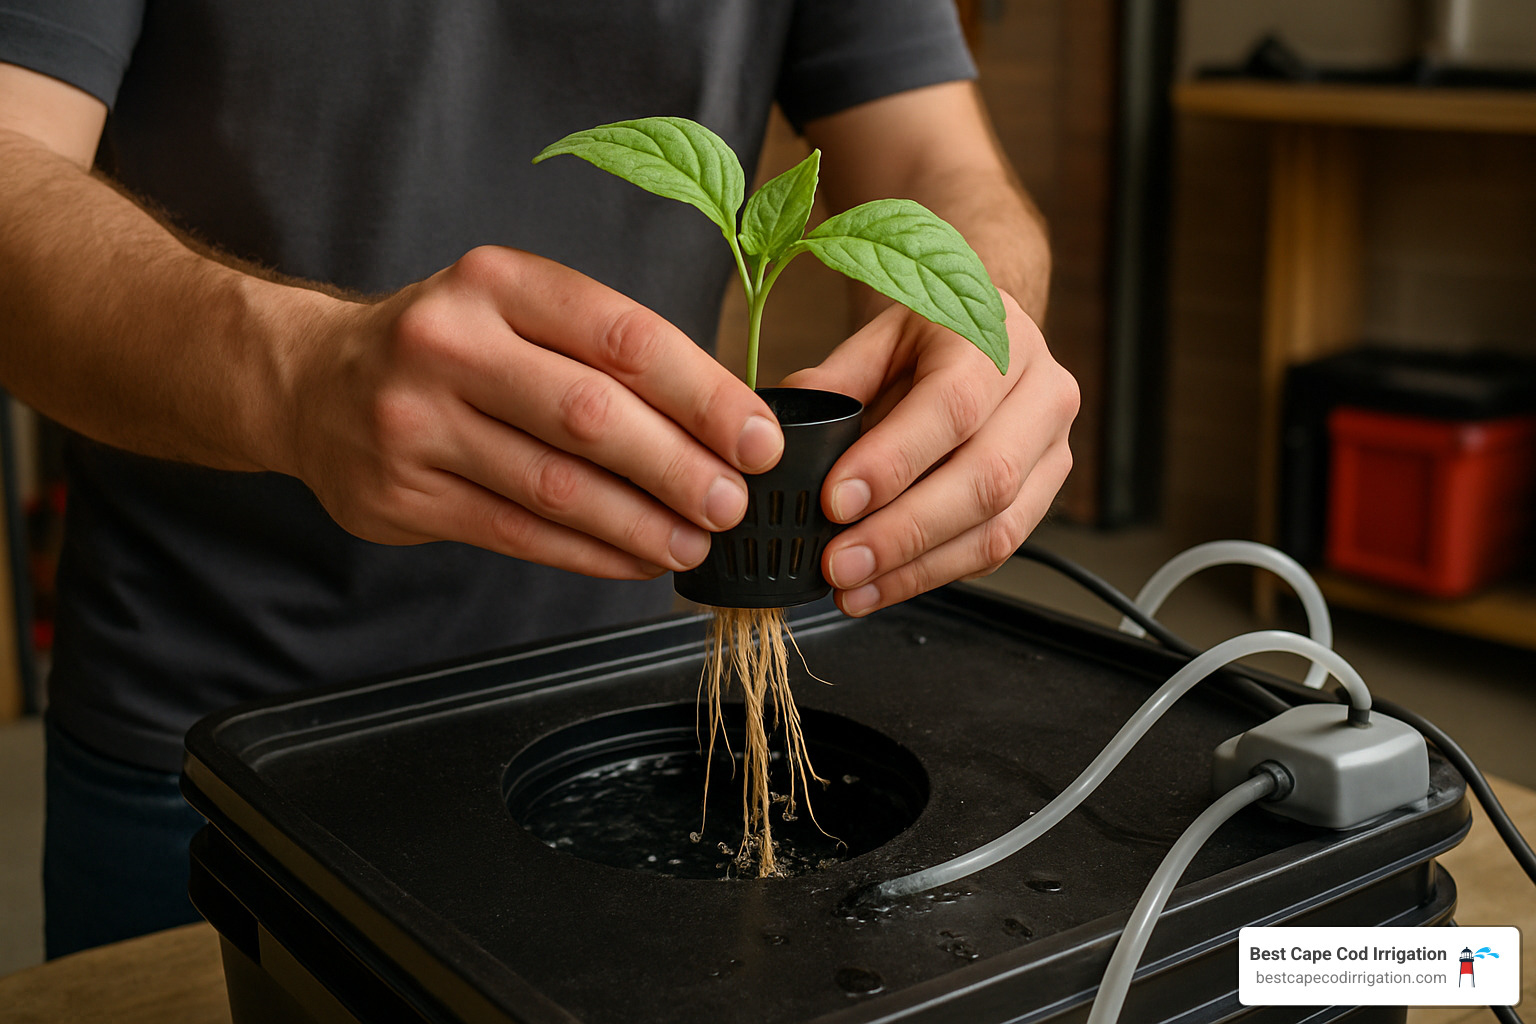
If you’re using rockwool, soak it in pH-adjusted water (5.5-6.0) for 30 minutes before planting. Place 2-3 seeds in each cube and keep moist until germination. Alternatively, grab seedlings from your local nursery, gently washing soil from the roots.
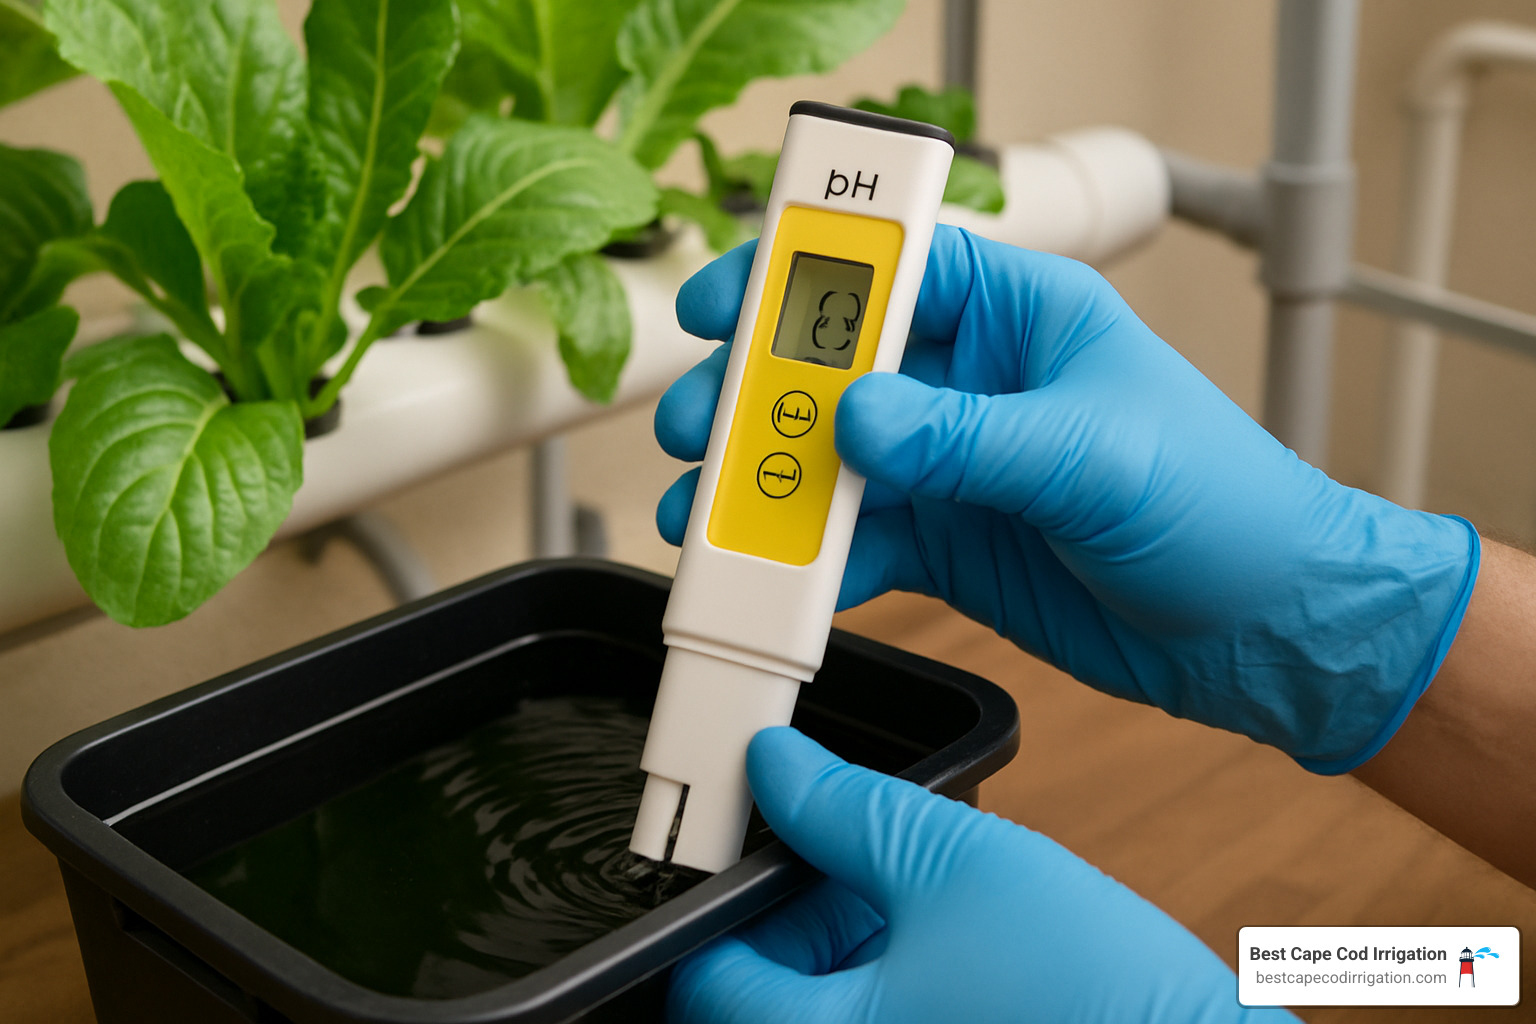
For your nutrient solution, follow the manufacturer’s instructions – typically 2ml of each A and B nutrient per liter of water. For a 55L reservoir, that’s about 110ml of each component. Most plants prefer a pH between 5.8-6.2, so use your pH testing drops or meter to check, then adjust with pH up/down solutions as needed.
Once your seedlings develop their first true leaves, it’s moving day! Transfer them to your system by placing the rockwool cube directly in the net pot, surrounded by clay pebbles for support. Turn on your pump and adjust flow as needed – each plant should receive a steady drip if you’re using a drip system.
For the first few days, check in on your system frequently. It’s like bringing home a new pet – you want to make sure everything’s running smoothly.
A seasoned grower once shared this wisdom with me: “Replace water and clean the reservoir every 14-21 days for optimal plant health.” This simple maintenance prevents nutrient imbalances and keeps algae at bay.
Maintaining, Troubleshooting & Scaling Up
A well-maintained diy self watering hydroponic system can provide years of productive growing with minimal effort. Think of maintenance as a relationship with your garden – a little regular attention goes a long way toward preventing problems before they start.
Regular Maintenance
Your hydroponic system needs routine care, much like any garden. Each morning, take a quick peek at water levels and plant health. When you notice the reservoir getting low, simply top it up with plain water – not nutrient solution. This is because plants consume water while leaving many of the nutrients behind, which can lead to concentration issues if you keep adding more nutrients.
Weekly, you’ll want to test and adjust your pH levels. This natural drift happens as plants consume different nutrients at varying rates, creating small chemical changes in your water. I’ve found keeping a log of these adjustments helps identify patterns in how your specific plants affect the system.
“I was amazed at how predictable my lettuce became,” one grower told me. “Every Thursday like clockwork, my pH would drift up and need adjustment.”
Every two to three weeks, plan to drain your reservoir completely, give it a thorough cleaning, and mix fresh nutrient solution. This prevents nutrient imbalances and salt buildup that can stress your plants. Monthly, remove and clean pumps, air stones, and tubing to prevent clogging and ensure optimal flow.
Don’t forget about root management. Occasionally trim roots if they become too dense and block water flow or oxygen uptake. Healthy roots should be white or cream-colored – if you see brown or slimy roots, it’s time for immediate attention.
Common Problems and Solutions
Algae growth is perhaps the most common issue in hydroponic systems. If you spot green slime in your reservoir or tubing, first make sure your reservoir is completely light-proof – even small light leaks can trigger algae blooms. Adding hydrogen peroxide (3%) at 2-3ml per gallon of water can help, as can more frequent cleaning and solution changes.
pH drift can stress plants and cause nutrient lockout – a condition where nutrients are present but unavailable to plants. Buffer your water with pH stabilizers and check more frequently during hot weather. Many experienced growers prefer rainwater when possible, as it typically has fewer minerals that cause drift.
When your pump stops working (and eventually, it will), first check the basics: power connections, impeller, and intake screen. A clogged impeller is often the culprit and can be easily cleaned. Smart growers keep a backup pump on hand for quick replacement – nothing kills plants faster than a prolonged pump outage.
Uneven growth – where some plants thrive while others struggle – usually points to distribution problems. Check for clogged drip lines, uneven nutrient distribution, or light imbalances. Sometimes simply rotating your container can solve lighting issues.
Scaling Up Your System
Once you’ve mastered the basics, expansion becomes tempting – and surprisingly straightforward. Adding more grow sites is as simple as drilling additional holes in your existing lid or creating a second linked system. Many growers find that increasing oxygenation with a larger air pump and multiple air stones dramatically improves plant health when scaling up.
Linking multiple reservoirs with overflow tubes creates a larger, unified growing area while maintaining the simplicity of your original design. One creative grower shared: “I used old floorboards for aesthetics on a public-view balcony” when building multiple linked containers, showing how these systems can be both functional and attractive.
Going off-grid becomes possible with a small solar panel and battery kit to power pumps and timers. For the tech-savvy gardener, digital pH, EC (electrical conductivity), and temperature monitors provide precise control and can even send alerts to your phone when conditions drift outside optimal ranges.
For a visual example of what’s possible, check out this video tour of a smart balcony setup that incorporates many of these advanced features.
At Best Cape Cod Irrigation, we’ve seen how these principles of scalable design apply equally well to landscape irrigation. The same attention to distribution, monitoring, and efficiency that makes hydroponics successful also creates thriving outdoor gardens. Whether you’re growing lettuce indoors or maintaining a lush lawn, the fundamentals of smart water management remain consistent.
Frequently Asked Questions About Self-Watering Hydroponics
How often do I replace the nutrient solution?
One of the most common questions I hear about a diy self watering hydroponic system concerns nutrient solution changes. For most systems, I recommend refreshing your nutrient mix every 14-21 days.
Think of it like changing the oil in your car—regular maintenance prevents bigger problems down the road. The exact timing, however, depends on a few factors. Larger plants like tomatoes will drink up nutrients much faster than small herbs. Similarly, if you’ve built a system with a generous reservoir, you might stretch a bit longer between changes.
Between those complete solution changes, you’ll need to top up with plain water (not more nutrient solution). Plants consume water while leaving most minerals behind, so adding more nutrient solution would create an increasingly concentrated brew that could harm your plants.
I love how one experienced grower put it: “Monitor water level and pH whenever you top up; add nutrients proportionally; and clean the reservoir every 14–21 days.” This simple routine keeps plants happy and productive year-round.
What are the best plants for beginners?
If you’re just getting started with your diy self watering hydroponic system, choosing the right plants can make all the difference between frustration and success.
Lettuce and leafy greens top my recommendation list. They grow quickly (often ready to harvest in just 30 days), forgive minor mistakes in nutrient levels or pH, and don’t demand much vertical space. Herbs like basil, mint, and cilantro also thrive in hydroponic systems and provide fresh flavors year-round.
Strawberries make a wonderful beginner crop too. They’re compact, produce well in self-watering systems, and there’s nothing quite like harvesting fresh berries from your indoor garden in the middle of winter. Spinach and kale round out my top recommendations—both grow quickly and can be harvested multiple times from the same plant.
I’d suggest avoiding root vegetables until you gain more experience, as they require specialized deep water systems. Very large plants like full-sized tomato varieties can also be challenging unless your system is specifically designed to support them.
As your confidence grows, you can gradually expand to more demanding crops like peppers, cucumbers, and dwarf tomato varieties. Each success builds your knowledge and opens up new possibilities.
How can I prevent overflow or leaks?
Nothing dampens enthusiasm for a diy self watering hydroponic system quite like finding a puddle of nutrient solution on your floor! Fortunately, there are several simple ways to keep everything flowing where it should.
First, install an overflow hole about 12 cm (about 5 inches) above the bottom of your reservoir. This simple 1 cm hole acts as a safety valve, preventing the system from flooding if something goes wrong with your water level controls.
Proper sealing is crucial. Apply silicone caulk to all drilled holes and connections. As one builder wisely advised: “Apply teflon tape to all threaded fittings and tighten with a wrench to prevent leaks.” That extra minute spent wrapping threads can save hours of cleanup later.
Control your pump flow carefully. Too much water moving too quickly is a common cause of overflows. “Reduce pump flow using an in-line clamp or pump dial, fine-tuning until inflow equals outflow,” suggests one experienced grower.
Before adding plants or expensive nutrients, run your system with plain water for 24 hours. This water test reveals any potential issues when stakes are low and fixes are easy.
Quality matters when selecting tubing and fittings. Barbed fittings create more secure connections than simply pushing tubing onto smooth pipes. The small additional cost pays dividends in reliability.
One builder’s honest admission always makes me smile: “If everything worked right away it would have been too good…” Expect to make minor adjustments during your initial setup—it’s part of the learning process!
At Best Cape Cod Irrigation, we apply these same leak prevention principles when designing outdoor irrigation systems, ensuring water goes exactly where intended without waste.
Conclusion
Building a diy self watering hydroponic system isn’t just a satisfying weekend project—it’s your gateway to sustainable food production that can thrive year-round. I’ve seen how these affordable systems (under $150 all-in) can double traditional container yields while slashing water usage. That’s a win-win in my book!
What I love most about hydroponics is how it adapts to your space, whether that’s a sunny kitchen windowsill, a compact apartment balcony, or a dedicated indoor growing area. There’s no wrong place to start—begin with something simple like a Kratky jar or basic wick system, then expand as your confidence grows alongside your plants.
After helping many gardeners make the leap to hydroponics, I’ve found these five principles make all the difference:
Balance the essentials. Successful systems maintain the perfect harmony between water, nutrients, and oxygen reaching the roots. This three-way balance is your foundation for healthy plants.
Start small, dream big. Your first system doesn’t need to feed a family of four. Begin with a simple setup and easy crops like lettuce or herbs, then scale up as you get comfortable with the process.
Watch and learn. Regular check-ins with your system—monitoring water levels, testing pH, and observing plant health—will teach you more than any article ever could. The first few weeks are your learning laboratory.
Clean consistently. Most hydroponic headaches can be prevented with regular reservoir changes and system cleaning. Think of it as changing your car’s oil—preventative maintenance that pays dividends.
Upgrade thoughtfully. As your skills develop, gradually add automation, monitoring equipment, and expansion modules. Your system can grow alongside your expertise.
As one enthusiastic grower told me: “My DIY self-watering system saved my sanity as a plant parent. I can finally take a weekend trip without coming home to a plant cemetery!” Beyond the convenience, these systems create ideal growing conditions that simply can’t be matched in traditional soil gardening.
At Best Cape Cod Irrigation, we understand that efficient, reliable watering is essential whether you’re growing hydroponically or tending a traditional landscape. Our expertise in irrigation installation builds on many of the same principles we’ve discussed here: delivering the right amount of water at the right time with minimal waste.
I hope this guide has inspired you to try your hand at building your own self-watering hydroponic system. There’s something truly special about harvesting fresh, homegrown produce from a system you built yourself—and knowing you’re conserving water while maximizing yields makes that first bite taste even sweeter.
Happy growing!
